
Windows 11 is Microsoft’s latest and most advanced operating system yet. If you’ve seen it for the first time, you’ll have noticed its new look, featuring a centered taskbar, rounded corners, and an overall clean, modern design. Additionally, its gaming performance has been improved and new AI features have been added, which we’ll explore later in this post.
Hello friends, I’m your very own TechWaleJha! and welcome to this detailed Windows 11 complete guide. If you’ve just bought a new laptop, or are thinking of upgrading your old PC to Windows 11, then let’s dive deep today and understand how you can set it all up correctly.
People often ask, “What’s so special about Windows 11? What’s new in it, how is the performance, and should you update your PC to Windows 11 or not?” So, let’s start learning about it without any further delay.
What is Windows 11?
Microsoft officially launched Windows 11 in October 2021. Its main vision was to make the user experience completely clean, fast, and distraction-free. If you’re reading this Windows 11 complete guide thoroughly, you’ll understand that it’s not just a visual update, but that significant under-the-hood changes have been made. The new OS’s memory management is so smart that the system doesn’t lag, even with heavy apps running in the background. Furthermore, by integrating AI features like Windows Copilot directly into the taskbar, Microsoft has taken productivity to the next level. If you spend 8-10 hours a day on your PC, this new clean UI will be easy on your eyes and make your daily tasks even faster.
Windows 10 vs Windows 11: What’s New?
Actually, people are very confused about this, so they go online and start searching for what the difference is between Windows 10 and Windows 11, and whether it’s really worth updating or not. Friends, in this case, if we make a direct comparison, this new OS not only looks premium but also has great speed, and if we talk about security, a lot of attention has been paid to it. If you want to see a comparison of the two, you can understand the main differences between these two OS in the table given below:
| Feature | Windows 10 | Windows 11 |
|---|---|---|
| Start Menu | On the left side, it come with cluttered Live Tiles. | Center me with clean and pinned apps. |
| Security | Basic hardware security | TPM 2.0 and Secure Boot mandatory |
| Gaming Speed | Normal game loading time | Auto HDR and DirectStorage support |
| Mobile Apps | Emulators are needed. | Native Android app support (Amazon Appstore) |
| UI Design | Sharp corners and old icons | Rounded corners, mica material, and new icons |
If you have a modern laptop, then upgrading is a very smart decision because official support for Windows 10 ends in October 2025.
System Requirements & Compatibility
Before migrating to a new OS, the biggest task is to check whether the system you want to update is capable of it or not. So now let’s dive into its hardware details in a bit more technical terms, where we’ll cover the processor, RAM, storage, UEFI Secure Boot, and the TPM 2.0 chip.
Official Minimum Requirements
Microsoft has set some very strict rules regarding the hardware specifications for this. If you want to officially install the new OS on your PC, your system must meet these hardware minimum requirements. As for RAM, at least 4GB is required, but for a lag-free experience, I always recommend 8GB of RAM and an SSD. Then, the system drive (C: drive) must have at least 64 GB of free space.
In addition, the biggest change has been in the processor. You need a compatible 64-bit processor with at least 2 cores and a clock speed of 1 GHz. For Intel, only 8th Gen or newer, and for AMD, Ryzen 2000 series or newer processors are officially supported. This is why many older computers don’t automatically receive the Windows Update notification.
What are TPM 2.0 and Secure Boot?
Many people think that the Windows 11 system requirement for TPM 2.0 is just a trick by Microsoft to sell hardware, but technically, that’s not the case at all. TPM stands for ‘Trusted Platform Module’. It is a small, dedicated security chip on your laptop’s motherboard that keeps your encryption keys, passwords, and biometric data, like your fingerprint, secure at the hardware level. This prevents hackers and ransomware from easily hacking your PC.
If you want to understand the in-depth cryptography and how TPM works, you can read the technical guide for TPM on Wikipedia. On the other hand, ‘Secure Boot’ is a UEFI feature that also prevents any malicious rootkit or virus from loading when the PC starts. Additionally, if you want to know how to install Windows 11 without TPM 2.0, you can read the step-by-step guide here.
PC Health Check App
After all this, the big question on our minds is how do you know if your laptop or desktop even meets all these strict hardware requirements? Well, there’s absolutely no need to worry. Microsoft has already created a free and official tool for its users called the ‘PC Health Check App’. You can download this application for free from Microsoft’s official website. If you want to know in detail whether your PC supports Windows 11, you can check out our easy guide: “How to Check if Your PC Supports Windows 11.”
After installing, as soon as you open the app, you will see a large button on the screen that says “Check Now”. Then, as soon as you click on it, a full report will appear. If everything is fine, it will say, “This PC meets Windows 11 requirements.” And if there is an error, the tool will tell you exactly what is missing, which you can then easily fix by going into your BIOS settings.
How to Install Windows 11 on an Unsupported PC
Friends, if your laptop is old, like an Intel 6th Gen, 7th Gen, or any other version, and it doesn’t have TPM 2.0 or a supported processor, then there’s absolutely no need to be disappointed. Because even in this situation, you can easily bypass TPM 2.0 and enjoy this new OS by using the Windows 11 unsupported PC trick. For this, we use a popular third-party bootable USB tool called ‘Rufus’:
- For this, first download the original Windows 11 ISO file from the Microsoft site.
- Then, open the Rufus software and insert a blank 8GB USB drive into the PC.
- After selecting the ISO file, go to the ‘Image Option’ menu.
- Here, you need to select “Extended Windows 11 Installation (no TPM / no Secure Boot)” from the dropdown.
- Then, click the ‘Start’ button.
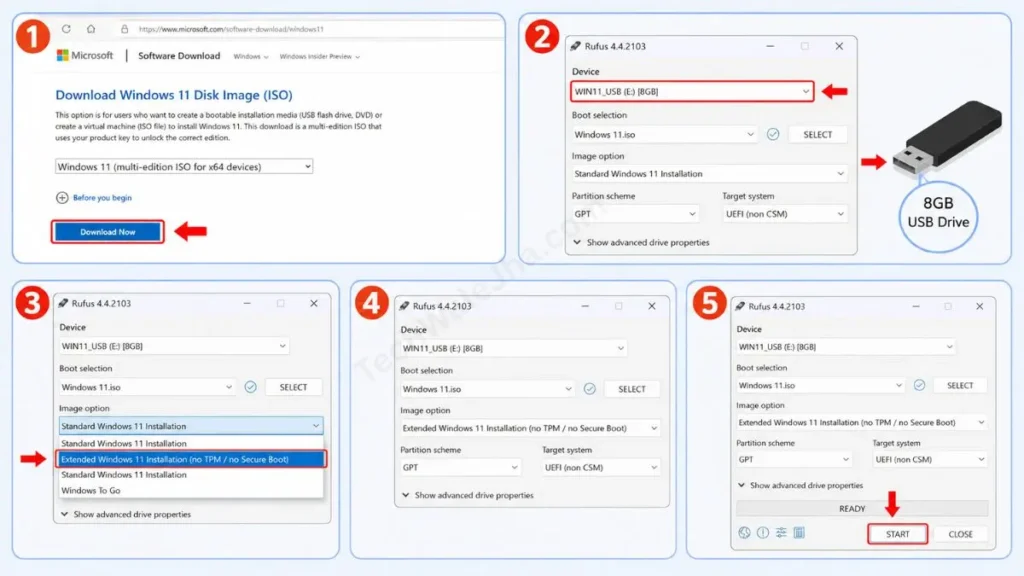
This is a registry bypass trick that removes the TPM and Secure Boot checks from the code when making the pendrive bootable. With this trick, you can install the OS on any laptop that is 10 years old! But be aware that on unsupported hardware, you may face many problems with getting future security updates.
To see the bypass process live, be sure to watch my quick tutorial video:
Windows 11 Installation Methods
Friends, installing the new Windows 11 on a PC isn’t rocket science. To do it, you just need to choose the right method based on your PC’s condition and your needs. You can directly upgrade through Windows Update, download the official ISO to create installation media with the Media Creation Tool, or prepare a bootable Pendrive with Rufus. If you want a completely fresh start, a Windows 11 bootable USB is the best option for a clean install. Now, let’s go over all these methods one by one, step-by-step, so there’s no confusion during the installation and you don’t make any mistakes.
Upgrade via Windows Update (Safe Method)
If you are a regular user who doesn’t want to delete any of your system’s data, photos, or installed software, then this is the safest and most official method. When Microsoft determines that your PC’s hardware is fully ready and compatible, it will automatically push the update to you. If you want to check this yourself, go to Settings in your Windows 10, click on Update & Security, and then go to Windows Update. There, click the “Check for updates” button. After that, if your system is eligible, a large banner will appear saying, “Upgrade to Windows 11 is ready and it’s free!”. From there, just click ‘Download and install’.
In the background, approximately 4GB to 5GB of data will be downloaded. After that, the PC will restart 2-3 times and your system will be completely upgraded to the new OS without any data loss. This method is the best for those who want to switch their system to a modern UI without any technical hassle.
Media Creation Tool & ISO Download
Many times, people get errors while updating Windows, or sometimes the update doesn’t show up at all. In such situations, Microsoft’s official ‘Media Creation Tool’ is the most helpful. It’s a small software that downloads a completely pure and original Windows 11 ISO file directly from Microsoft’s secure servers. This file is needed when you have to install the OS on multiple computers, or if you want to save the OS for a future backup.
To use it, go to Microsoft’s software download website and download the tool from the “Create Windows 11 installation media” section. Then, after running it, select the “Create installation media (USB flash drive, DVD, or ISO file)” option. After selecting the language (English) and edition (Windows 11), choose the ‘ISO file’ option and save this 5.5GB file to a secure location on your PC. This original file does not contain any malware or third-party bloatware, so you can safely download it.
How to Create a Bootable USB
Once you have the official ISO file, the next step is to create a bootable USB drive. To do this, you can either use the Media Creation Tool’s direct USB option or use a software called ‘Rufus,’ which is more advanced and faster.
Then, download and open Rufus. For this, plug a blank USB drive of at least 8GB into your PC. Rufus will automatically detect the drive. Now, click the ‘Select’ button and choose the same ISO file you downloaded. For the partition scheme, make sure to select GPT (and target system UEFI) for modern PCs. Only select MBR if your PC uses an older BIOS. After that, click ‘Start’. Rufus will format your pendrive and in about 10–15 minutes create a powerful clean-install Windows 11 bootable USB, allowing you to easily install a new OS on any PC.
Clean Installation (Step-by-Step)
Friends, “Clean Installation” means completely formatting your C: Drive and installing the OS from scratch. This method is the best way to increase PC speed and remove old viruses.
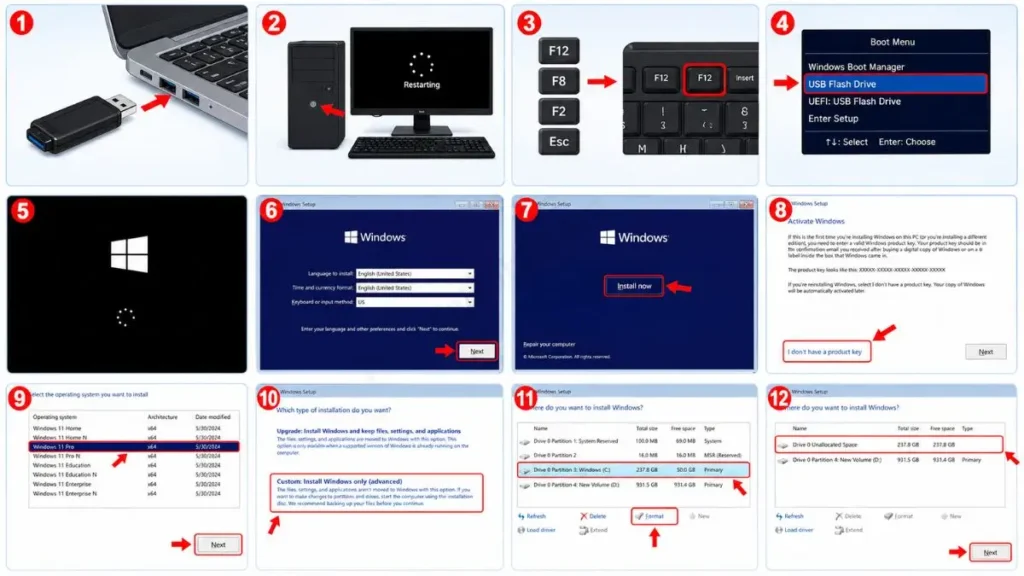
- Now, insert your prepared bootable USB drive into the PC and restart the system.
- As soon as the screen turns on, repeatedly press your motherboard’s Boot Menu Key, such as F12, F8, F2, or Esc.
- When the boot menu appears, select your USB Flash Drive.
- After that, the Windows logo will appear on the screen. Now, select your language and time zone, click ‘Next’, and then click ‘Install Now’.
- Then, click on “I don’t have a product key” and select your version, such as Windows 11 Pro.
- Then, select Custom: Install Windows only (advanced) for the setup type.
- Here you will see the partitions on your hard drive. After that, select your old C: Drive (Primary partition) and click ‘Format’ or ‘Delete’ (Note: this will erase all the data on your C drive).
- Then select that ‘Unallocated Space’ and click Next. The installation will begin, and after that, your PC will feel like new.
How to Set Up Windows 11 Without Internet
There’s a major problem with Windows 11: after installing the OS and reaching the first (OOBE) screen, Microsoft forces you to connect to the internet and log in with an online Microsoft Account. Because without an internet connection, the ‘Next’ button doesn’t work. But as a tech expert, I’m going to tell you a great hidden shortcut for this.
As soon as you reach the “Let’s connect you to a network” screen, press Shift + F10 on your keyboard. This will open a black CMD (Command Prompt) window. In this CMD, type: OOBE\BYPASSNRO and press Enter. Your PC will restart immediately. After restarting, when you return to the network screen, you will see a new option below: “I don’t have internet”. Click on it and then select “Continue with limited setup”. Boom! Now you can easily complete the entire setup with just a simple local offline account by entering your name, even without the internet or an online account.
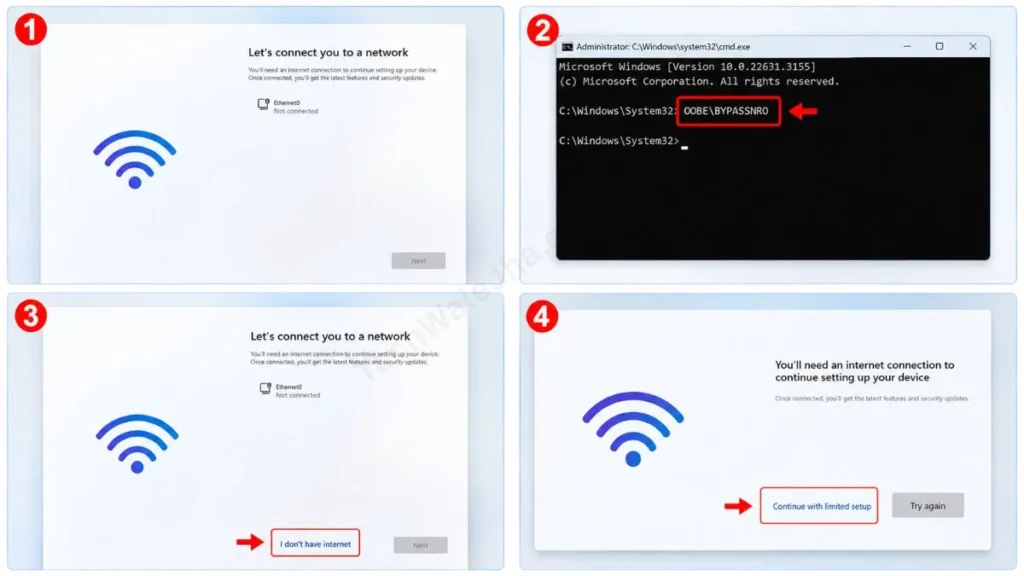
If you want to know more details about this, you can read our detailed guide, “How to Install Windows 11 Without a Microsoft Account.” In this guide, I have covered this topic in detail.
To see my offline account setup trick in action, watch this video:
New User Interface (UI) and Customization
The design of Windows 11 is quite different from previous Windows versions, as you may have noticed. It features modern changes like rounded corners, a new translucent Mica theme, and smooth animations. But if you find its default look or working style a bit uncomfortable, there’s absolutely no need to worry.
You can also easily customize Windows 11 to your liking, such as moving the centered Start menu to the left side, making tasks even easier by using modern tabs in File Explorer, enabling Dark Mode system-wide, or even disabling the new “Show more options” menu to bring back the old classic right-click context menu. With these small customizations, the Windows 11 interface will become more comfortable for your way of working.
Start Menu and Taskbar Customization
You’ll notice that in the new OS, all the icons on the Taskbar and Start Menu are set to the center by default, just like on Apple’s Mac computers. If you’ve been using Windows for years and are used to moving the mouse to the left corner, there’s no need to worry because it’s very easy to fix.
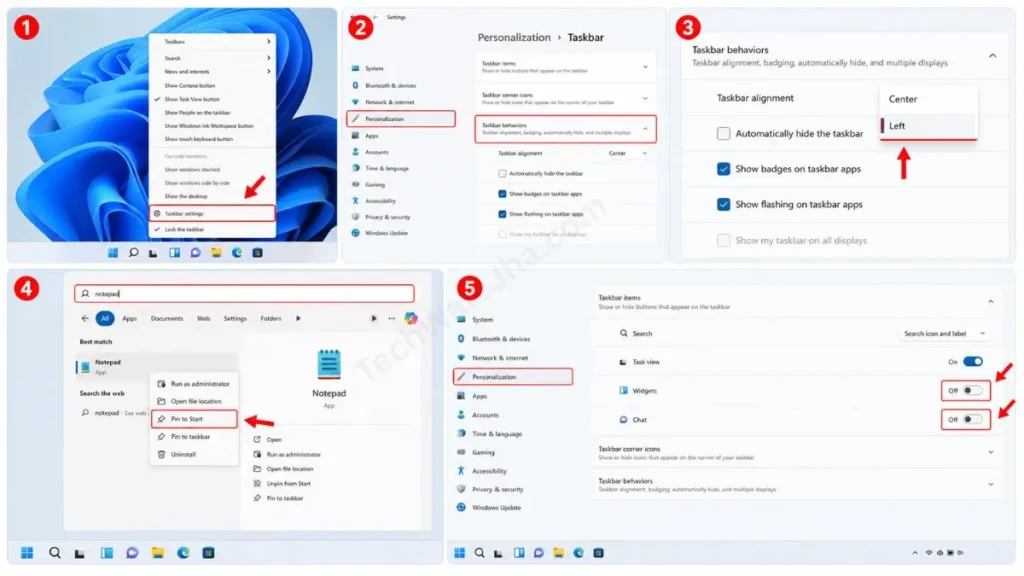
To do this, right-click on any empty part of the Taskbar and go to Taskbar Settings. Then, open the Taskbar behaviors section at the very bottom. Here, change the ‘Taskbar alignment’ from “Center” to “Left.” Also, in this new Start Menu, the Live Tiles that used to flip have been removed. For this, you now get a ‘Pinned apps’ section. Then, type any app into the search bar, right-click on it, and select ‘Pin to Start’. This way, you can easily access your daily-use software right at the front. You can also easily turn off useless Taskbar icons like Chat and other Widgets in these same settings.
New File Explorer (Tabs & Gallery)
For the first time in Windows history, Microsoft has completely modernized File Explorer (My Computer). The biggest and most useful feature is Tabs. Just as you open different tabs in Google Chrome or Firefox, you can now open multiple folder tabs in a single File Explorer window by pressing “Ctrl + T.” This makes copying and pasting files and multitasking much faster and cleaner.
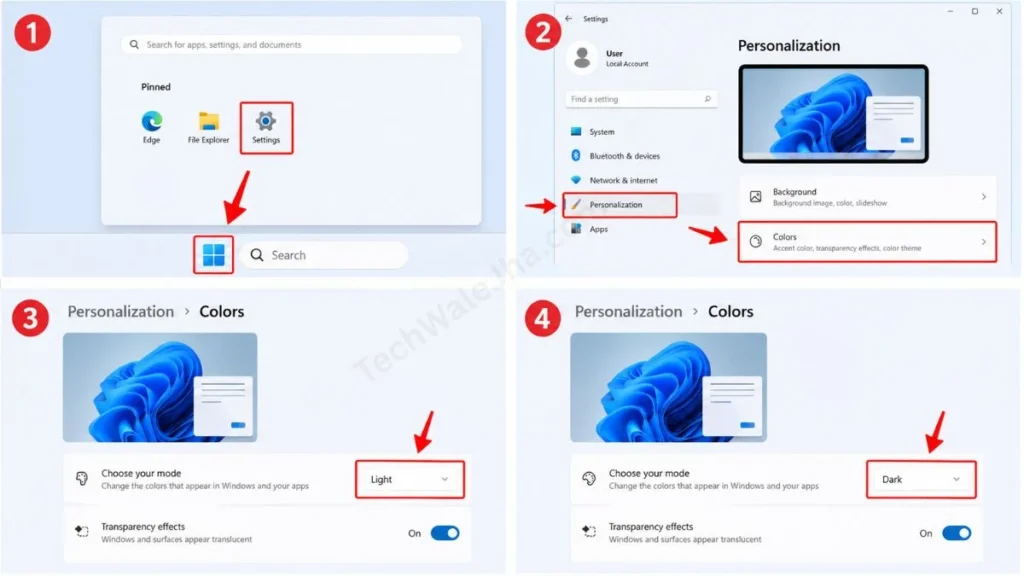
Additionally, a new Gallery view has been added that shows all the photos from your PC and connected smartphones in one place in a timeline format. If you work on your PC at night, a Dark Mode feature has been added to protect your eyes from fatigue, and you should definitely enable it. To enable it, just go to your system’s Settings, then to Personalization, go to Colors, and select “Dark” under ‘Choose your mode’. This will convert the entire File Explorer and the OS to a beautiful black and grey tone.
Context Menu (Bring Back the Old Right-Click)
If you’ve used Windows 11, you’ve probably been most frustrated by the new Right-Click (Context) menu. In it, Copy, Paste, and Rename are just small icons, and to see a software’s options, you have to repeatedly click “Show more options” or have to press Shift+F10. To permanently disable this time-wasting feature and bring back the old, large Windows 10 right-click menu, you need a small Registry Edit trick:
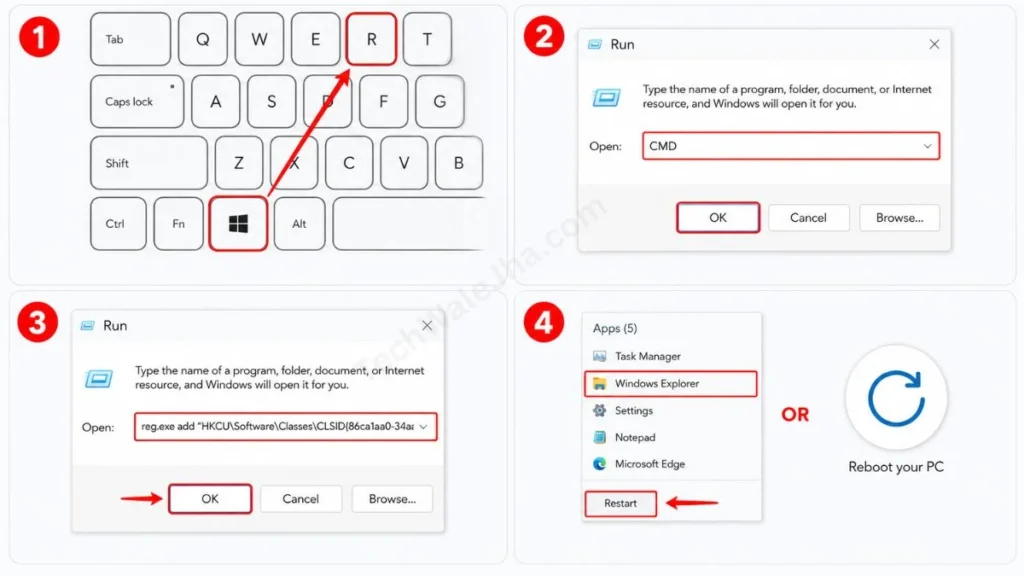
- Press the Windows key + R on your keyboard. A Run dialog box will open and type CMD and press Enter.
- then copy this command exactly and paste it there and press Enter:
reg.exe add “HKCU\Software\Classes\CLSID{86ca1aa0-34aa-4e8b-a509-50c905bae2a2}\InprocServer32” /f /ve- After that, restart ‘Windows Explorer’ from your Task Manager or reboot your PC.
- As soon as the PC starts, you will get the old, full-detailed context menu back for good.
If you want to know in detail about how to restore the Windows 11 right-click menu, you can read about it in detail here.
Themes and Dynamic Lighting (RGB Sync)
This is great news for gamers and PC enthusiasts. Previously, you had to install separate, heavy software like Razer Synapse or Corsair iCUE to control the lights on your RGB mouse, keyboard, and CPU cooler, which would slow down your PC in the background. But now, Microsoft has introduced a built-in Dynamic Lighting feature.
If you want to turn it on, go to Settings, then Personalization, and then Dynamic Lighting to sync and control the color, brightness, and effects of all your PC’s connected compatible RGB accessories from one place. In addition, thousands of new premium themes are available on the Microsoft Store. If you set the ‘Windows Spotlight’ theme, your desktop wallpaper will automatically change daily, providing a fresh look.
Top Features and Productivity Tools
Windows 11 isn’t just stylish and modern in appearance, but it also comes with plenty of smart tools that can make everyday tasks much faster and easier. For example, you can get help with your work from the Copilot AI assistant, easily manage multiple windows at once with Snap Layouts, create your own workspaces for different tasks with Virtual Desktops, and see essential information in one place with the Widgets board. Once you learn to use these tools properly, tasks that used to take hours can be completed in much less time. So, let’s dive into these useful Windows 11 productivity features one by one and see how they can make your daily workflow even faster.
If you want to know what the top hidden features of Windows 11 are, you can read this Top 10 Hidden Features in Windows 11.
Windows Copilot (AI Assistant)
Friends, in 2026, ‘Artificial Intelligence’ has become the biggest tech trend. Microsoft has directly integrated the power of ChatGPT into the OS, which is called ‘Windows Copilot’. This is not a normal search bar, but rather it’s like your personal AI assistant. This one tool has completely changed the way PCs are used.
To launch Copilot, click its icon on the taskbar, press Windows key + C on your keyboard, or press the dedicated Copilot key on newer laptops. It opens in a sidebar on the right side of the screen. The biggest advantage of this ultimate Windows Copilot AI features guide is that it can control system settings. You can type into it or use voice commands like “Turn on dark mode,” “Take a screenshot,” or “Summarize this long PDF.” It also searches the internet for the latest information and can generate AI images with text commands. For more technical details about this AI tool, you can read the Copilot guide on Wikipedia.
Snap Layouts & Snap Groups
If you work on a large monitor, manually dragging and resizing multiple windows can be very annoying. You’ve probably experienced this at some point. In such cases, Windows 11’s Snap Layouts feature eliminates this problem at its root. To use this feature, you just have to hover your mouse over the ‘Maximize’ icon (the box icon in the top-right corner) of any open app.
You will then see different grid layouts, such as 2 half-screens, 3 columns, or 4 corners. Click on the box of your choice, and your window will snap perfectly into place. After that, the OS will ask you which app to place in the remaining empty space. Once you create a group of 3-4 apps, a “Snap Group” for it is created in the taskbar. If you switch to another app, you can later open all four apps together again with a single click from the taskbar. And this is a game-changing trick for multitasking.
Widgets Board (Removing the News Feed)
On the left side of the taskbar, you’ll see a weather icon. When you click it or press Windows key + W on your keyboard, a glass-like sidebar called the Widgets Board opens. It gives you a quick glance at the stock market, weather, and sports scores.
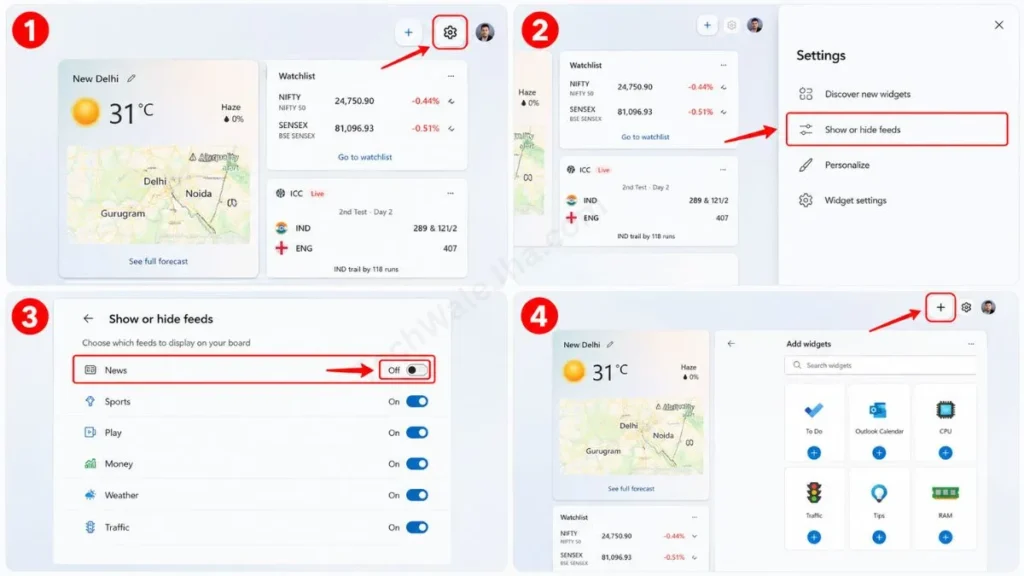
But by default, it comes with an endless news feed from MSN, which consumes a lot of internet data and PC RAM in the background. If you don’t want it to slow down your background processes, it’s very important to turn off its news feed. To do this, click on Settings (the Gear icon) in the top-right corner of the Widgets Board. There, go to ‘Show or hide feeds’ and turn off the news feed. Now, you can click ‘Add widgets’ (+) to add widgets that are useful for you, like a To-Do list, Outlook Calendar, or a CPU and RAM usage monitor. With this small setting, you can easily achieve an active speed-up of Windows 11 performance.
Virtual Desktops
Often, we have Office Excel sheets, WhatsApp, YouTube, and gaming apps open on our PC at the same time, which makes the entire screen look cluttered. Virtual Desktops are used to solve this clutter. To turn this feature on, click the ‘Task View’ icon on your Taskbar or press Windows key + Tab and click the “+” (New desktop) at the bottom.
This way, you can create separate, clean desktops for your different tasks. For example, you can name Desk 1 “Office Work” and Desk 2 “Personal or Gaming.” To switch between them, you can use the keyboard shortcut Ctrl + Win + Left or Right Arrow. The most interesting part of this feature is that you can set a different wallpaper on each virtual desktop. To set this up, right-click on Desktop in Task View and select the “Choose Background” option. This way, you’ll know clearly whether you’re in your work zone or your chill zone.
Mobile Sync and Connectivity
There was a time when transferring files from your phone to your PC meant first finding a USB data cable, then plugging it in, and only then sending the files. But now with Windows 11, all of this has become quite easy. You can wirelessly connect your smartphone to your PC through the Phone Link app and manage SMS, calls, and notifications directly on your computer. And if you just want to transfer files, you can use Quick Share to easily and quickly transfer files between your phone and PC without a data cable. This means that even though the phone and laptop are separate devices, they feel like part of the same ecosystem when connected together.
Phone Link App (Android & iOS)
Microsoft’s Phone Link app, formerly known as Your Phone, is the ultimate tool for mobile and PC sync. With recent updates, it now fully supports not only Android but also iOS (iPhones) via Bluetooth. If you want to take advantage of this feature, open the Phone Link app on your PC to set it up. If you haven’t already, download it from the Microsoft Store. Then, on your mobile device, download the ‘Link to Windows’ app, open it, and scan the QR code displayed on your PC screen.
Once set up, you can keep your phone in your pocket. After that, you can receive and reply to all WhatsApp messages, OTPs, and calls directly from your PC screen. The latest 2,000 photos on your phone will wirelessly sync to the gallery, which you can then copy and paste directly.
Pro Hardware Performance Guide: The most powerful and premium feature of this app is “Screen Mirroring,” which lets you run your phone’s apps and screen live on your PC. However, this feature is mostly supported on Samsung Galaxy, Honor, ROG, and select Oppo or OnePlus devices.
If you want to use this feature without any lag or frame drops, then keep in mind that the mobile hardware’s processor and RAM play a major role. If you have a budget phone with an entry-level MediaTek SoC or an older Snapdragon 4-series and 4GB of RAM, you’ll experience frame drops (stuttering) and the device will heat up quickly while screen mirroring to a PC, because continuous wireless casting places a heavy load on the hardware.
But if your smartphone has high-end hardware like a Snapdragon 7+ Gen 2 or 8 Gen series processor, paired with 8GB or 12GB of LPDDR5X RAM and UFS 3.1/4.0 storage, then this casting experience runs at a completely butter-smooth 60fps. On top of all that, you can also control your heavy mobile games with a PC mouse without any lag.
The ‘AirDrop’ feature is the most popular in the Apple ecosystem because it makes file transfers very fast. Now, that exact same feature has officially arrived for Windows 11 users. Google and Samsung have teamed up to integrate Quick Share, formerly known as Nearby Share, with Windows.
Thanks to this feature, you no longer need to send files via WhatsApp and deal with a loss in quality. To do this, install the Quick Share for Windows app on your PC. Then, whenever you need to send a large file, like a 1GB video, from your phone to your PC or vice versa, just select the file, press ‘Share,’ choose your PC, and the file will transfer easily. However, keep in mind that this will only work if the PC has Wi-Fi and Bluetooth enabled. This technology creates a peer-to-peer Wi-Fi Direct connection, providing transfer speeds of 50 MB/s to 80 MB/s. It is completely wireless, fast, and secure.
Check out the video here to learn this trick for wirelessly transferring files in seconds:
Gaming Performance In Windows 11
If you’re a gaming enthusiast, Windows 11 can be quite useful for you. Microsoft has added some features to this OS with gamers in mind, which were previously seen on Xbox consoles. For example, Auto HDR makes game visuals more vibrant, DirectStorage can make game loading much faster, and Game Mode helps free up CPU and GPU resources for gaming by controlling unnecessary background apps. This means that if you’re a hardcore gamer, Windows 11 can make your gaming experience even smoother and faster by making better use of your PC’s hardware.
Auto HDR and DirectStorage
Many older PC games were designed in SDR (Standard Dynamic Range), which makes their colors look a bit washed out on today’s modern monitors. But in Windows 11, the Auto HDR feature uses an AI algorithm to automatically apply High Dynamic Range (HDR) to older SDR games. This makes the game’s lighting, shadows, and colors look much more realistic and vibrant. For this, you need an HDR-supported monitor. To turn it on, go to Settings, click on System, then go to Display, and select HDR. There you will see the Auto HDR toggle then turn it on.
The second biggest game-changer feature is DirectStorage. Normally, when you play a game, data first goes from the hard disk to RAM, then the CPU processes it and sends it to the GPU (graphics card), which takes time and makes loading screens longer. This is where DirectStorage technology sends data directly from the NVMe SSD to the GPU, bypassing the CPU. This literally reduces game loading times to just 1-2 seconds. But keep in mind, to enjoy this premium feature, it’s essential to have a Gen3 or Gen4 NVMe SSD in your system.
Game Mode and the Xbox App
When you’re playing a game, a background Windows Update or an antivirus scan can cause sudden frame drops (stuttering) in your game. To solve this problem, the OS already has a built-in Game Mode. When this mode is on, Windows stops all non-essential background services and gives your processor’s full power (priority) exclusively to the game you are playing. If you want to turn it on, go to Settings, then to Gaming, and then to Game Mode to turn it ON.
Additionally, the pre-installed Xbox App has become a hub for PC gamers. If you have an Xbox Game Pass PC subscription, you can download and play over 100 high-quality games like Forza Horizon, Halo, or others without buying them, right from this one app. This app is also very well-optimized for voice chat (Xbox Party) with friends.
Advanced Optimization: How to Increase PC Speed?
It often happens that after installing a new Windows 11, it feels like your laptop has become even slower than before. Actually, Windows 11 by default uses a lot of resources in the background, especially if your hardware is old. But there’s absolutely no need to worry. If we just tweak a few under-the-hood settings, performance can be significantly improved even on an old laptop.
Things like uninstalling unnecessary pre-installed bloatware apps, disabling heavy startup programs from the Task Manager, turning off VBS for gaming, and enabling Storage Sense so that Windows automatically cleans junk and unnecessary files. These small changes can combine to make Windows 11 noticeably faster and smoother.
Removing Bloatware
As soon as you install the OS, Microsoft fills the Start Menu with a lot of third-party apps like Spotify, TikTok, Candy Crush, and McAfee. These are called ‘bloatware,’ which use up both your storage and RAM. And then we get frustrated when the PC starts to lag. If you want to make your PC faster, the very first step is to remove these unnecessary apps from your system.
You can manually go to the Start menu, right-click on each app, and ‘Uninstall’ them. But if you want to save time, you can use our Windows 11 bloatware removal script. Running this in PowerShell clears all the junk with a single click, making your system feel super light and making your Windows 11 run even faster than before.
Disabling Startup Apps
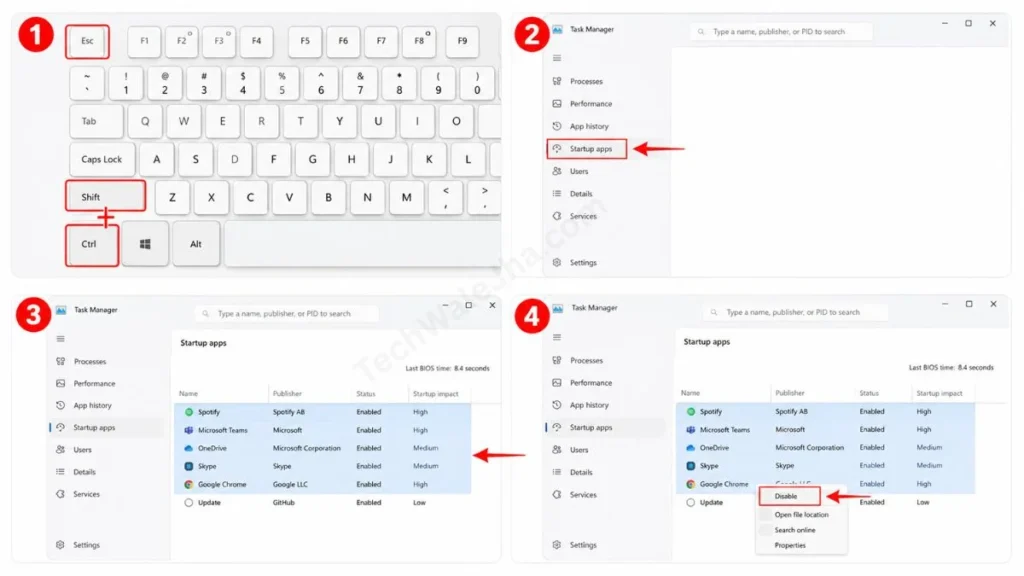
If your PC is taking 2-3 minutes to turn on after pressing the power button, the main reason for this is ‘Startup Apps’. These are the software programs that automatically start in the background as soon as the PC turns on, such as Skype, uTorrent, OneDrive, or other apps.
- To disable them, press Ctrl + Shift + Esc on your keyboard at the same time to open your Task Manager.
- Then, on the left side, click on Startup apps (the speedometer icon).
- Here, right-click on all the apps you don’t need immediately, and disable them by selecting ‘Disable’.
- This small trick will cut your boot time in half, and you’ll start to notice a significant speed-up in Windows 11 performance.
Disabling VBS (For Gamers)
In Windows 11, ‘Virtualization-Based Security (VBS)’ and ‘Core Isolation’ are enabled by default to enhance security. These features greatly help protect against hackers. However, testing has shown that with VBS enabled, there is an FPS loss of 10% to 15% in gaming performance!
If you’re a hardcore gamer and need maximum framerates while playing games, you can turn it off. To do this, go to the Start menu and search for “Core Isolation.” Then, turn off the Memory Integrity toggle and restart your PC. However, be sure to only disable it if you stay away from piracy (cracked games) and play genuine games.
If you want to know more details about disabling VBS and its advanced settings, you can read this detailed guide: How to Disable VBS in Windows 11 with Advanced Fix.
Storage Sense
If your C: Drive is about to fill up or is already full, your PC will hang 100%. This is because Windows needs at least 15 to 20 GB of free space on the C: Drive to function properly. If you want to avoid this issue and stay worry-free, you can turn this setting on by following these steps.
To turn it on your PC or laptop, go to Settings, then System, and then Storage. You will see the Storage Sense option then turn it ON. This feature works like a smart AI. It automatically deletes old files from your Recycle Bin and Downloads folder, as well as the internet temporary cache, according to the time period you’ve set. This keeps your drive always clean and completely eliminates the chance of lag.
Security And Privacy Settings
These days, malware, ransomware, and phishing attacks are becoming quite common in the world of the internet. But there’s absolutely no need to worry too much about security in Windows 11, because Microsoft has built security features like Microsoft Defender Antivirus and Smart App Control right into the OS. However, if you want to be extra careful about your privacy, it’s a good idea to manually disable diagnostic data tracking and personalized ads in the Privacy & Security settings. This will give you a bit more control over your privacy in addition to your security.
Windows Defender
Many people, as soon as they get a new PC, immediately buy and install a third-party antivirus like Avast, Quick Heal, or McAfee. Is it really necessary? My straightforward answer is a big No! Because Windows 11 comes with a built-in Microsoft Defender, which is one of the best antivirus programs in the world today. It’s completely free for Windows users, quietly updates in the background, and doesn’t slow down the system either. As long as you don’t download pirated software from the internet’s dark web or shady websites, Defender will keep you 100% safe from every USB virus and online threat.
Privacy Control (Turn Off Tracking)
By default, Windows continuously sends a lot of your “diagnostic data” to Microsoft’s servers in the background so they can further improve their products. If you are very strict about your digital privacy, then it is very important for you to turn off this tracking.
- To turn this off, go to Settings, then Privacy & security, and then Diagnostics & feedback.
- From there, turn off “Send optional diagnostic data”.
- Disable “Tailored experiences” below it as well, so Microsoft won’t show you irrelevant ads in the Start menu using your data. If you make this setting, this trick will also save your internet data, especially when you’re connected to the internet via a hotspot on your phone.
Smart App Control
In Windows 11 version 22H2 and later, a new AI-powered security feature has been introduced. Whenever you download and install a new or unknown app from the internet, Smart App Control checks the file’s code in the cloud. If the app appears malicious, the OS blocks it before it can run. This feature is very useful for people who have a habit of downloading random software from the internet.
Troubleshooting: Common Errors and Their Solutions
Running Windows 11 without any errors or glitches can sometimes feel difficult. Imagine everything is running perfectly fine, and then suddenly an update gets stuck, Disk Usage shows 100%, or a BSOD appears. If you use the Windows 11 OS, you’ve surely faced such issues at some point, or you might encounter them in the future. If you find yourself in such a situation, there’s absolutely no need to worry.
If Windows Update keeps getting stuck, you can try the built-in troubleshooter. If Disk Usage is at 100%, you can try disabling SysMain in Services. And if the Blue Screen of Death (BSOD) keeps appearing, keeping your graphics card and motherboard drivers updated can also be very helpful. Below, I have provided some of the common errors you might face in Windows 11 and their simple, practical solutions.
Windows 11 Update Stuck or Fail
The most common problem is that sometimes Windows Update gets stuck at 99% or shows a ‘Download Error’.
Solution: This happens because some files on your system become corrupt, and as a result, you face this update problem.
To do this, you can apply these settings on your system. First, go to Settings, then click on System, then go to Troubleshoot, then to Other troubleshooters, and click Run next to “Windows Update”. The OS will then automatically clear the corrupt files and restart the update from scratch. If it still doesn’t work, then go to the C:\Windows\SoftwareDistribution folder and manually delete everything, then restart your system.
100% Disk or CPU Usage Fix
If your PC suddenly slows down without any heavy apps open and the Task Manager shows 100% disk or CPU usage, it’s a glitch in a background service.
Solution: To fix this, press the Windows key + R on your keyboard. A Run dialog box will open then type services.msc and press Enter. Then, in the list of services, find SysMain, which was previously called Superfetch. Double-click on it, then set the ‘Startup type’ to Disabled and click ‘Stop’. After this, disable the ‘Windows Search’ service in the same way. Your 100% usage will immediately return to normal.
Blue Screen of Death (BSOD)
You are working on your PC and suddenly the screen turns completely blue and the PC restarts. This is called a BSOD.
Solution: This is caused by a hardware or driver conflict. A stop code appears on the screen, such as MEMORY_MANAGEMENT or DRIVER_IRQL_NOT_LESS_OR_EQUAL. This is generally a sign of corrupt RAM or an outdated graphics driver. Always download and update the BIOS and the latest display drivers from the motherboard’s official website. If the problem persists, remove your RAM stick, clean it, and then reinsert it.
Frequently Asked Questions
Is Windows 11 completely free?
Yes, it is free. If your PC is running a genuine and activated version of Windows 10, you can upgrade to Windows 11 for free through Windows Update. You don’t need to purchase a separate license key for this.
Will Windows 11 run well on a laptop with 4GB of RAM?
4GB of RAM is the official minimum requirement, so the OS will install and basic web browsing will work. However, if you open 4-5 Chrome tabs or multitask, the system will start to hang. If you want a smooth experience, at least 8GB of RAM and an SSD are mandatory.
When will support for Windows 10 end?
According to Microsoft’s official announcement, support for Windows 10 has already ended on October 14, 2025. After this date, no new updates or features will be released for this OS. If you are still using Windows 10, you should upgrade to Windows 11 immediately.
Will my personal data be deleted after updating?
If you upgrade directly from Settings using the Windows Update method, none of your photos, videos, or installed software will be deleted. Everything will stay exactly the same. However, it’s always a good idea to back up your data.
How to run Android apps on Windows 11?
To do this, you need to open the Microsoft Store and install the ‘Amazon Appstore’ by searching for it. This will install the ‘Windows Subsystem for Android (WSA)’ in the background. After that, you can directly download and play Android apps natively from the Amazon Appstore, without needing any third-party emulators like BlueStacks.
Final Words From TechWaleJha
Friends, I truly hope this ultimate deep-dive, Windows 11 complete guide that I’ve written has successfully cleared up all your doubts. From installation to speeding up the system, we’ve learned everything properly today.
If you run into any errors while setting it up or don’t understand any of the settings, be sure to ask your questions in the comment box below. I personally read your comments and provide their technical solutions in my replies.
Stay safe, stay secure, and keep your PC experience the best it can be. Until then, take care and bye-bye.




