
To Fix 100% disk usage on Windows 10 SSD, first identify the process in Task Manager. Then disable SysMain and Windows Search, run CHKDSK, reset virtual memory, and check SSD optimization. This will easily pinpoint the actual cause.
Hello friends, I’m your very own TechWaleJha! Has your system suddenly become slow, is the mouse lagging, and are apps taking forever to open? That’s one thing, but when you press Ctrl + Shift + Esc and check, the Disk column is stuck at 100% in red. So there’s absolutely no need to panic, because in this guide, we’ll systematically learn how to easily Fix 100% disk usage on Windows 10 SSD, so that your PC is as fast as new again.
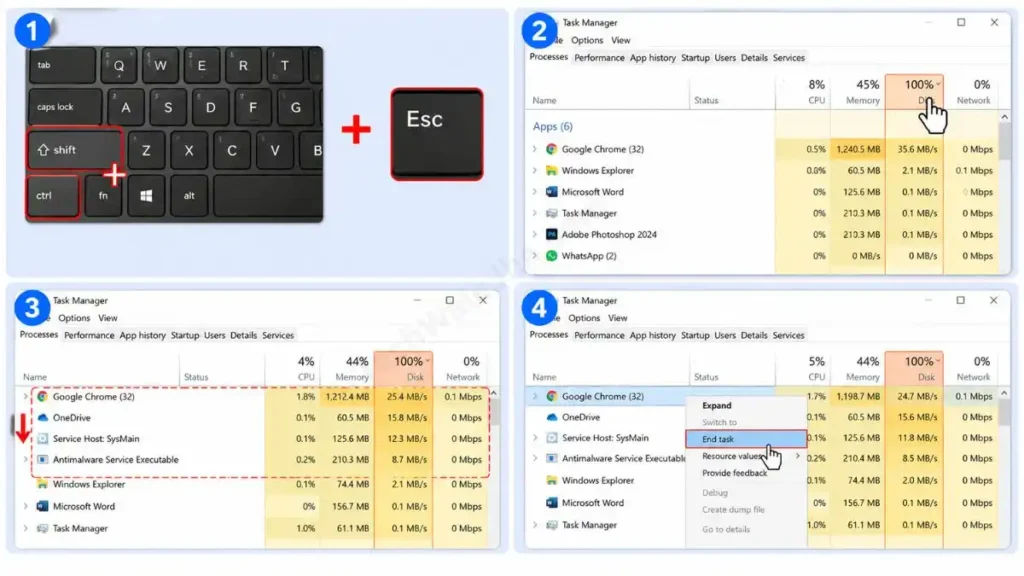
First, open the Task Manager with the 100% disk screen and click the Disk column in the Processes tab. This will show you exactly which app or service is draining your storage.

Quick Fixes at a Glance
If you’re repeatedly getting a 100% disk usage error on your PC in Windows 10, then instead of randomly tweaking settings, try the fixes listed below one by one:
| Fix / Solution | What problem is it targeting? | Difficulty Level |
|---|---|---|
| Disable SysMain | Background app preloading is blocked. | Easy |
| Disable Windows Search | Continuous indexing loop band cuts. | Easy |
| Run CHKDSK scan | Fixes hidden file system errors. | Medium |
| Virtual Memory Reset | Fixes paging file (RAM) issues. | Medium |
| SSD Optimization Check | Identify scheduled maintenance conflicts. | Easy |
| Task Manager Check | Get actual disk-heavy software. | Easy |
Pro Tip: Always change only one setting at a time and observe your PC. This way you’ll know exactly which step is actually working on your system to fix 100% disk usage.
Also Read: How to Disable Windows 11 Telemetry (Safe Guide Latest 2026)
Why Is My Windows 10 SSD Showing 100% Disk Usage?
There isn’t just one reason for 100% disk usage on a Windows 10 SSD. It can be caused by SysMain, Search indexing, paging activity, file-system errors, updates, or a heavy background app. The issue can be fixed immediately by identifying the correct process.
Often, people wonder, “I just got a new SSD, so how did it suddenly get full?” Friends, this is the biggest confusion, and it’s very important to clear it up.
What 100% Disk Usage Actually Means
When you see 100% disk usage in Task Manager, it doesn’t mean your storage (C: Drive) is full.
Let’s say you have a 500 GB SSD with 300 GB of free space. The Task Manager can still show 100% Disk usage! This is because Windows is showing your SSD’s active time (i.e., how busy the drive is), not its storage capacity.
- Disk 100%: The SSD is at its maximum output, continuously reading or writing.
- Storage 100% full: There is no more space left on the SSD to save data.
So if your Windows 10 is showing high disk usage, there’s absolutely no need to rush out and buy a new SSD! It could be a purely software or service-level issue. If you want to learn in detail how SSDs handle data, be sure to read this Wikipedia guide on Solid-state drives.
Common Causes of High Disk Usage
Common problems can make your drive over-busy:
- SysMain (Superfetch): This feature preloads data in the background to open apps faster, which makes the drive overactive.
- Windows Search: File indexing can sometimes get stuck in a loop and continuously read from the disk.
- Virtual Memory (Paging): When the PC’s RAM runs low, Windows starts using your SSD as temporary RAM.
- Windows Update: Heavy disk activity occurs when updates are downloading or installing in the background.
- Antivirus Scans: Real-time protection or deep system scans can cause your disk usage to spike.
Now that we’ve thoroughly understood the root of the problem, we’re practically fully ready to properly Fix 100% disk usage on Windows 10 SSD.
Also Read: How to Disable VBS in Windows 11 | Advanced Fix Latest 2026
Disable SysMain to Reduce Windows 10 Disk Usage
SysMain is a background service specifically designed in Windows 10 to help your frequently used applications like Chrome, MS Word, Excel, or any others open faster. It preloads data from the SSD into RAM in the background. The problem arises when this service becomes overactive. If your PC is suddenly lagging, disabling SysMain in Windows 10 should be your first and most effective troubleshooting step.
How to Disable SysMain in Windows
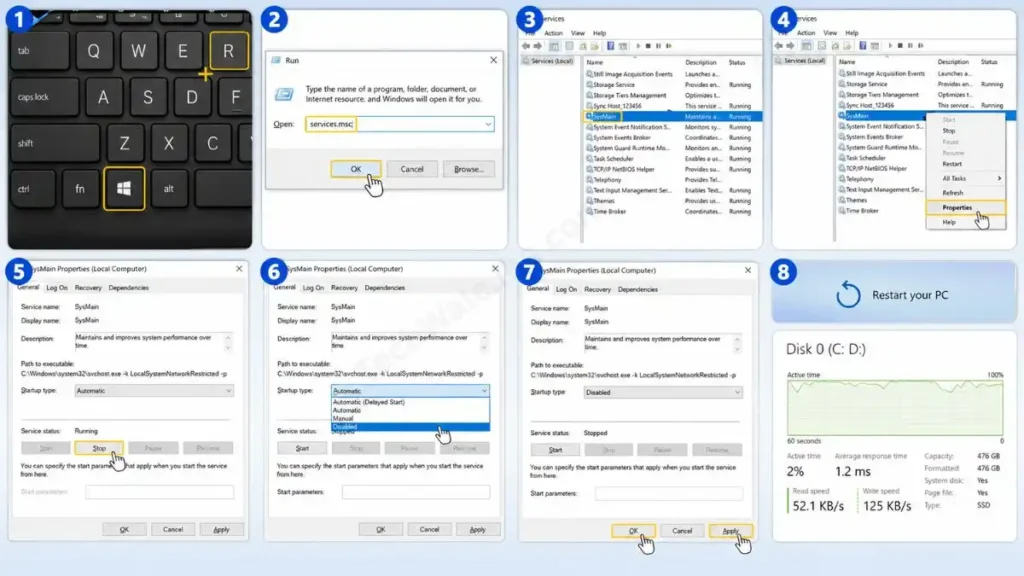
To completely and safely stop SysMain, we need to use the Windows Services panel. To do this, follow the steps below:
- Now, press the Windows key + R together on your keyboard.
- The Run dialog box will open and type
services.mscand press Enter. - After this, a long list of services will open. Scroll down and find SysMain.
- Then, right-click on SysMain and select Properties.
- If the service is showing as ‘Running’, first click the Stop button.
- Then, right above it, you will see a ‘Startup type’ form dropdown and select Disabled from there.
- After that, click Apply and then click OK.
- Now, restart your PC and check the Disk usage in Task Manager again.
Should You Keep SysMain Disabled?
Note, friends, SysMain is not automatically the culprit for 100% disk usage on every PC running Windows 10. If, after disabling the SysMain Windows 10 process and restarting, the disk usage returns to normal (0% – 10%), then you should leave it permanently disabled. But if it makes no difference, then there’s nothing wrong with this service. In that case, it’s better to set it back to ‘Automatic’ so that your apps continue to load smoothly.
Also Read: How to Fix Blue Screen Error in Windows 11 Using Command Prompt
Disable Windows Search Indexing
Windows Search works by creating an “index” or map of all your files, documents, and photos so that when you search something in the Start menu, the results appear instantly. Under normal conditions, it runs quietly in the background. But often, due to corrupted files or a heavy indexing loop, Windows Search becomes the main cause of high disk usage.
How to Stop the Windows Search Service
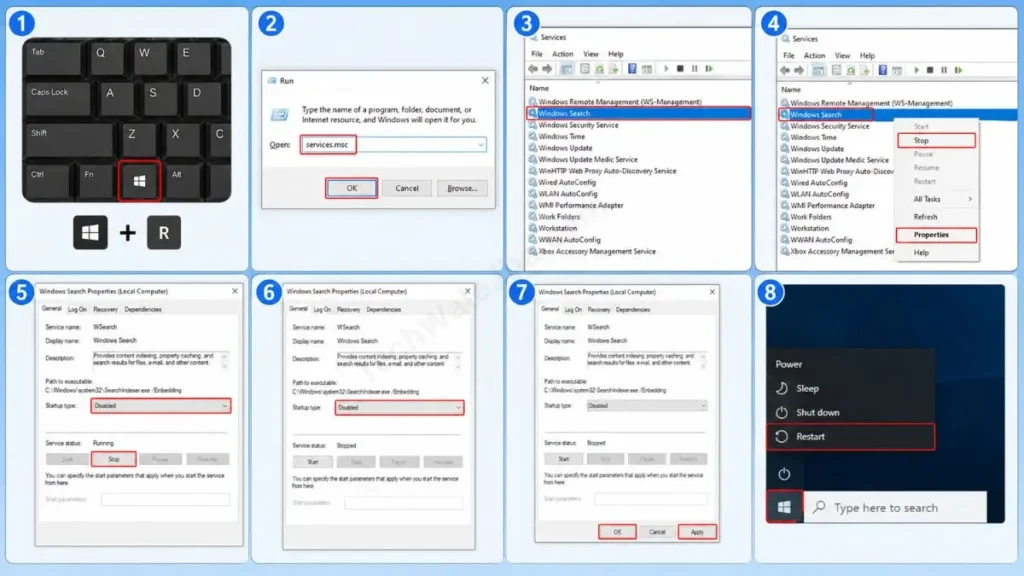
If you think the SSD is constantly reading/writing due to indexing, we can test it by temporarily stopping it:
- Press Windows key + R again, type
services.mscin the Run dialog box, and press Enter. - Now, scroll to the bottom of the list and find the Windows Search service.
- Then, right-click on it and go to its Properties.
- Now, under the Service status, you will see a Stop button then click on it.
- Now, go to the Startup type and set it to Disabled.
- Finally, click Apply, then click OK to close the window.
- After all this is done, be sure to restart your system.
After it restarts, open the Task Manager and check. If the red column is now normal, then you have successfully identified and solved the problem.
When Windows Search Should Stay Enabled
One important thing to always keep in mind: permanently disabling Windows Search to fix high disk usage is not always a good idea. If you have thousands of files on your PC and frequently use the Start menu search, then turning off indexing will make it take a very long time for search results to appear.
If disabling it doesn’t solve the 100% disk usage problem in Windows 10, immediately set it back to ‘Automatic (Delayed Start)’. A PC is never fixed by just guessing instead of this we need to take logical steps. Let’s move on to the next technical step!
Also Read: How to Find Error Codes on Windows 11 Quickly 2026
Run CHKDSK to Check for Disk Errors
Often, our PC’s OS files or file system fail to read properly. This is because when there is corrupt data on the SSD, Windows repeatedly tries to read it, which causes a CHKDSK 100% disk usage loop. When I run heavy scripts, media files, and software on my PC continuously, file system errors become a common occurrence. In such cases, a simple command in Command Prompt can save your PC. Let’s find out what that command is.
How to Run CHKDSK /f /r on Windows
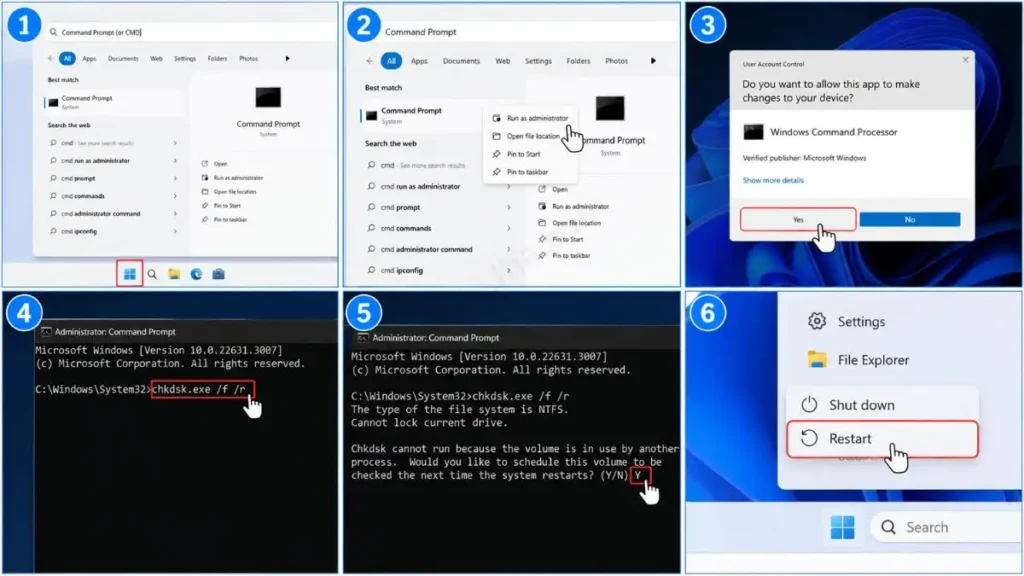
You need administrator permissions to run a CHKDSK scan. Be sure to follow this step-by-step process carefully and correctly:
- Click the Start menu and type Command Prompt (or CMD) in the search bar.
- Then, right-click the Command Prompt app and select Run as administrator. If a UAC prompt appears, click Yes.
- After the black screen opens, type the exact command:
chkdsk.exe /f /rthen press Enter. - Since your Windows C: Drive is currently in use, a message will appear on the screen asking if you want to schedule the scan for the next restart. Here, type Y and press Enter.
- Now, close the Command Prompt and restart your computer.
When it restarts, a black screen will appear and the disk check will begin. Let it complete 100% because it may take some time, so please be patient.
What CHKDSK /f /r Does
If you’re wondering what /f and /r mean in the command, this short table will clear things up for you:
| Command Switch | What is its real purpose? |
|---|---|
/f (Fix) | It forcibly fixes (repairs) all logical file system errors found on the SSD. |
/r (Recover) | It finds the disk’s problematic (bad) sectors and recovers the readable information. |
Once the scan is complete, Windows will open normally. If the issue was caused by corruption, this step will properly fix 100% disk usage on Windows 10 SSD.
Also Read: How to Check Your Laptop Battery Health (Easy Guide 2026)
Reset Windows 10 Virtual Memory
Now let’s talk about a problem that occurs most often on PCs with low RAM. When your PC’s physical memory (RAM) starts to run out, Windows borrows a portion of your SSD and uses it like temporary RAM. This is called Virtual Memory or the ‘Paging file’ (pagefile.sys). If this file gets corrupted, your disk will become 100% busy.
How to Reset the Paging File
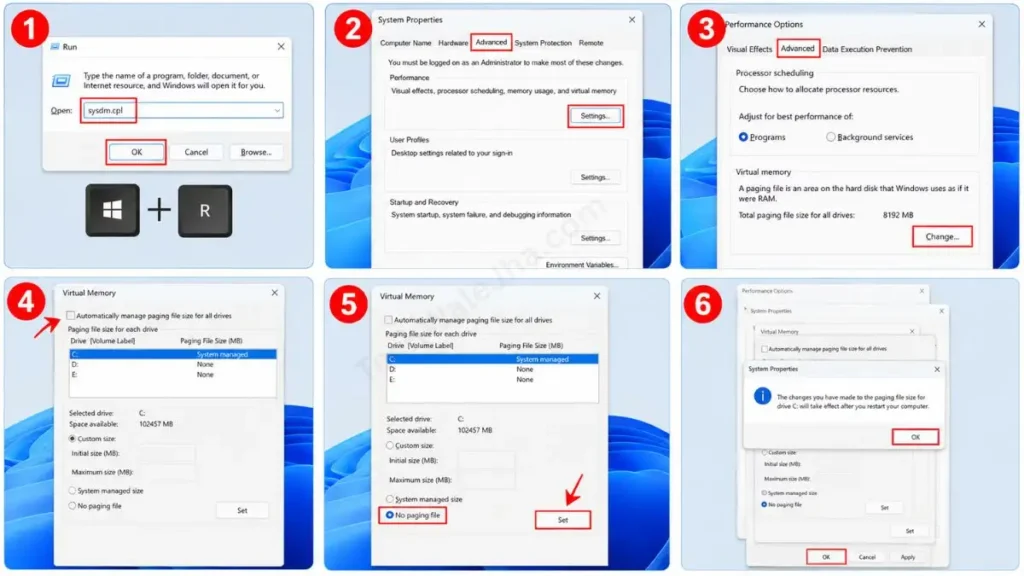
The best way to fix this glitch is to reset the virtual memory in Windows 10. This process is completely safe:
- To do this, press Windows + R on your keyboard, then type
sysdm.cplin the dialog box and press Enter. - Then, click the Advanced tab and press the Settings button under the ‘Performance’ section.
- A new window will open. Here, go back to the Advanced tab.
- and at the bottom, click on Change… in the ‘Virtual memory’ box.
- Now, uncheck the box for “Automatically manage paging file size for all drives” at the top.
- After that, select your C: drive, then under it, check the ‘No paging file’ option and click Set.
- Click OK to close all the boxes and restart your system.
After it restarts, follow the same steps again. But this time, check the “Automatically manage paging file size for all drives” box again, click Apply, and then click OK. Then restart your PC one last time. The paging file will be created brand new.
Why the Paging File Can Cause High Disk Usage
Imagine you’re using 20 tabs in Chrome and also have heavy software running in the background. When the RAM in your PC or laptop (let’s say you have 8GB of RAM) is full, Windows starts to forcibly dump the data of these active tabs into the paging file on the SSD. In this case, if you frequently switch between heavy apps, the SSD continuously reads and writes data, causing the Task Manager to show 100% disk usage.
When you reset it, this cycle is completely broken and the system’s memory management returns to normal.
Also Read: How to Repair Windows 11 Using Command Prompt (Guide)
Check Windows 10 SSD Optimization Settings
In the old days, we used to defragment our bulky Hard Drives (HDDs) so that the data would be properly arranged in one place and the drive would run a little faster. But with SSDs, defragmentation is not necessary at all. Instead, you can use the TRIM command for Windows 10 SSDs. It essentially tells the drive which data blocks are no longer valid and can be cleared internally.
How to Open Drive Optimization
Is Windows repeatedly defragmenting your SSD thinking it’s an HDD? Here is a simple way to check this:
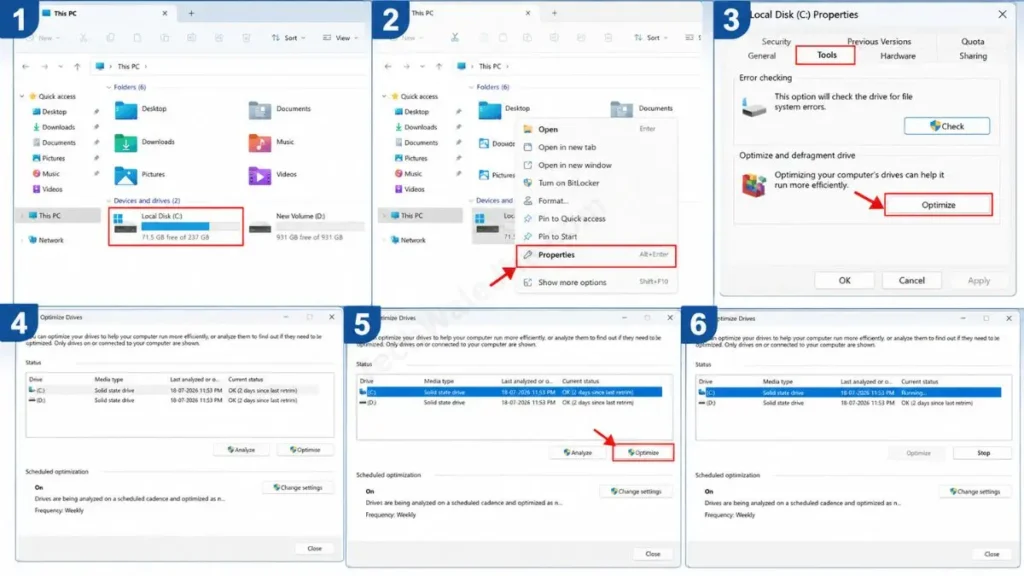
- To do this, open File Explorer (or This PC) on your PC.
- Then, right-click on your main Windows drive, i.e., the C: drive, and select Properties.
- Now, click on the Tools tab at the top.
- Under the “Optimize and defragment drive” section, click the Optimize button.
- Now, the “Optimize Drives” window will open.
Here you can check that your drive’s ‘Media type’ correctly shows as Solid state drive, and see when it was last optimized.
Should You Disable Scheduled SSD Optimization?
On some internet forums, you’re advised to disable SSD optimization altogether. But friends, that advice is completely wrong! Because background TRIM operations are essential for keeping your SSD smooth and fast in the long run.
However, if your Windows 10 high disk usage occurs strictly at the scheduled optimization time, like every Wednesday afternoon, you can temporarily disable it to test the issue. If this doesn’t fix the problem, then optimization is definitely not the cause of the 100% SSD disk usage. The best solution is to set it back to the ‘Weekly’ schedule.
Also Read: How to Make a Pendrive Bootable (Fast & Easy Guide 2026)
Other Things to Check When Disk Usage Stays at 100%
If you’ve tried deep settings like SysMain, Windows Search, CHKDSK, and Virtual Memory, but the red line in Task Manager still isn’t coming down, then the problem might be a bit more specific. This time, instead of fiddling with random settings, focus on the items listed below:
Check Task Manager for the problematic process
If the C: drive is stalling despite the system settings being correct, it could be directly related to an active software process.
- To check this, press Ctrl + Shift + Esc again to open the Task Manager window showing 100% disk usage.
- Now, click on the Disk column to sort the list, so the apps using the most disk space will appear at the top.
- Now, take a close look to see if it’s Chrome. Is it the OneDrive or Google Drive sync process? Or is it some strange malware process? Whatever application is constantly reading or writing data at over 10MB/s and causing the problem, right-click on it and immediately End Task.
Check Available SSD Storage
This is the step that people most often ignore. However, an SSD needs at least 15-20% free space to function properly. If you only have 5GB of space left on your 500GB SSD, the SSD won’t be able to handle its temporary data (cache) and will constantly run at 100% capacity. Therefore, check your storage and immediately delete unnecessary downloads, temporary files, and old Windows Updates from the C: Drive.
Check Windows Update and Background Apps
It’s a known behavior of Windows 10 that whenever a new feature update is available or a large security patch is being downloaded or installed, the OS continuously performs unpacking and file-copying operations in the background.
- To check this, go to Settings, then Update & Security, and then go to Windows Update to see if any update is still in progress.
- Additionally, deep scans by antivirus programs like Windows Defender running in the background can also lock the disk at 100% for several hours. In such cases, wait for the scan or update to complete; once these processes are finished, all the problems will resolve themselves automatically.
Also Read: How to Remove Virus from Pendrive Without Losing Data
Best Order to Fix 100% Disk Usage on Windows 10 SSD
The best order to fix 100% disk usage is as follows. First, identify the heavy process from the Task Manager, then test SysMain and Windows Search. After that, run CHKDSK, reset virtual memory, and finally, check for SSD optimization and free storage.
Friends, the biggest rule of troubleshooting is to follow a logical sequence rather than trying random things. If you want to fix this 100% disk usage problem on Windows 10 for good without any headache, then follow this 7-step checklist below systematically and correctly:
The 7-Step Master Checklist
- Step 1: Identify the Disk-Heavy Process: First, open Task Manager by pressing Ctrl + Shift + Esc. Then, look at the Disk column. If a specific app like Chrome, uTorrent, or a game is causing the problem, don’t immediately change your Windows settings unnecessarily. Just close or uninstall that app.
- Step 2: Test SysMain: If you don’t find a particular app, open
services.msc, stop SysMain (Superfetch), and observe the disk usage in Task Manager. - Step 3: Test Windows Search: Whether SysMain is fixed or not, be sure to stop the Windows Search service to rule out an indexing loop. If you don’t see any results, enable it again.
- Step 4: Check the File System: Open an admin CMD prompt, run
chkdsk.exe /f /r, and restart the PC. This will fix logical corruptions on the SSD. - Step 5: Reset Virtual Memory: If you’re doing heavy multitasking and your RAM is full, reset Virtual Memory (paging file) by selecting “No paging file,” then restart. If that doesn’t work, set it back to “Automatically manage.”
- Step 6: Inspect SSD Optimization: Check the ‘Optimize Drives’ setting to see if the scheduled TRIM is running at the proper time. Also, do not permanently disable it.
- Step 7: Check Updates, Storage, and SSD Health: Always keep at least 15–20% free space on the C: drive, allow pending Windows updates to complete, and use a good software tool to check the SSD’s health.
Also Read: How to Find Hidden Viruses Using CMD (2026 Guide)
Frequently Asked Questions
Why is my SSD at 100% usage on Windows 10?
The reason can range from a simple background service like SysMain or Windows Update to deep file-system errors. You can find the exact culprit by opening Task Manager.
Does disabling SysMain fix 100% disk usage?
Disabling SysMain stops background preloading on many PCs, instantly reducing disk activity. However, it’s not a 100% guaranteed universal solution, so only temporarily stop it for testing and check the results first.
Is 100% disk usage bad for an SSD?
No, 100% active time doesn’t mean your SSD will fail or that it’s full. It just means the drive isn’t completely free. However, if this continues for days on end, the system can overheat, which may slightly shorten the SSD’s lifespan.
Can CHKDSK fix 100% disk usage?
Yes, if your Windows 10 high disk usage is caused by file-system corruption that the OS is repeatedly trying to read, then the chkdsk.exe /f /r command will fix it perfectly.
Should I disable Windows Search on Windows 10?
It’s not recommended to disable it permanently. If you’re experiencing a slowdown due to indexing, then turn it off just to test. For those who use the Start menu, it’s better to keep this feature ON.
Can low free space cause high disk usage?
Absolutely! SSDs need breathing room to move temporary files and cache. If your drive is 95% full, it will definitely lag and the SSD will show 100% disk usage.
Why does disk usage randomly reach 100%?
Random spikes are completely normal. They occur when an antivirus scan starts in the background, cloud apps (like OneDrive) sync data, or Windows silently downloads a security patch. They usually go back to normal on their own after a short while.
Final Thought
I truly hope that with this ultimate, step-by-step guide, you have successfully Fix 100% disk usage on Windows 10 SSD. Your system should now definitely feel as smooth and lag-free as it did before.
I’m your friend, TechWaleJha! System maintenance is an art, and now you’ve mastered it. If you’re facing any issues with this, you can discuss your problem with me in the comments. I’m there to help you out completely.
Disclaimer: All system tweaks mentioned in this guide (such as Command Prompt, Services, and Virtual Memory changes) are advanced troubleshooting methods. Please apply these steps carefully and entirely at your own risk. Before making any major system setting changes, back up your important data and be sure to create a System Restore Point. We are not liable for any data loss, system failure, or OS errors.




