
Has your computer suddenly become very slow? Or are you getting strange error messages for no reason, and files are disappearing? These days viruses and malware have become so smart that they can easily slip past a normal antivirus scan, and you don’t even realize it. They hide themselves in your system or on a USB drive (flash drive) by disguising as hidden system files.
In such a situation, you might think you’ll have to format your PC or buy an expensive antivirus software from the market. But that’s not the case at all! If you want, you can easily remove viruses using the command prompt without any software.
Command Prompt (CMD) is a built-in and very powerful tool in Windows. Although CMD doesn’t automatically scan for and delete viruses, when it comes to unhiding files using CMD, there’s no better or faster tool. In this process, you have to become a digital detective yourself, then use commands to strip away the virus’s disguise and manually remove it from the system.
In this deep-dive guide, I’ll walk you through step by step how to safely find hidden viruses using CMD. Or we’ll practically see how malicious files hide and how they’re destroyed. If you want to learn in detail about cybersecurity and the core mechanisms of viruses, you can refer to Wikipedia’s guide on Computer Viruses. So let’s start our virus hunt without any delay.
Also Read: How to Recover Deleted Files for Free
How to Find Hidden Viruses Using CMD?
To quickly find hidden viruses using CMD, follow these steps:
- Press the Windows key or type CMD, then open CMD as an administrator.
- Then, to view hidden files, type
attrib -s -h -r -a /s /d *.* - Then, to find suspicious files like autorun.inf, type
dir - To stop the active process, type
taskkill /f /im virus.exe - To remove it permanently, type
del virus.exe
This bulleted list gives you a direct and fast overview of the entire process. But to permanently remove a successfully hidden virus, you must understand the logic behind these commands. To do this, see the table below for which commands we will use in this guide and what their actual roles are:
| CMD Command | What is its real purpose? | Why use it? |
|---|---|---|
| attrib | Forces the removal of the ‘hidden’ and ‘system’ tags from files. | The attrib command is the very first and most important step in removing a virus. |
| dir | Displays the complete list of every normal and hidden file inside the folder. | To identify fake or randomly named (gibberish) files. |
| tasklist & taskkill | It detects the virus running silently in the background and stops it. | Use Taskkill to stop the malicious process so the file can be easily deleted. |
| del | It permanently deletes any selected file from the system. | To permanently destroy the malware. |
When you perform a manual recovery, even a small mistake can have serious consequences. That’s why, when removing viruses using the command prompt, you need to carefully check the file names so that no essential Windows file gets deleted.
Also Read: How to Check If Someone Used Your Computer
Step-by-Step: Reveal Hidden Files (The Attrib Command)
Viruses and malware are very clever. As soon as they get onto a PC, they set their own “Hidden” and “System File” tags. This trick makes them completely disappear from the normal Windows File Explorer. But here, we’ll use CMD to forcefully remove these tags.
Open CMD as Administrator
To make any system-level changes, you must have admin powers (the highest permission level):
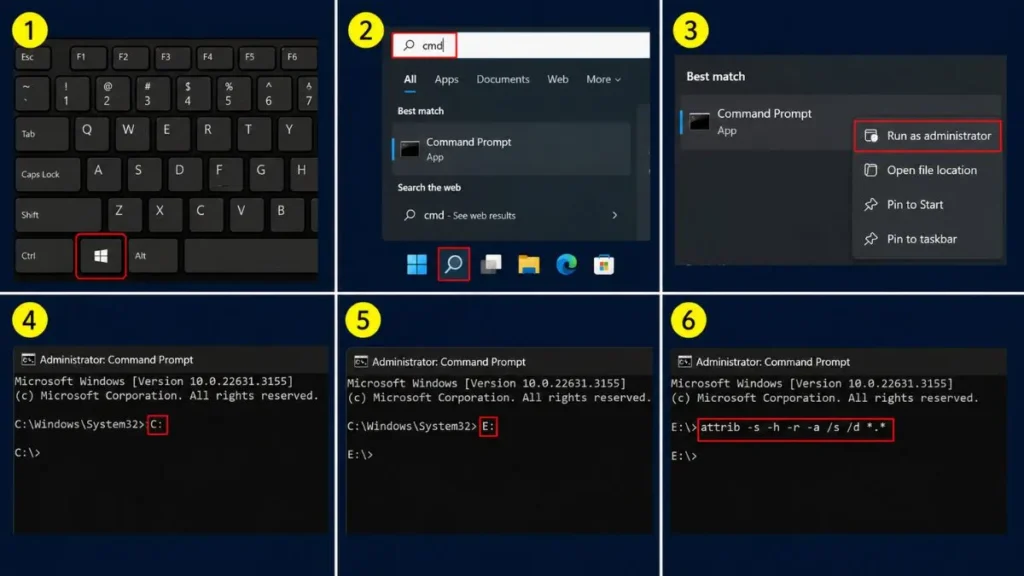
- To do this, press the Windows Key on your keyboard.
- Then, type “cmd” in the search bar.
- Next, right-click on Command Prompt and select “Run as administrator.”
Strip Attributes to Unhide the Virus
Now that the black CMD screen is open, first select your target drive. For example, if you want to scan the hard drive, type C: and press Enter, or for a USB drive, type E: and press Enter. After that, you need to run a specific attrib command to remove the virus‘s disguise.
To do that, type this exact command and press Enter: attrib -s -h -r -a /s /d *.*
What does this command actually do?
- -s: Removes the ‘System’ attribute from the file so the system stops protecting it.
- -h: This is the most important part of the command to unhide files using CMD.
- -r: Removes the ‘Read-only’ tag so you can easily delete the file later.
- -a: Clears the ‘Archive’ attribute.
- /s & /d: Tells the command to process the folder and all its subfolders deeply.
Also Read: How to Reduce RAM Usage in Windows 11
The Hunt: Spot, Kill, and Delete the Threat
After successfully bringing the hidden files into view, your real work begins. Now you have to find and kill that one virus from among the thousands of files.
How to Spot Suspicious Files (autorun.inf & Random .exe)
Now, on the same CMD screen, type dir and hit Enter. This will bring up a long list of all the hidden and normal files on that drive. Now you need to look for “Red Flags” (signs of danger) in this list:
- autorun.inf: If you’re checking an external USB drive and see this file, be immediately alerted. Old-school viruses use this to automatically run as soon as the drive is connected to the PC. You will have to destroy it using this delete autorun.inf virus CMD trick.
- Strange Extensions: Unknown files with
.vbs, .bat, or.scrat the end. - Gibberish Names: Files with random letters like
xKJH3.exe. This is almost 100% a sign of malware.
Kill Active Processes using Taskkill
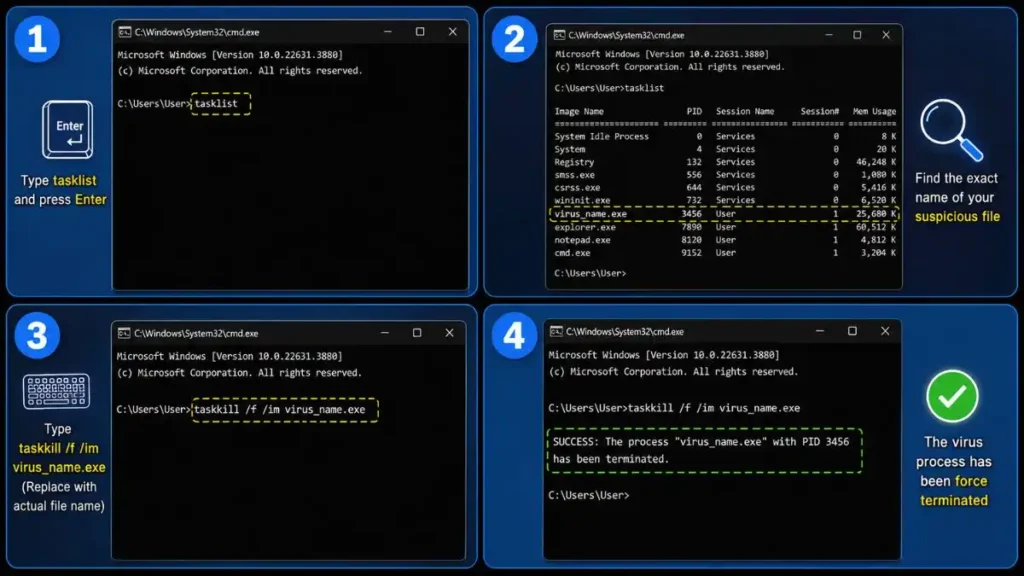
Many times when you try to delete a virus, Windows gives an error: “File is in use”. This means the malware is still running in the background. To stop it, you have to apply the taskkill malicious process method. To do this:
- In CMD, type
tasklistand press Enter. This will show a list of all the active processes running on your PC. - Then, in that list, find the exact name of your suspicious file, such as
virus_name.exe. - Then type:
taskkill /f /im virus_name.exeor, in this case, replace virus_name.exe with the name of the actual file and then press Enter. This command will immediately ‘Force Terminate’ the virus.
Permanently Delete the Virus
After the process stops, the virus is now completely weakened. To permanently remove it from your PC, use the DEL command by simply typing: del virus_name.exe and pressing Enter. (For example: del autorun.inf).
Now you have saved your PC by successfully using the command prompt method to manually remove the virus. This technique is the most reliable way to safely find hidden viruses using CMD.
Also Read: How to Install Windows 11 Without TPM 2.0
Alternative Method for Find Hidden Viruses Using CMD
If you find manually searching for files a bit technical or time-consuming, you can also use CMD to directly command your Windows’ built-in security system. Let’s see how to do this easily.
Trigger an Official Windows Defender Scan via CMD
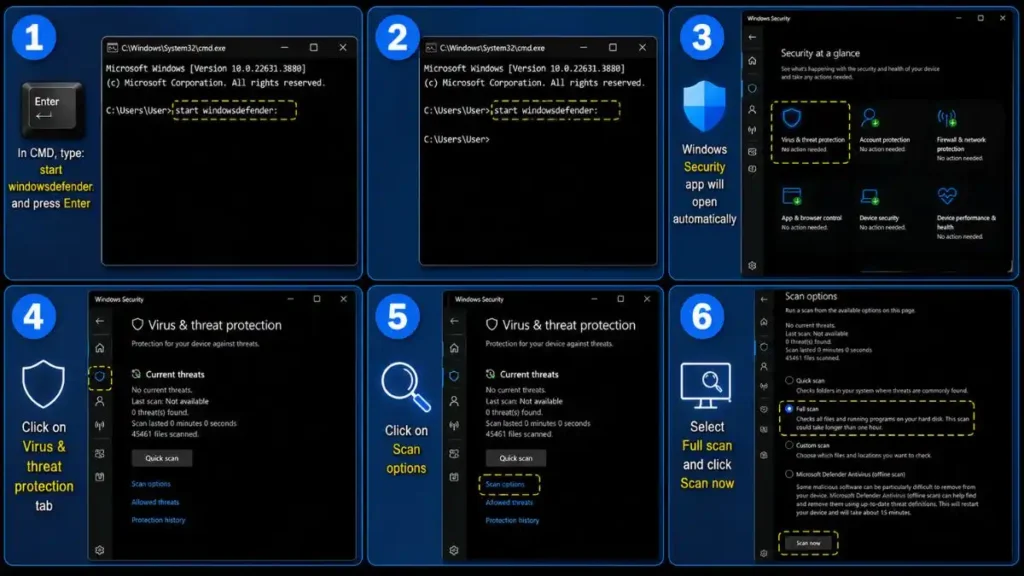
Often, dangerous malware blocks your Start menu and settings, preventing you from opening your antivirus. In such cases, you can launch a reliable, automated scan via CMD by following these steps:
- Now, in your CMD window, type:
start windowsdefender:and press Enter. - This command will directly open the Windows Security app.
- From there, go to the Virus & threat protection tab and run a Full scan.
- This shortcut is very useful when you need to trigger Windows Defender from the CMD without navigating through the UI.
Also Read: How to Create a Windows 11 Bootable USB
Frequently Asked Questions
Can I also remove a virus from my USB flash drive?
Yes, absolutely! If you want to know how to remove a virus from a USB drive using CMD, you can follow the same steps. Just type your pendrive’s letter like E: or F: instead of C: in the CMD, then run the attrib and del commands. This will fix the hidden files on your pendrive without formatting it.
Can CMD remove all types of viruses?
CMD can’t do that because it isn’t a scanning engine. It can show you hidden files, but to manually delete malware you have to identify it yourself. For advanced Trojans or rootkits, you need a dedicated antivirus.
What if an essential Windows file is accidentally deleted?
That’s why you should always check the file name carefully. If a system file is accidentally removed, the PC might crash. If you’re not sure whether a file is a virus, be sure to search its name on Google before deleting it.
Important Safe Mode Advice & Final Thoughts
If your system is completely under the control of a virus and CMD commands aren’t running properly, our biggest piece of advice is to boot your PC into Safe Mode. In Safe Mode, Windows starts up with only the most essential drivers, which prevents the virus from activating in the background. Following the CMD virus removal steps in Safe Mode is a 100% safe and effective method.
Learn to think like a digital detective! Today you learned how to find hidden viruses using CMD without any external software. Unhiding files with the Attrib command, terminating processes with taskkill, and finally deleting the threat. These are all advanced troubleshooting skills that every smart PC user should have. And to keep your data safe, always stay away from unknown USB drives and untrusted websites.
Have you successfully removed the hidden virus from your PC or USB drive using these CMD commands? Which suspicious file did you find in the list, like autorun.inf or some random .exe? If you’re getting “Access Denied” or any other error when running CMD, be sure to comment below and let me know—I’ll help you out completely! 👇
Disclaimer: The CMD commands such as attrib, taskkill, and del, and the virus removal steps mentioned in this guide are for educational and troubleshooting purposes only. Tampering with system files or background processes via Command Prompt can risk Windows crashing or data loss. Please verify any unknown file before deleting it. Apply these steps with extreme caution and at your own risk. We will not be held liable for any system failure, data loss, or technical errors.




