
Friends, do you also have a great high-end PC or a modern laptop, but as soon as you try to install Windows 11 on it, a very annoying error appears on the screen saying, “This PC can’t run Windows 11?” If this is happening to you too, it’s completely normal to get frustrated.
But there’s absolutely no need to panic because your PC is perfectly fine and the hardware is fully capable. This error is mostly caused by a small security feature that is disabled in the background. These days, every new PC builder on the internet is searching for “how to enable TPM 2.0 in BIOS.”
The problem is that different motherboard brands like Asus, MSI, or Gigabyte hide this option in their BIOS menus under strange names. In this deep-dive guide, I’ll show you step-by-step, without any technical confusion, how you can find and enable this setting on your Intel or AMD PC. Let’s get your system 100% ready for Windows 11, without wasting any time.
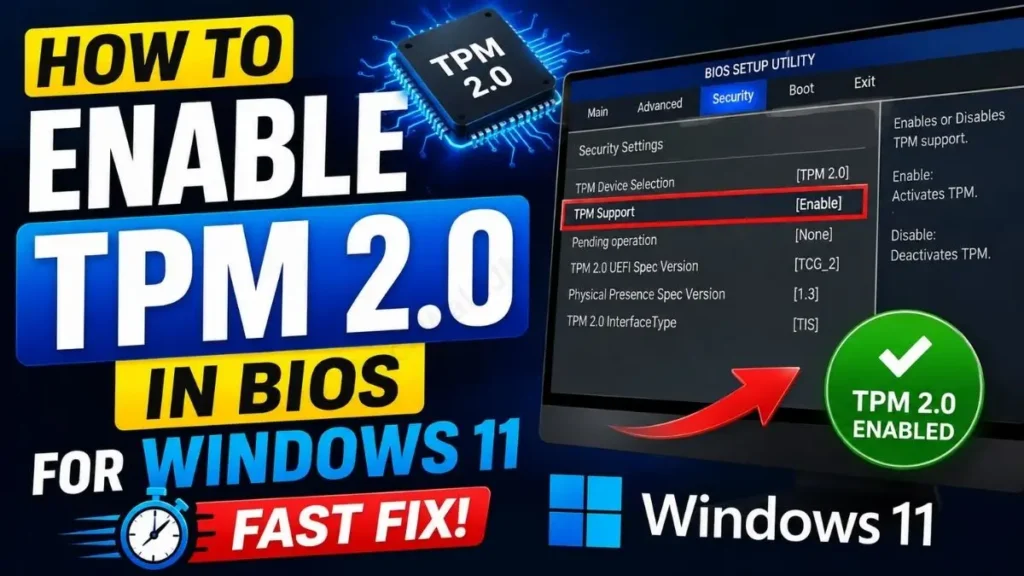
What is TPM 2.0 and Why Does Windows 11 Need It?
As a smart PC user, we should understand a bit of the technical logic before diving straight into the BIOS menus. After all, what is this TPM, and why is Microsoft so insistent on it?
TPM stands for Trusted Platform Module. In simple terms, it’s a security chip on your motherboard or an in-built firmware feature in modern processors. Its main job is to securely store your PC’s most sensitive data, such as passwords, encryption keys, and biometrics (Windows Hello fingerprints).
As Wikipedia’s official article on Trusted Platform Module explains in detail, the TPM creates a cryptographic vault at the hardware level, which prevents hackers or malware from easily stealing your data.
So why is this necessary for Windows 11?
Microsoft has built Windows 11 on a “Zero Trust” security model, given the rise in ransomware and cyberattacks over the past few years. Their clear rule is that the new OS will only run on PCs with a secured hardware foundation. Therefore, until you complete the TPM 2.0 enablement process on your system for Windows 11, the Windows 11 installer will keep rejecting your PC every time.
The good news is that almost all processors made in the last 5-6 years, such as Intel 8th Gen and above, and AMD Ryzen 2000 series and above, already come with this TPM 2.0 feature built-in. You don’t need to buy a separate chip from the market for this; you just have to enable it in the BIOS.
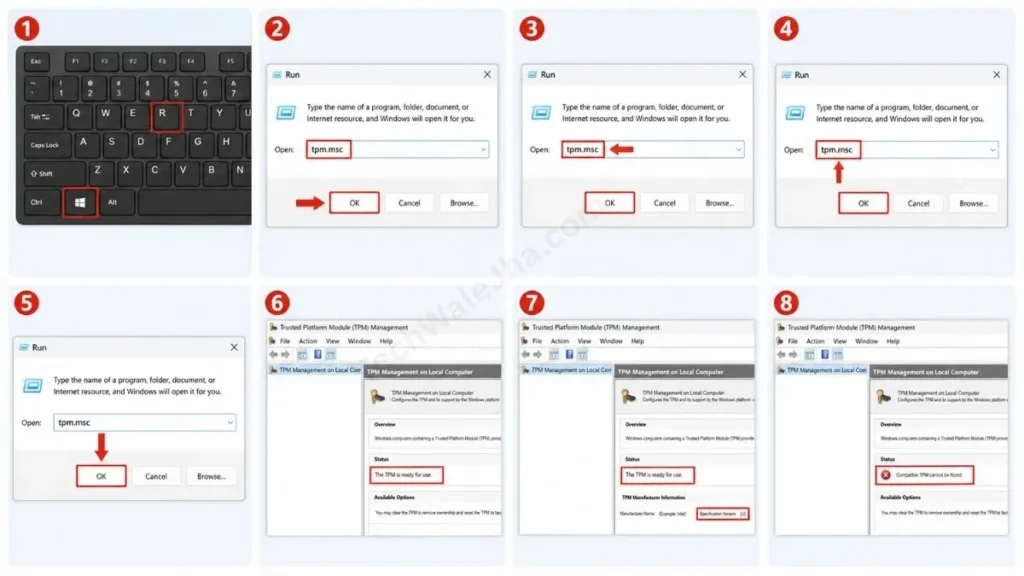
Step 1: Check if TPM 2.0 is Already Enabled (The tpm.msc trick)
Often, when building a PC or buying a new laptop, the TPM is already enabled on the motherboard. So, before you go into the BIOS and start fiddling with things, you should always confirm your TPM status from within Windows. Checking this is very easy, let’s see how to do it:
- Now, press the Windows Key + R together on your keyboard.
- Then, a small Run box will open. Type
tpm.mscexactly and press Enter. - Now, the ‘Trusted Platform Module (TPM) Management’ window will open on your screen.
- In it, check that if the middle box says “The TPM is ready for use” and the bottom right side shows TPM Specification Version 2.0, then congratulations, you don’t need to do anything at all.
- But, if you get an error on the screen that says “Compatible TPM cannot be found,” it means the TPM is disabled in the BIOS. In that case, you will need to follow the steps below.
Step 2: How to Enter the BIOS/UEFI Menu
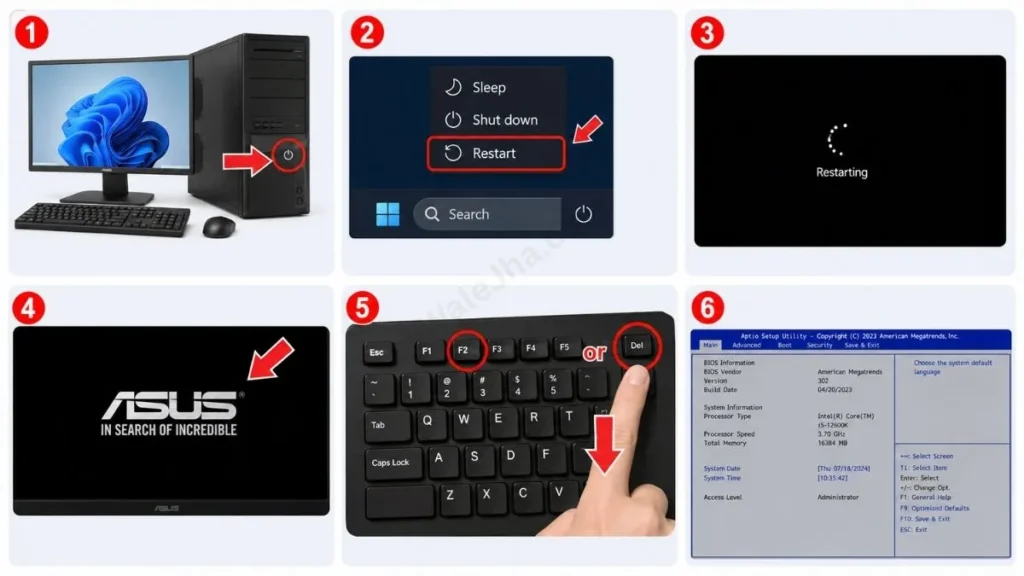
To turn on TPM, we first need to enter the system’s “engine room,” i.e., the BIOS. Modern PCs turn on very quickly, so you’ll have to be fast:
- Now, restart your computer in the normal way. Do not shut it down, just restart it.
- As soon as the screen lights up or the PC’s brand logo appears, such as Asus, MSI, For a Lenovo or any other brand you’re using, start continuously pressing the Delete (Del) or F2 key on your keyboard. Keep tapping it until the BIOS’s blue screen appears. Do not hold the key down; if you do, the PC will restart.
- If you press the key at the right time, instead of Windows loading, a complex, advanced-looking screen will open. This is your BIOS/UEFI menu.
Pro Tip: On custom-built desktop PCs (gaming setups), the ‘Del’ key almost always opens the BIOS. Whereas on most laptops, such as HP, Dell, Asus, and Lenovo, the ‘F2’ key is used.
How to Enable TPM 2.0 in BIOS (Intel vs AMD)
The biggest problem people face when they get into the BIOS is searching for “TPM 2.0” on the screen, but they can’t find it anywhere. In fact, in the world of PC hardware, Intel and AMD have given this same feature different names.
- Intel Processors: On Intel boards, this software-based TPM is called PTT (Platform Trust Technology).
- AMD Processors: On AMD motherboards, it is called fTPM (Firmware TPM).
If you’re tired of searching for “how to enable tpm 2.0 in bios,” just remember that you need to look for PTT or fTPM, not TPM. Let’s look at the exact steps for both processors.
For Intel Processors (Enable PTT)
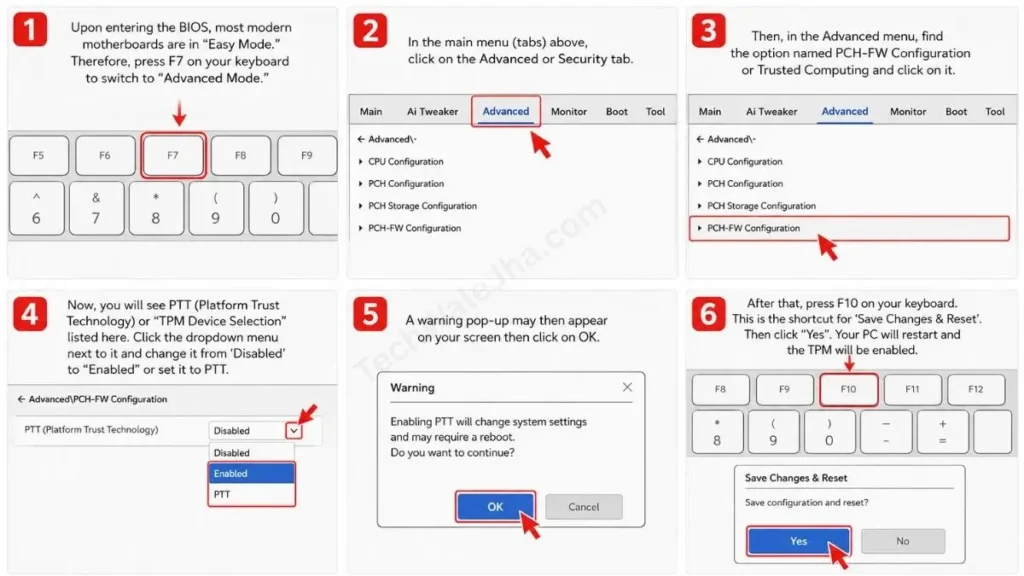
If your PC has an Intel Core i3, i5, i7, or i9 processor, you will need to complete the Intel PTT enable BIOS process using the steps provided below:
- Upon entering the BIOS, most modern motherboards are in “Easy Mode.” Therefore, press
F7on your keyboard to switch to “Advanced Mode.” - In the main menu (tabs) above, click on the Advanced or Security tab.
- Then, in the Advanced menu, find the option named PCH-FW Configuration or Trusted Computing and click on it.
- Now, you will see PTT (Platform Trust Technology) or “TPM Device Selection” listed here. Click the dropdown menu next to it and change it from ‘Disabled’ to “Enabled” or set it to PTT. A warning pop-up may then appear on your screen then click on OK.
- After that, press
F10on your keyboard. This is the shortcut for ‘Save Changes & Reset’. Then click “Yes”. Your PC will restart and the TPM will be enabled.
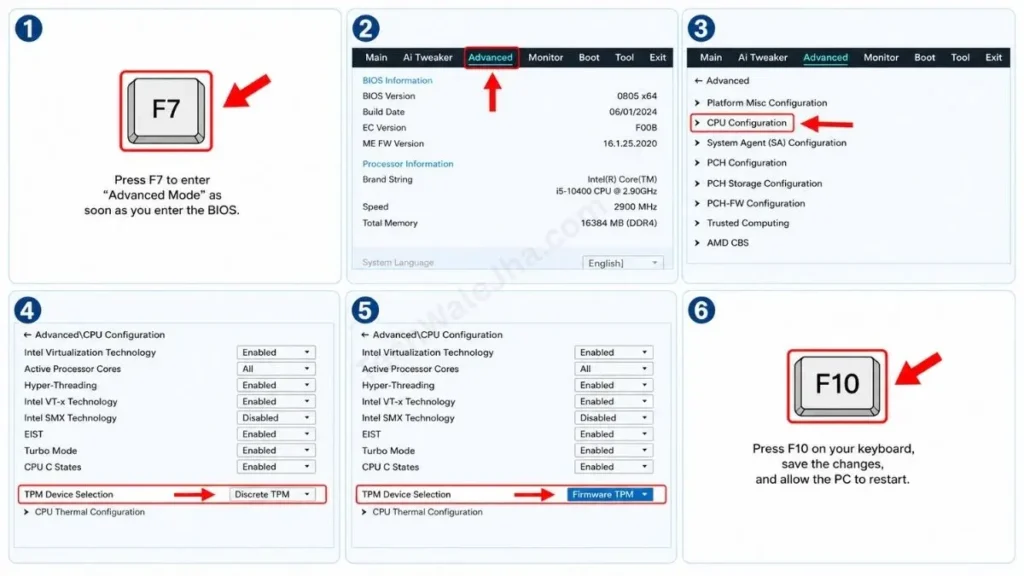
For AMD Processors (Enable fTPM)
If you are using AMD processors like Ryzen or Threadripper, you will need to enable the AMD fTPM settings with these simple steps:
- To do this, press
F7to enter “Advanced Mode” as soon as you enter the BIOS. - Then, select the Advanced tab from the top menu bar.
- Now, scroll down and click on the CPU Configuration or AMD fTPM configuration section.
- After clicking, you will find an option for “TPM Device Selection” or “AMD fTPM switch.” Change it from “Discrete TPM” or ‘Disabled’ to “Firmware TPM” or “Enabled.”
- When the setup is complete, press
F10on your keyboard, save the changes, and allow the PC to restart.
Motherboard-Specific TPM Paths (Asus, MSI, Gigabyte)
Every major motherboard company designs its menus differently. Whether you’re looking for the Asus motherboard TPM 2.0 or stuck in MSI Click BIOS 5 TPM, the quick reference table below will show you the exact menu path where this setting is hidden.
(Note: After entering the BIOS, always press F7 first to open ‘Advanced Mode’.)
| Motherboard Brand | For Intel Processors (Enable PTT) | For AMD Processors (Enable fTPM) |
|---|---|---|
| ASUS | Go to Advanced, then to PCH-FW Configuration, then to PTT. | Go to Advanced, then to AMD fTPM configuration, then to TPM Device Selection. |
| MSI | Go to Security, then to Trusted Computing, then to Security Device Support. | Go to Settings, then Security, then Trusted Computing, then the AMD fTPM switch. |
| Gigabyte / AORUS | Go to Settings, then to Miscellaneous, then to Intel Platform Trust Technology (PTT). | Go to Settings, then to Miscellaneous, then to AMD CPU fTPM. |
Pro Tip: If you’re looking for the Gigabyte BIOS F-TPM and it’s not in the “Miscellaneous” tab, be sure to check the “Peripherals” tab, because on older models it’s located there.
Frequently Asked Questions
Can I install Windows 11 without enabling TPM?
Officially, no, but according to Microsoft’s official Windows 11 specifications guide, TPM 2.0 is a strict requirement. However, you can bypass this requirement by using a third-party tool like ‘Rufus’, but if you do so, Microsoft may completely block security updates for your PC in the future.
Is AMD fTPM the exact same thing as TPM 2.0?
Yes, absolutely! fTPM (Firmware TPM) is AMD’s own method of implementing the TPM 2.0 standard. It doesn’t involve a physical chip, but rather secure code within the processor that performs all the functions of TPM 2.0, and Windows 11 fully recognizes it as valid.
What should I do if both Secure Boot and TPM 2.0 are enabled but Windows 11 still says unsupported?
This is a very common glitch. If you have followed the process to enable TPM 2.0 in BIOS correctly, and Secure Boot is also on, but you’re still getting this error, then be sure to run tpm.msc in Windows to check. If everything is fine there, uninstall and reinstall your PC Health Check app, or directly upgrade using the official Windows 11 Installation Assistant.
Conclusion: You Are Now Ready for Windows 11!
Friends, I truly hope that by following this article step-by-step, you’ve enable TPM 2.0 in BIOS all by yourself without paying a mechanic or technician. Now your system is fully ready to take advantage of next-generation Windows 11 gaming and productivity features.
Stay tuned for more in-depth, practical troubleshooting guides like this on hardware and software. If you come across a setting in the BIOS that you don’t understand, it’s better to type your motherboard model in the comments section than to make a mistake by clicking on it. We’ll tell you its exact path.
Disclaimer: This guide is for educational and informational purposes only. Changing settings in the BIOS/UEFI menu is an advanced process. Please only modify the options mentioned, such as TPM, PTT, or fTPM. Tampering with any other setting without proper knowledge can cause your PC to enter a boot loop or corrupt your Windows installation. TechWaleJha or its author will not be held responsible for any system errors, hardware damage, or data loss. Please apply these steps at your own risk and discretion.




