
Hello friends, I’m your very own TechWaleJha! Have you ever had your PC suddenly show the Blue Screen of Death (BSOD), restart on its own, or display a “DLL File Missing” error as soon as you open a program? Has this ever happened to you or are you experiencing it right now? If so, there’s absolutely no need to worry. This often happens when some important Windows system files get corrupted. This corruption can be caused by a sudden power outage, malware or virus infection, or a failed or interrupted Windows Update. The problems may look a bit scary, but the good news is that fixing them isn’t as difficult as they seem.
Often, people get so panicked in such situations that they format (reset) their PC, which deletes all their important data. But in such a situation, formatting your PC should be a last resort. The root cause of all these errors is the corruption of system files. When Windows’ core files get damaged, the OS can’t boot properly, and the system ends up crashing.
To fix this problem without any data loss, we will use a powerful Windows auto repair tool script, which is specifically designed to fix BSOD and DLL errors. This script replaces all the corrupt files in the background using command prompt.
Also Check This Tool: One Click Windows Telemetry Disable Script (Boost Speed 2026)
How Does the 1-Click Windows Auto Repair Script Work?
If you’re wondering how a small file can fix such major system errors, it’s very important to understand the technology behind it. Because a good tech-user always knows what changes are happening on their PC.
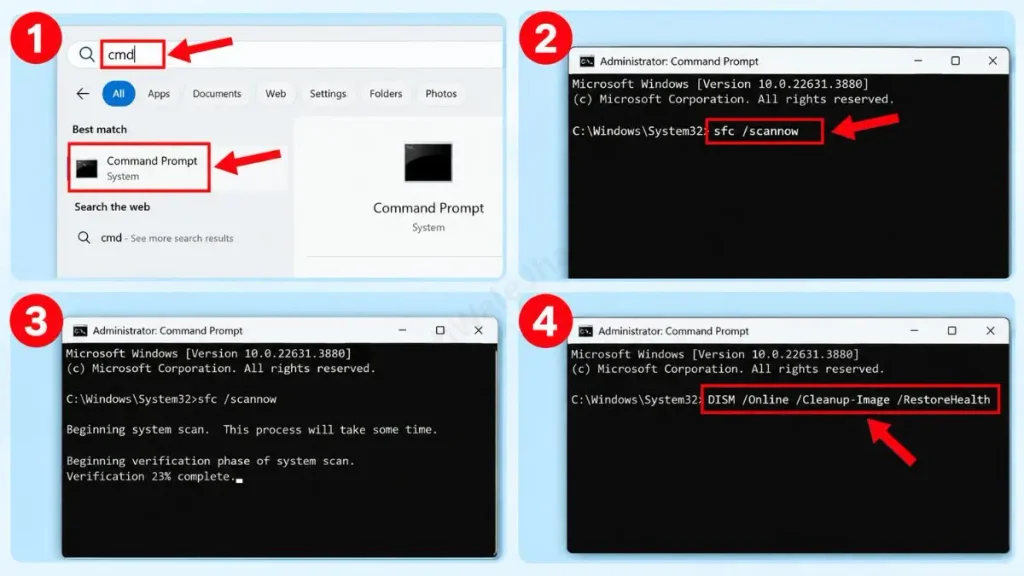
Our 1-click windows auto repair tool basically combines Windows’ built-in diagnostic tools into a single command. This is called an SFC and DISM batch file. Instead of manually typing long commands in CMD, this script executes everything automatically. If you want to read the official technical documentation for these commands, be sure to read Microsoft’s official DISM guide.
Let’s see how this script fixes corrupt files in the background:
How the Auto-Repair Process Works
| Tool Name inside Script | Technical Function | How it Helps Your PC? |
|---|---|---|
| SFC (System File Checker) | sfc /scannow | It searches the local Windows cache memory for missing or corrupt system files and restores them. |
| DISM (Deployment Image Servicing) | DISM /Online /Cleanup-Image /RestoreHealth | If the local cache is also corrupted, this tool automatically repairs the PC by downloading fresh files directly from Microsoft’s servers. |
When you combine these two tools to run the process of repairing corrupt Windows system files, there’s a 99% chance your system will start working like new, and that too without any third-party repair software.
Also Check This Tool: One Click Network Fixer Script: Fix WiFi No Internet Fast
Create the Auto-Repair Tool Manually (BAT Script Code)
Friends, as I always say, if you’re a PC user, it’s very important to have technical knowledge. Tech experts always prefer transparency. So, if you want to create your own system file checker script, you can easily do so using Notepad. This way, you’ll know exactly what’s executing on your PC, and there won’t be any security issues.
To create your own custom auto-repair tool, follow these simple steps:
- Now, press the Windows Key on your PC, search for Notepad, and open it.
- Copy the code provided below and paste it into Notepad:
@echo off
color 0B
title Windows Auto Repair Tool by @TechWaleJha
echo =======================================================
echo Starting Windows Auto-Repair Process... Please Wait.
echo =======================================================
echo.
echo [Step 1 of 2] Running System File Checker (SFC)...
sfc /scannow
echo.
echo [Step 2 of 2] Running Deployment Image Servicing (DISM)...
DISM /Online /Cleanup-Image /RestoreHealth
echo.
echo =======================================================
echo Auto-Repair Complete! Please RESTART your PC.
echo =======================================================
pause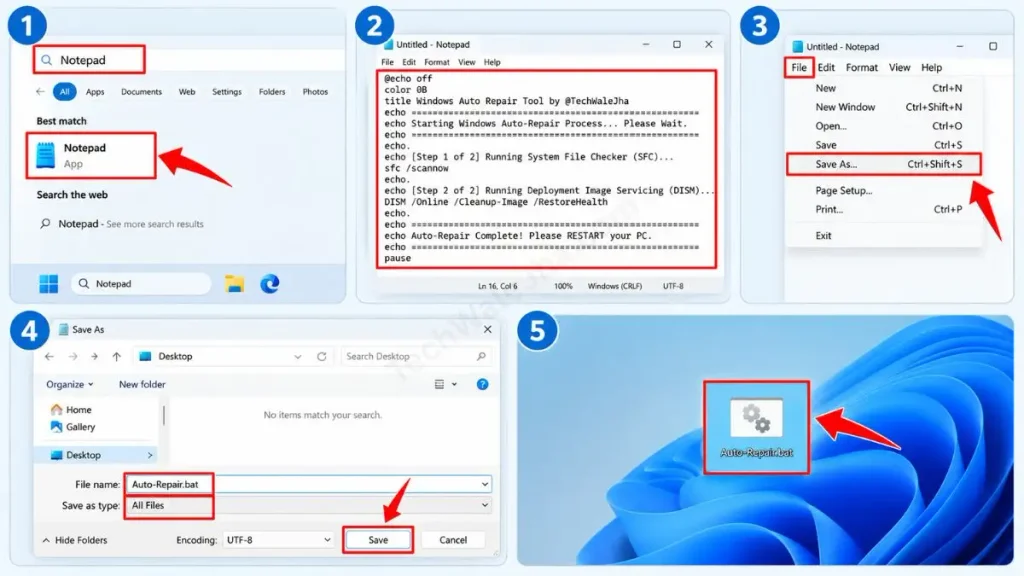
- After pasting the code into Notepad, click the File menu in the top left and select the “Save As” option from the list.
- A window will then pop up. Set the “Save as type” option to “All Files,” name the file Auto-Repair.bat (or any name you prefer), and save it to your Desktop.
Line-by-Line Code Breakdown (How does it work?)
So that you have no doubt about the originality and safety of this script, let’s understand this code:
- sfc /scannow: This command scans every critical system file of the OS and if any file is found to be corrupt, it automatically replaces it with a new one from the local Windows cache.
- DISM /Online … /RestoreHealth: This is the most advanced Windows command. Our script automatically runs the DISM command. If the local cache itself is corrupted, causing SFC to fail, it downloads the original, fresh files from Microsoft servers over the internet and automatically fixes the system.
Also Check This Tool: 1-Click PC Speedup Script: Clean Temp & Cache Files Fast
Download the 1-Click Windows Auto Repair Script (ZIP)
If you don’t want to get into the technical hassle of coding and Notepad and want an error-free, ready-to-use tool, then don’t worry. I have already created a safe and tested file for you. You can directly download this ZIP file I created from the link provided below.
This Windows 11 auto repair download also works perfectly on older versions like Windows 10.
Why did I put this tool in a ZIP file?
This is a very common technical problem. Whenever you download a .bat (Batch) file directly from the internet, browsers like Google Chrome or Microsoft Edge flag it as a “suspicious” or “harmful file,” give a false alarm, and block it, causing the download to fail. That's why I've securely packed this file inside a ZIP folder so the browser won't block it. This auto repair bat file is safe, 100% virus-free, and has been personally and extensively tested by me, so you can download it without any worries.
Also Check This Tool: Best Free Windows 11 Debloat Script Batch File
How to Use the Script Correctly (Important Steps)
Friends, since this script directly modifies and fixes Windows' core system files, its execution must be perfect. If you skip even a single step, the process will fail midway. Therefore, follow these instructions very carefully:
- Step 1: Place the downloaded Auto-Repair-Tool-TechWaleJha.zip file on your Desktop, right-click on it, and select ‘Extract Here’ or ‘Extract All’ to extract it.
- Step 2: After the folder is extracted, right-click on the Auto-Repair.bat file inside and be sure to select “Run as Administrator.” This is the most important step, otherwise the script will not be able to access the file system properly.
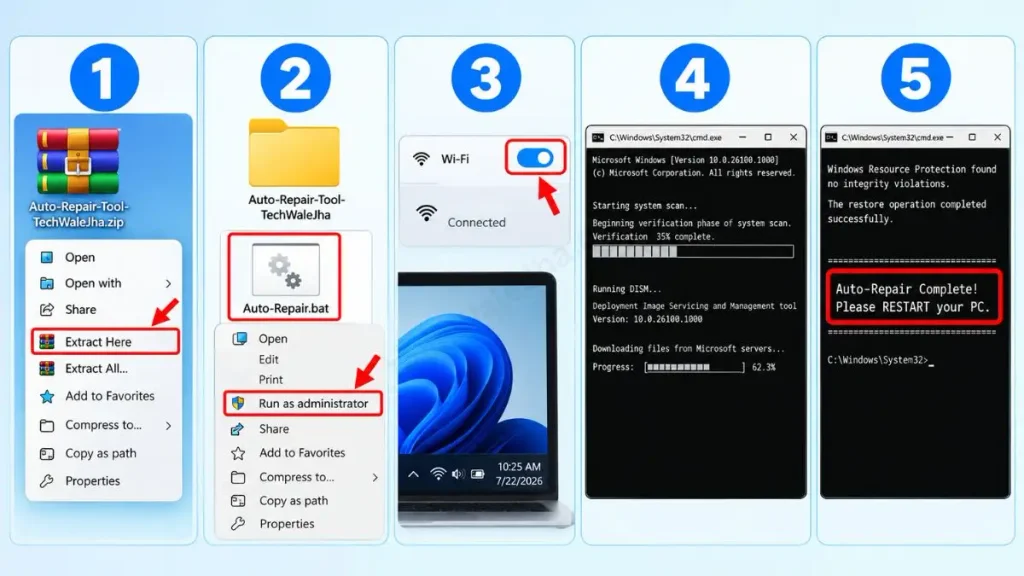
- Step 3: Keep your internet connection ON. As I mentioned before, the DISM tool needs to download fresh, uncorrupted files from Microsoft's servers, which requires an active internet connection.
- Step 4: A black Command Prompt window will open on the screen. This process can take 10 to 20 minutes. It will show its progress in percentage (%). Please do not close this black window by mistake, otherwise the system may crash.
- Step 5: When both scans (SFC and DISM) are complete and you see “Auto-Repair Complete! Please RESTART your PC.” on the screen, close the window and restart your PC.
Frequently Asked Questions (FAQs)
Will this tool delete my personal files, photos, or games?
No, absolutely not! This tool only checks and repairs the Windows OS files, i.e., the system files, on the C: Drive. Your personal data, photos, games, and installed software will be 100% safe. It doesn't touch them at all.
Why does the script close automatically as soon as I open it?
This happens when you open the file by double-clicking it normally. The tool requires admin permissions to modify system files. To fix this, right-click the file and always select “Run as Administrator.”
Does this script require an active internet connection?
Yes. Although the SFC scan can work offline, the DISM scan needs to download new files directly from Microsoft's servers to replace corrupt files. Therefore, a stable internet connection is very important.
How long does the repair process take?
This completely depends on the speed of your hard drive (HDD or SSD) and your internet connection. On a typical PC, it can take 10 to 20 minutes. Do not close the black screen thinking the process has stopped.
Conclusion & Social Proof
So friends, this was the safest and fastest way to fix the corrupt files on your Windows PC. Now you will get permanent relief from the recurring “Blue Screen of Death” and the problem of the PC restarting suddenly, and that too without losing any of your data.
Did this 1-click Windows auto repair tool fix your error? Be sure to share your experience in the comments. If you're facing a specific error, feel free to ask in the comments, and I'll be sure to help you.
For more advanced PC troubleshooting scripts, hidden tech tricks, and daily hacks, be sure to follow my social handles @TechWaleJha on YouTube Shorts, Instagram, and Facebook Reels. Until we meet again with a solution to a new problem, take care and bye-bye.
Disclaimer: Friends, I have personally tested all the Batch (.bat) scripts provided in this article, and they are completely safe. However, since everyone's PC configuration is different, please use them at your own risk. Before running any system-level script, be sure to back up your important data. TechWaleJha, its author, or this website will not be held responsible for any unexpected data loss, system errors, or PC crashes. Please run the script exactly as per the steps provided and avoid making any unintended changes to the code.




