Friends, every day we open our laptops, do our routine tasks, and then shut down our PCs. But did you know that Microsoft has hidden secret superpowers in this operating system that can do hours’ worth of work in just a few minutes? Probably not, right? Because almost 90% of regular users don’t even know about these 7 hidden Windows 11 Features!
Often, we start downloading various third-party software to make our PC more productive and faster, which makes the system very heavy. But the truth is, you don’t need them at all. Because Windows 11 already has built-in tools that can easily take your multitasking and daily workflow to the next level.
So in today’s article, I, your tech-buddy TechWaleJha, am going to tell you about 7 such mind-blowing Windows 11 tricks that will completely change your PC experience. And you can do this without any extra software or coding—just by turning on these simple settings, you can convert your regular PC into a “Smart PC.” So, without further delay, let’s explore these secret features one by one and learn about them in detail!
1. Windows 11 Clipboard History – Paste Previously Copied Text
Has it ever happened to you that you copied an important text and then accidentally hit the copy button again, causing the old text to disappear forever? This is because by default, Windows only saves the last item you copied, which you can paste at that moment. But Windows 11 Clipboard History is the only permanent solution to this problem.
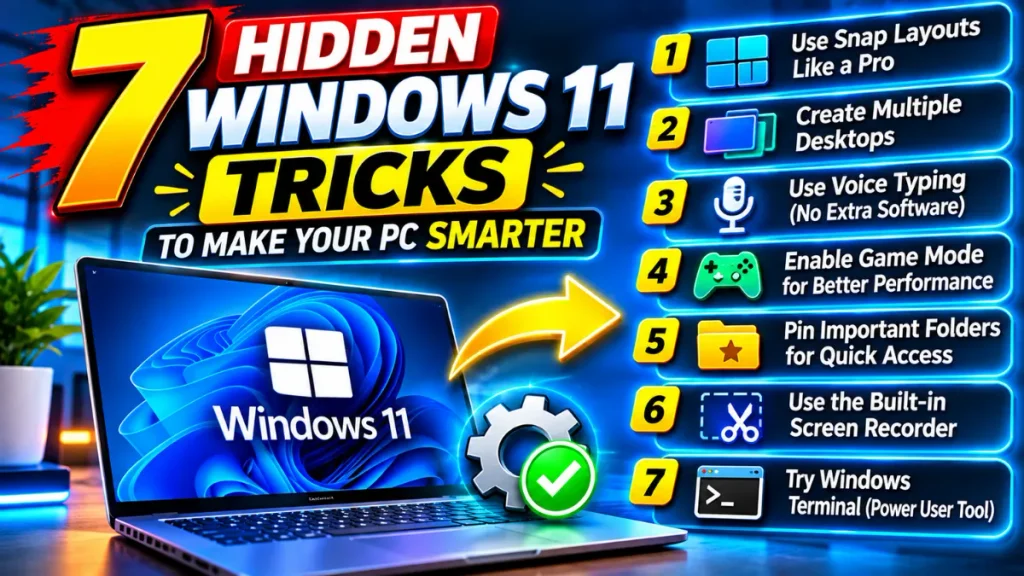
If you use this feature, everything you copy throughout the day, whether it’s text or images, is saved in one place in your Clipboard History. Then, whenever you want to paste an old text, just press the Windows + V shortcut key on your keyboard, and a small history window will open where you can select your previously copied data and easily paste it.
How to Enable and Use Clipboard History:
If you have never used this feature before, it will be off the first time you press Win + V. To turn it on, follow the steps below:
- Step 1: Press Windows + V on your keyboard.
- Step 2: A small pop-up will appear on the screen with a “Turn On” button. Click on it. If you want, you can also turn it on by going to Settings, then System, and then Clipboard.
- Step 3: Now copy multiple lines or paragraphs.
- Step 4: Where you want to paste, press Win + V and select your item from the list to paste it.
Pro Tip (The “Pin” Feature): The biggest advantage of this tool is its ‘Pin’ feature. If you frequently use any text—like your address, bank account details, or an email address—you can click the “Pin” icon that appears next to that text in the clipboard history. The pinned data won’t be deleted even after restarting your PC!
2. Emoji and Symbol Keyboard – Use Emojis Without Opening a Website
These days, social media posts, emails, or YouTube comments look really boring without emojis. On mobile, the emoji keyboard is right there, but when it comes to PC, most people search for “smile emoji” on Google, copy and paste them, and it’s a very time-consuming process. Sometimes they can’t even get around to commenting because of it. You should know that your PC already has its own hidden Windows Emoji Keyboard Shortcut, but you don’t even know how to use it.
This feature isn’t just limited to emojis; you also get trending GIFs and Kaomoji (like ¯(ツ)/¯).
How to Access the Emoji and Symbol Panel:
To add instant expressions to your documents or chats, follow these steps:
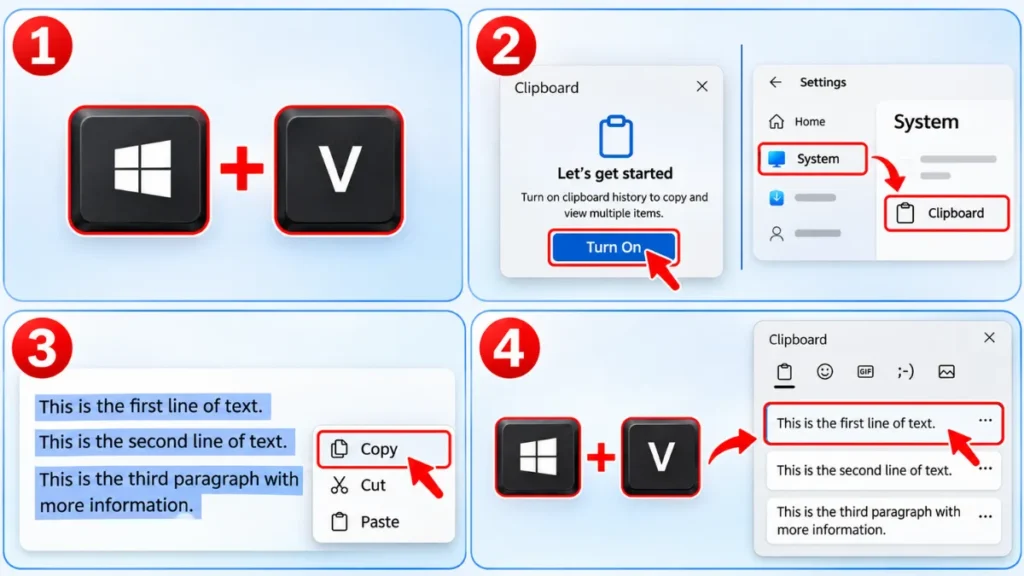
- Step 1: Wherever you are typing something, like in Notepad, Word, or Chrome, place your cursor there.
- Step 2: Then press Windows + . (Period / Dot) together on your keyboard.
- Step 3: A stylish Emoji Panel will open on your screen. From here, you can also search directly by typing anything you want, such as “laugh,” “fire,” or something else.
- Step 4 (For Symbols): Click on ‘Symbols’ (Ω) in the tabs above. From here, you can also directly insert currency symbols like the Rupee ₹, Euro €, or Copyright © and advanced math symbols into your document without any complicated Alt-codes.
This little trick makes your social media management and daily typing much faster and more professional.
3. Virtual Desktops – Create Multiple Desktops on a Single PC
If you’re a heavy multitasker like me, you probably always have 10-15 Chrome tabs, Word files, and folders open on your screen. Having so many apps on one screen can be very confusing, and you find yourself wishing you had a second monitor! But without spending any money, you can also create multiple virtual monitors (desktops) on your single PC by using Windows 11 Virtual Desktop.
Virtual desktops give you the freedom to keep your personal and professional work completely separate.
How to Create and Manage Virtual Desktops:
Use the shortcuts below to clean and organize your cluttered workspace:
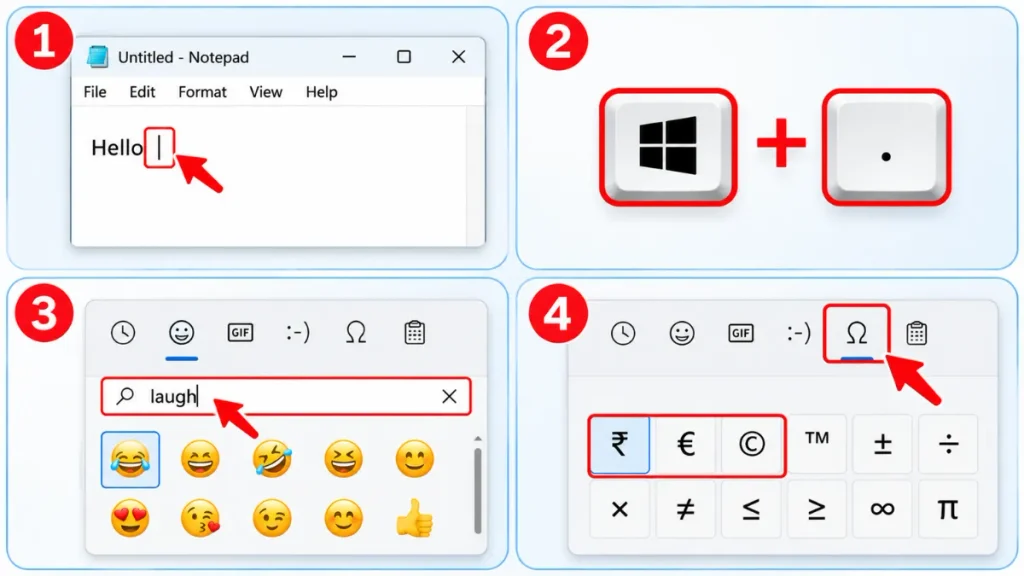
- Step 1: Press Windows + Tab on your keyboard. This will open your Task View, where all your open windows will be displayed at once.
- Step 2: At the bottom of the screen, you will see a “New Desktop” or a + (Plus) icon. Click on it. Alternatively, you can also create a new desktop directly using the shortcut Windows + Ctrl + D.
- Step 3: Now you have Desktop 1 and Desktop 2. You can do your office work on Desktop 1 and listen to music or casually browse on Desktop 2, or do your personal tasks. This way, your stuff won’t get mixed up!
- Step 4 (Ninja Shortcut): To switch between desktops quickly, use the Windows + Ctrl + Left/Right Arrow keys. It’s so fast that no one will even realize what you have open in the background.
If you want to learn the advanced uses of this feature, you can also visit Microsoft’s official Virtual Desktop guide. Once you start using this trick, going back to a single desktop will be impossible for you!
4. Windows God Mode – Access All Important Settings in One Place
Generally, if you need to change a setting on your PC, like power options, network sharing, or any user accounts, you have to navigate through a lot of menus in the Control Panel and the Settings app, and Microsoft knows how annoying this can be for many users. That’s why they’ve built a hidden feature into Windows that tech enthusiasts call “God Mode.”
But keep in mind, “God Mode” isn’t a secret operating system or some kind of magic software. It’s actually a single master folder that contains all of Windows’ important settings (over 200 of them) organized alphabetically. It’s nothing short of a treasure trove for a techie or a PC admin!
How to Enable God Mode in Windows 11:
The process to unlock this master control panel might seem a bit technical, but it’s actually very simple. Carefully follow the steps given below:
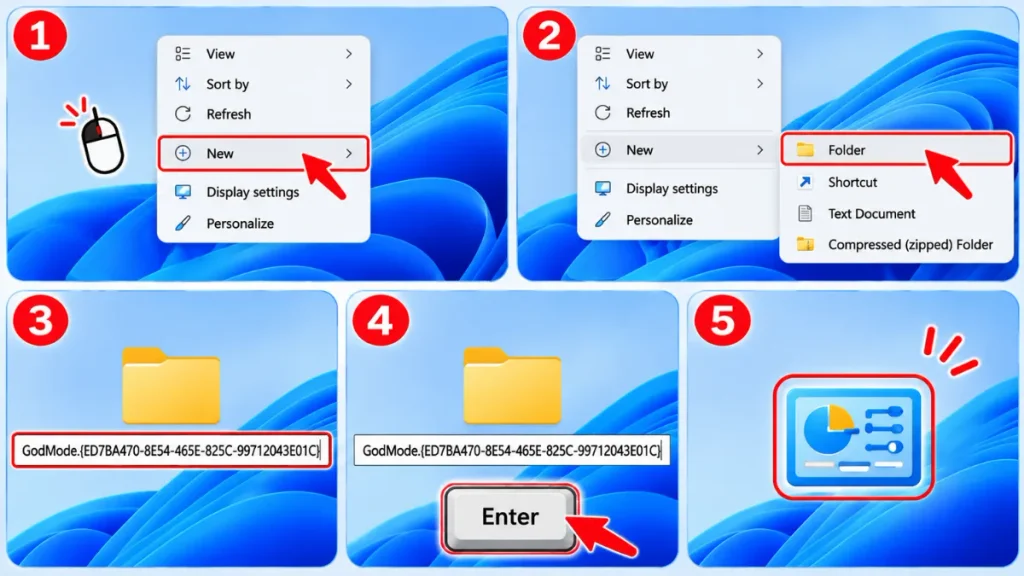
- Step 1: Now, right-click on any empty space on your Desktop.
- Step 2: Create a new folder by selecting New > Folder.
- Step 3: Now, to rename this new folder, right-click on it or press F2, and copy and paste the code below exactly as it is provided:
- GodMode.{ED7BA470-8E54-465E-825C-99712043E01C}
- Step 4: After pasting the code, press Enter on your keyboard.
- Step 5: After this, you will see that the folder’s name will disappear and its icon will change to look like the Control Panel.
Double-click on this folder. Now, every single setting in Windows will be listed in one place. This is the biggest gem of Windows 11’s secret features, and it can save you hours of troubleshooting your PC.
5. Aero Shake – Shake one window to minimize the other windows
When you’re multitasking, sometimes you find yourself with many windows open on your screen, and you suddenly need to focus on one specific one. In that case, minimizing all the other windows one by one can be very tedious. This is where the Windows 11 Aero Shake feature comes in!
Aero Shake is a feature where you click and hold the mouse on the window you want to focus on and quickly “shake” it on the screen. As soon as you do this, all the other open windows will instantly minimize at once!
How to Enable Aero Shake in Windows 11:
This feature was on by default in Windows 7, but in Windows 11, Microsoft has hidden it by default. To re-enable it, carefully follow the steps given below:
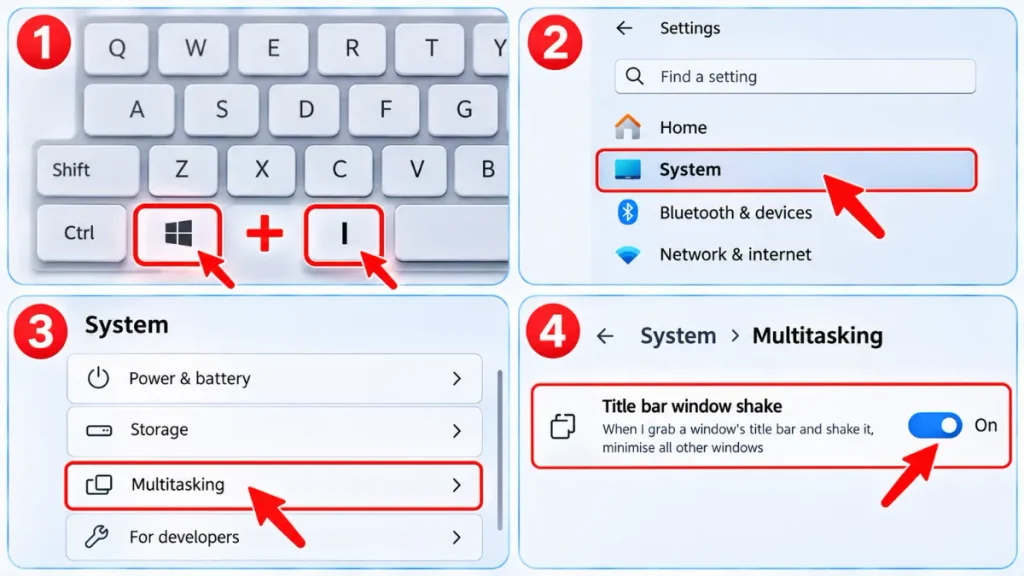
- Step 1: Press Windows + I on your keyboard to open Settings.
- Step 2: In the left menu, click on System.
- Step 3: Scroll down a bit and click on the Multitasking option.
- Step 4: Here you will see an option named “Title bar window shake.” Turn on the toggle switch next to it.
Now try it out! Left-click and hold on the title bar of any window, like Notepad, and quickly move your mouse back and forth. All the background windows will minimize. To bring them back, just shake it again. It’s a fun and productive trick!
6. Show File Extensions – Identify the actual format of files
Friends, when you download a file from the internet, do you always know what kind of file it actually is? By default, Windows 11 hides file extensions like .jpg for photos, .mp4 for videos, or .exe for software. Microsoft does this so that new users don’t accidentally change the extension when renaming files, which could corrupt the file.
But this has a major downside. Hackers often name malware something like Important_Document.pdf.exe. Because the last .exe, which is the actual extension, is hidden, you think it’s a normal .pdf file, and you double-click it, infecting your PC! Therefore, showing extensions is a sign of a smart and safe PC user.
How to Enable File Name Extensions:
To see the actual format of your files, be sure to follow the simple steps given below:
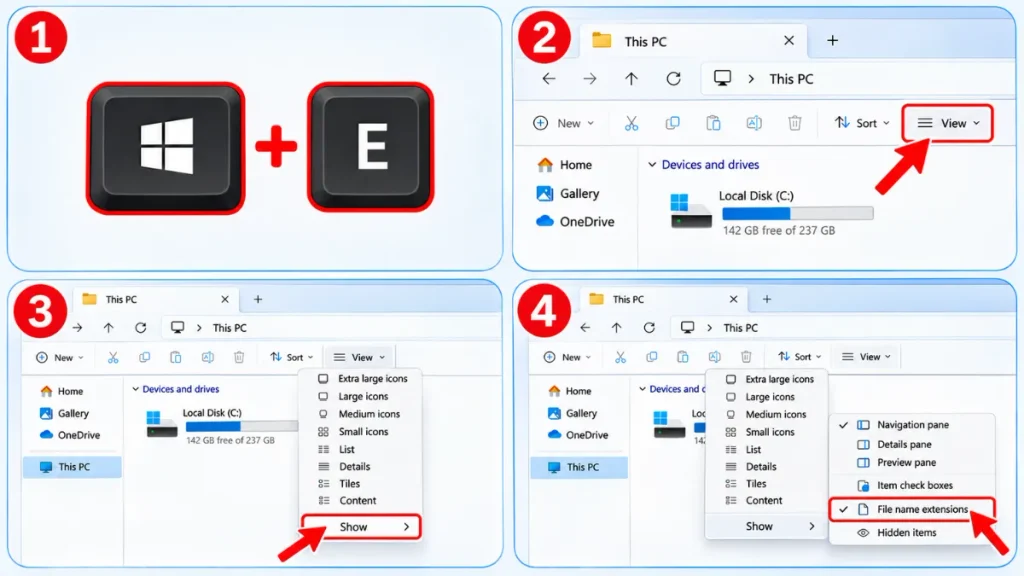
- Step 1: Now open File Explorer by pressing Windows + E on your keyboard.
- Step 2: In the top menu bar, click the View button.
- Step 3: In the drop-down menu, move your mouse to the Show option at the very bottom.
- Step 4: A new side menu will open. There, click on File name extensions and place a checkmark (✓) next to it.
Now the original format of each of your files will be displayed in front of it. Note: Keep in mind that just renaming a video from .mp4 to .mp3 won’t make it audio; to actually convert the file, you need to use proper converter software. Renaming the file extension can cause the PC to choose the wrong app to open the file.
Do you still find yourself searching for a data cable to transfer photos from your phone to your PC? Or do you send the files to yourself via WhatsApp and download them on your PC, only to find their quality is severely degraded? In the Apple ecosystem, “AirDrop” is very famous for file transfers. Similarly, for Android and Windows users, Google has created Quick Share, which was previously known as Nearby Share.
Note: Windows 11 has its own built-in “Nearby Sharing” option, but it mostly works well only between Windows PCs. If you need to instantly send files between your Android smartphone and laptop, Google’s Quick Share is the best and fastest option.
To create a wireless bridge between your phone and PC, carefully follow and implement the steps given below:
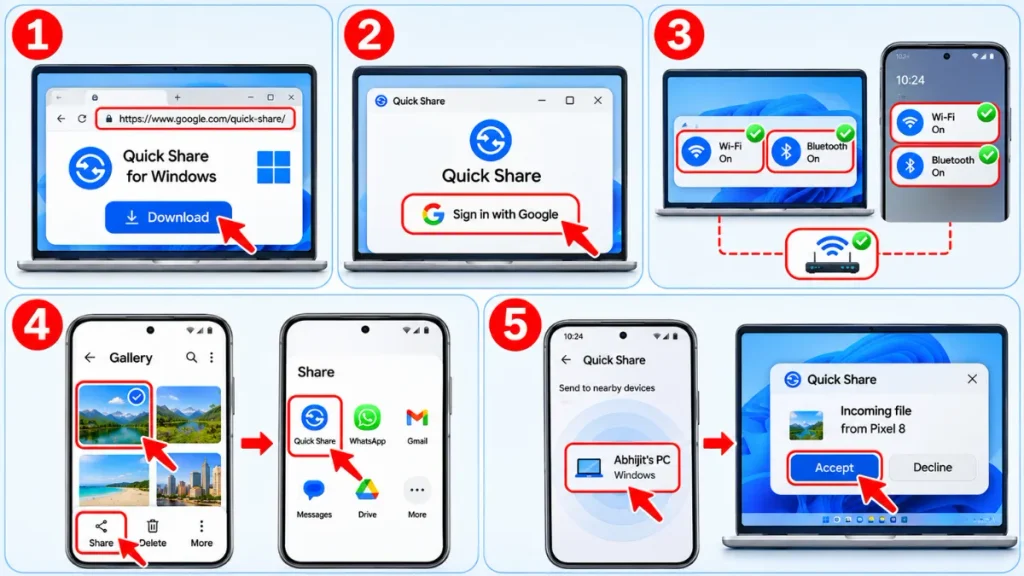
- Step 1: Download and install the Quick Share for Windows software from Google’s official website on your Windows 11 PC.
- Step 2: Open the app and sign in with the same Google Account that’s on your Android phone.
- Step 3: Make sure that Wi-Fi and Bluetooth are ON on both your PC and phone. Also, both devices must be connected to the same Wi-Fi network for this to work.
- Step 4: Go to your Android phone’s Gallery or File Manager, select a photo or video, and tap ‘Share’ to select the Quick Share option.
- Step 5: Your PC’s name will appear on the radar. Tap on it, and click the “Accept” notification that appears on your PC. That’s it, your file will now transfer wirelessly.
If you’re having trouble connecting, check that your Device Visibility in the PC app’s settings isn’t set to “Hidden.” Try setting it to “Your Devices” or “Everyone” and trying again.
Bonus Section – Windows 11 Keyboard Shortcuts You Should Know
Friends, beyond these 7 advanced tricks, a smart PC user is truly defined by their navigation speed. Instead of repeatedly using the mouse, memorize these 8 daily-use shortcuts. These little shortcuts will completely transform your daily workflow:
| Shortcuts | Functions |
|---|---|
| Win + V | Open Clipboard History (Multiple Copied Items) |
| Win + . | Open Emoji, GIF, and Symbol Keyboard |
| Win + Tab | Open Task View (To manage Virtual Desktops) |
| Win + Ctrl + D | Create a New Virtual Desktop Instantly |
| Win + Ctrl + Left/Right | Switch between active Virtual Desktops |
| Win + E | Open File Explorer |
| Win + Shift + S | Open Snipping Tool (To Take Custom Screenshots) |
| Win + A | Open Quick Settings (Wi-Fi, Bluetooth, Volume) |
Frequently Asked Questions (FAQs)
If you have any doubts about these settings, I’ve provided the exact answers to the most common questions below, so you can check those. If you have any other questions, you can ask me in the comments.
The best hidden features of Windows 11 include Clipboard History, God Mode, Virtual Desktops, and Aero Shake. These tools double your productivity and multitasking speed without any extra software.
How do I enable Clipboard History in Windows 11?
To enable it, press Windows + V on your keyboard while typing anywhere and click ‘Turn On’ in the pop-up menu that appears on the screen.
How can I enable God Mode in Windows 11?
Right-click on your Desktop and create a new folder. Name the folder exactly GodMode.{ED7BA470-8E54-465E-825C-99712043E01C} and press Enter. God Mode will activate as soon as the icon changes.
Does Windows 11 have a built-in emoji keyboard?
Yes! You can open the built-in Emoji, Kaomoji, and special Symbol keyboard in any text field (Word, Chrome, or WhatsApp Web) by pressing Windows + . (period).
How do I create multiple desktops in Windows 11?
Press Windows + Tab on your keyboard and click the ‘+’ (New Desktop) icon at the very bottom of the screen. You can also use the direct shortcut Win + Ctrl + D.
What is Aero Shake in Windows 11?
Aero Shake is a great focus feature. If you click and hold the title bar of an active window and quickly shake the mouse, all other windows in the background will minimize at once.
How can I show file extensions in Windows 11?
Open File Explorer (Win + E), click on View in the top menu bar, go to Show in the dropdown, and check (tick) File name extensions.
Can I transfer files from Android to Windows 11 without a USB?
Yes, absolutely! You can install Google’s Quick Share for Windows on your PC to wirelessly transfer files at high speed between an Android phone and a laptop over Wi-Fi and Bluetooth.
Conclusion – Make Your Windows 11 PC Smarter!
So friends, these were the top 7 hidden Windows 11 tricks that can turn a basic laptop into a “Super-Smart PC.” Whether it’s the administrative power of God Mode, the clean setup of Virtual Desktops, or the daily use of Quick Share’s wireless magic features, you can become a true Tech-Expert among your friends and colleagues!
Which of these 7 tricks did you find the most surprising and useful? Be sure to let me know your answer in the comments section below, because I really enjoy reading your comments!
If you want to learn more time-saving PC tips, secret Windows hacks, and premium tech tutorials for free, be sure to follow and subscribe to your tech-friend @TechWaleJha on YouTube, Instagram, and Facebook. Until we meet again with the next tech hack, Happy Computing!