
Friends, does your laptop screen shine so brightly at night that it hurts your eyes or even causes pain? Or does it look so dim in the daylight when you’re outside that you can’t make out anything on it? Does this happen to you as well? To be honest, Windows 11 is a very modern and beautiful operating system, but its new design often makes it very confusing to find basic settings.
If you’re also bothered by this small but very important problem and have been constantly searching the internet for “how to change brightness in Windows 11,” then there’s absolutely no need for you to worry anymore. Because your very own tech guide, In this post from TechWaleJha, I’m going to show you not one, but four different easy methods to solve this problem for good. Whether you’re using a new, modern laptop or a large desktop PC, after reading this article, you’ll be able to control your screen’s brightness at your fingertips.
So let’s find a solution to this problem without any further delay.
Why Adjusting Screen Brightness is Important?
Before getting straight to the methods, as a smart PC user, let’s talk in detail about its health and technical benefits. After all, why should you make it a habit to adjust your screen brightness in Windows 11?
- Protect Your Eyes from Strain: When you work in a dark or low-light room at full 100% brightness, it has a very negative impact on your eyes. In tech terms, this is called ‘Digital Eye Strain,’ which can also lead to headaches and eye inflammation.
- Massive Battery Savings: If you’re a laptop user, you should know that your screen is the biggest drain on your laptop’s battery. Keeping your brightness slider around 50% or 60% can easily extend your laptop’s battery life by 1 to 2 hours.
- Better Sleep Cycle (Circadian Rhythm): The bright light from a laptop at night, especially the blue light, signals to your brain that it’s still daytime. This can disrupt your sleep. Therefore, adjusting the brightness correctly allows you to work comfortably and get a good night’s sleep.
Therefore, adjusting your screen’s brightness according to your environment (surrounding light) is a very good tech habit.
Also Read: How to Change File Type in Windows 11 (Fast Fix)
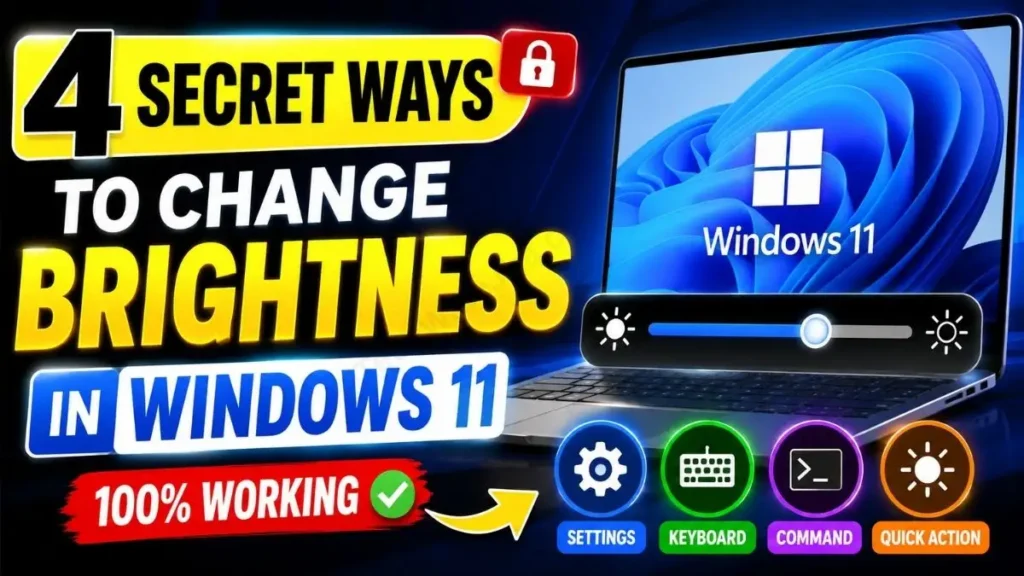
How to Change Brightness in Windows 11 (in Just 3 Seconds!)
Alright friends, let’s get straight to the methods that let you adjust your screen’s brightness up or down in just a few seconds. If you’re searching directly for “how to change brightness in Windows 11” without following any lengthy process, then this first method is going to be your favorite.
Method 1: Using the Quick Settings Panel (Fastest Way)
Windows 11 has made its User Interface (UI) much cleaner and smarter than before. Now you don’t need to get stuck in the Control Panel or long menus. With the new “Quick Settings” panel what people used to call the Action Center you can adjust brightness with a single click. Follow the steps below exactly as they are provided:
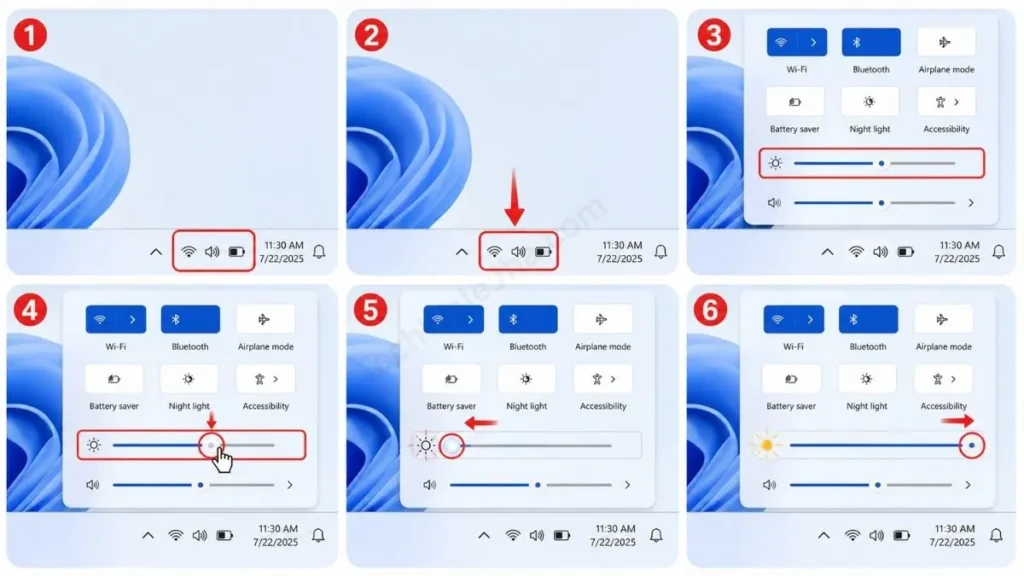
- Now, look at the bottom right corner of your screen (the Taskbar). Here you will see a cluster of icons for Wi-Fi, Volume, and Battery.
- Left-click once on these grouped icons with your mouse. Or, you can also open it super fast by pressing the Windows Key + A on your keyboard.
- After that, a pop-up menu will open. In this panel, you will see the action center brightness slider with a Sun icon, located right next to the Volume slider at the top.
- Then, with your mouse, click and hold on the dot of the slider. If you move it to the left, it will decrease the brightness (the screen will dim). And if you move it to the right, the screen will become full bright.
This method is so fast and easy that while playing a game or watching a movie, you can adjust the brightness without minimizing your screen.
Also Read: How to Enter BIOS in HP Laptop (Fastest Methods 2026)
Method 2: Using Dedicated Keyboard Shortcuts
Now let’s talk about another super-fast method. But what if you don’t want to touch the mouse or trackpad at all? If you’re a laptop user, whether it’s an HP, Dell, Lenovo, Acer, or ASUS, then hardware companies provide you with a built-in physical solution that all software methods can’t beat.
If you’re wondering exactly how the brightness keyboard shortcut works, let’s easily understand this hardware magic:
- Identify the Brightness Keys: First, carefully look at the top row of F-keys on your laptop’s keyboard (from F1 to F12). On two adjacent keys, you’ll see “Sun” icons. One icon is small or partially empty and is used to dim, and the other is large or fully filled and is used to brighten.
- Direct Press Method (For Modern Laptops): In modern laptops, the function keys work directly as action keys. This means you simply press the Brightness Up or Brightness Down key, and a small on-screen slider will pop up showing the brightness adjust.
- The ‘Fn’ Key Combo (For Classic/Older Laptops): If just pressing the F-key doesn’t do anything (like refreshing a web page), then there’s absolutely no need to panic. Now, look in the bottom-left corner of your keyboard, near the Spacebar, for a key labeled ‘Fn’ (Function). You need to press and hold the Fn key first, and then press your brightness key along with it. That’s all you have to do; it will work.
To learn more in-depth about the specific programming of these keys on laptop keyboards, you can read Wikipedia’s detailed guide on Computer Keyboards, which explains how hardware interacts seamlessly with the OS.
This method is best for students and office workers who want to adjust the lights on the fly while typing.
Also Read: How to Enter Safe Mode in Windows 11 (3 Fast Methods)
Method 3: How to Change Brightness via the Settings App
If your action center is glitching, you can directly go into the Windows 11 display settings to finely tune your screen’s brightness. This method is very detailed and reliable. So, follow the easy steps given below:
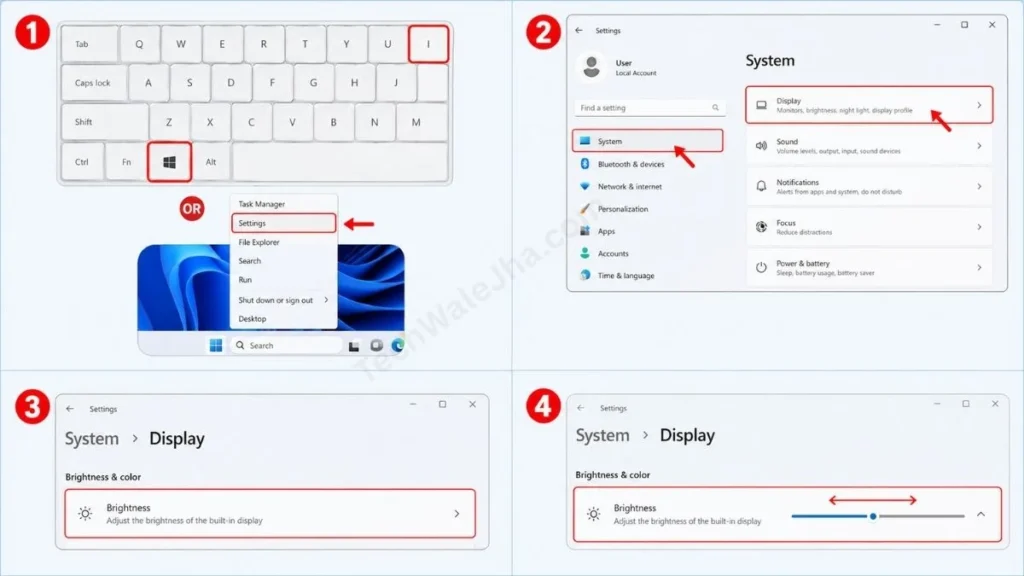
- Now, press the Windows Key + I on your keyboard at the same time. This is the fastest shortcut to open the Settings app. Alternatively, you can also right-click on the Start menu and open ‘Settings’ from there.
- After the Settings app opens, click on System at the top of the menu on the left side.
- Now on the right side, the first option will be Display, which has a monitor icon. Click on it.
- Right below the ‘Brightness & color’ section, you will find the ‘Brightness’ slider. You can adjust your screen’s brightness to your comfort level by dragging this slider left or right with your mouse.
How to Turn Off Adaptive Brightness (Auto-Brightness)
Many users complain that when they open a dark website, the screen dims, and as soon as they switch to a white page, it suddenly gets bright again. This is called Windows 11 adaptive brightness (or CABC – Content Adaptive Brightness Control).
If you are bothered by this auto-brightness and want to turn it off, then:
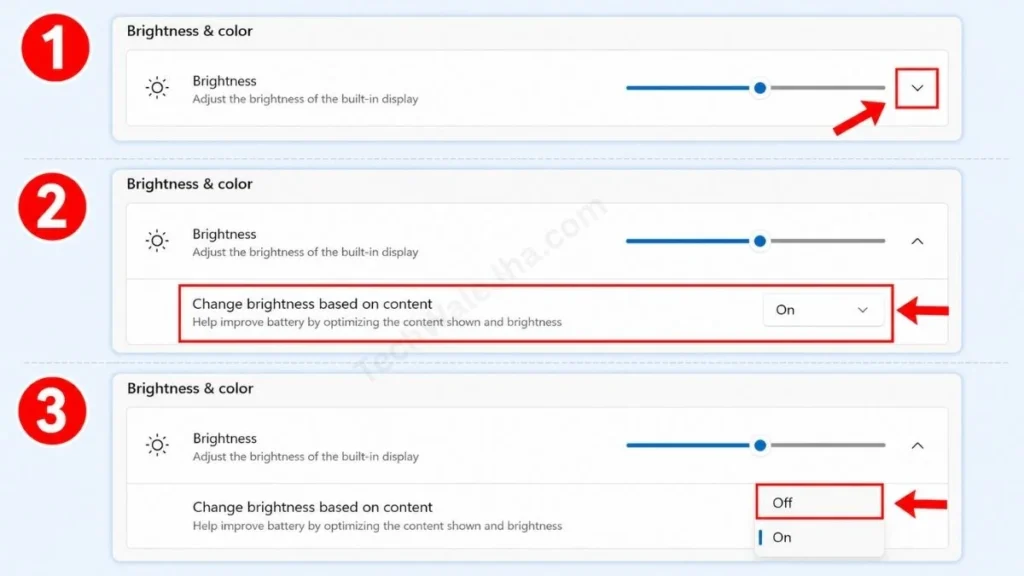
- In the Display settings mentioned above, there will be a small Down-Arrow (∨) in front of the ‘Brightness’ slider; click on it.
- A new option will appear: “Change brightness based on content” or “Help improve battery by optimizing the content shown and brightness”.
- Click the drop-down menu and select “Off”. Now, your screen’s brightness will be under your control and will no longer change automatically!
Method 4: Adjusting Brightness on a Desktop PC
Now, let’s get to the users who are using a desktop PC with an external monitor connected, such as an LG, Dell, Acer, etc. When these desktop users try the first 3 methods, they face a very common problem: they don’t see any slider on their system! People then mistake this for the “Windows 11 brightness control missing” error online.
But friends, this isn’t an error or a bug. The technical reality is that the Windows OS cannot directly control your external monitor’s hardware backlight via a simple HDMI or DisplayPort cable. So, how do you change the brightness on a desktop PC?
Here you will need to use these hardware methods:
- Use the Monitor’s Physical Buttons (OSD): Check the bottom, side, or back of your external monitor’s screen. You’ll find some physical buttons or a small joystick there. Press those buttons to open the monitor’s own menu (On-Screen Display). In that menu, you’ll find options to adjust brightness and contrast.
- Pro Tip for Desktop Users: If you don’t want to repeatedly press the monitor’s buttons, you can download a free third-party app called Twinkle Tray. This app adds a slider to your Windows 11 taskbar that uses DDC/CI technology to let you control your external monitor’s brightness directly from the software.
Also Read: How to Check CPU Temperature in Windows 11 Easily
Frequently Asked Questions
Why is the brightness slider missing on my laptop even though it’s not a desktop?
If you are using a laptop and are still getting the Windows 11 brightness control missing error, then this is 100% a display driver issue. Sometimes, a basic Microsoft display driver gets installed when you update Windows. To fix this: right-click the Start menu, open Device Manager, expand Display adapters, right-click your graphics card (Intel/AMD), and select Update driver. Once the driver updates, your brightness slider will be back in Windows 11!
What is the “Night Light” feature and how is it different from decreasing brightness?
Simply decreasing the brightness reduces the screen’s light, but the blue light that is harmful to your eyes remains. Night Light in Windows 11 is a built-in blue light filter. When you turn it on, the screen turns slightly yellowish (warmer), which makes studying or coding at night much easier on the eyes.
Does lowering the screen brightness actually save battery?
Yes, absolutely! The laptop screen, especially modern IPS and OLED panels, consumes the most power. By adjusting your screen brightness in the Windows 11 settings from 100% down to 50-60%, you can easily get an extra 1 to 2 hours of screen-on time.
Conclusion: Control Your Screen Comfort!
Friends, I hope that after reading this detailed guide, you’ve found the exact solution for how to change the brightness in Windows 11. Whether you’re a fan of keyboard shortcuts, a fast clicker using the Action Center, or a hardcore desktop setup user, your screen’s brightness is now completely under your control.
Taking care of your eyes should be the top priority when using a PC. So, optimize your screen according to your room’s lighting today.
If you enjoy practical and in-depth tech guides like this on Windows optimization and hardware, then stay tuned to our TechWaleJha blog. We make technical things so easy that even a new user can become a PC expert!
In your personal setup, do you prefer to keep the auto-brightness feature (CABC) on or do you always use manual control? Be sure to let us know in the comments.
Disclaimer: This guide is for educational and informational purposes only. TechWaleJha or its author will not be held responsible for any technical errors or system glitches that may arise from updating display drivers or using third-party software like Twinkle Tray. Please follow all steps at your own discretion and risk.




