
Friends, if you have an image or document and want to change its file format, but you don’t know how to change file type in Windows 11, then there’s absolutely no need to worry. And you don’t even need any third-party software for this.
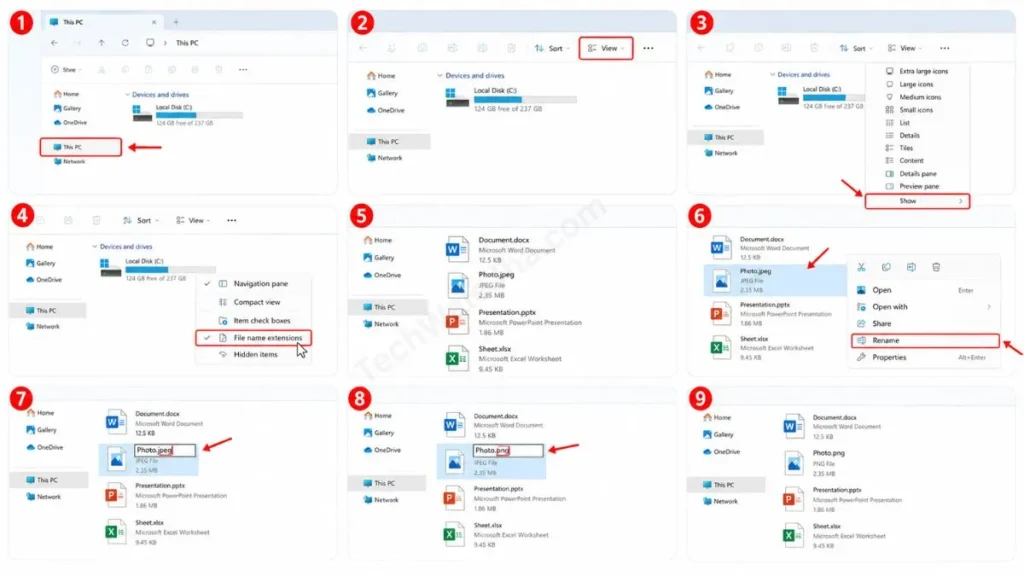
First, open File Explorer. Then click View at the top, go to Show, and check File name extensions. Now, right-click the file whose format you want to change and select Rename. Then, in the file name, delete the extension after the period (.) and type your desired format, such as .csv. After that, press Enter, and if Windows displays a warning that changing the file extension could make the file unusable, click Yes without hesitation.
This trick is very useful when a government website or an online portal requires a specific format, like .png, .jpg, or .pdf, for file uploads. Just remember that renaming the file extension alone doesn’t actually convert the file’s format. If you genuinely need to convert a .jpg to .png or .pdf, you’ll have to use the proper file conversion method.
Also Read: How Long Does it Take to Upgrade to Windows 11?
Why Are File Extensions Hidden in Windows 11?
If you’re trying to rename a file for the first time, you’ve probably noticed that the file’s actual format—like .pdf or .mp4 or any other—isn’t shown at the end of the name. That’s because Microsoft by default hides these extensions from regular users.
But why are file extensions hidden in Windows 11? The reason is that new users often accidentally delete the extension when renaming a file in a hurry. Doing this can corrupt the file, and Windows can’t figure out which software (app) to open it with. But when we specifically need to change a format, we first have to enable the Show file extensions setting in Windows 11 so we can easily make manual changes.
Also Read: How to Turn Off Smart App Control Windows 11 (Quick Fix)
Method 1: Change File Type by Renaming (Main Step)
This is the fastest and most direct way to easily complete the Windows 11 file extension renaming process. Let’s apply it step-by-step on our laptop:
- First, open any folder or ‘This PC’ (My Computer) on your PC.
- Then, click the View button in the top menu bar. Next, hover your mouse over Show below, and from the new menu that opens on the side, click on ‘File name extensions’ to check it.
- Now you will see that a dot (.) has been added in front of each file name to show its type, such as document.docx or photo.jpeg. Now, right-click on the file and click the Rename icon, or press F2 on your keyboard.
- Now, delete the part after the dot and type the new extension, for example, replace .jpeg with .png, and then press Enter.
Common File Types (Safe vs Unsafe Changes)
Keep one thing in mind: when learning how to change file type in Windows 11, you can’t just directly rename any file to any random format. Some formats are similar to each other, while others have completely different engines:
| Conversion Type (Change) | Is this safe? | Result (What will happen?) |
|---|---|---|
| Convert from .txt to .csv or .html | Yes (100% Safe) | A text file will easily be converted into web code or an Excel data sheet. |
| Convert from .jpeg to .jpg or .png | Yes (Safe) | Standard image formats can be easily converted between themselves without losing quality. |
| Convert from .mp4 to .jpg or .pdf | No (Unsafe Error) | The file will immediately become corrupted because you can’t directly convert a video into a document or photo. |
Also Read: How to Show Hidden Files in Windows 11 (2 Easy Methods)
Method 2: Use the ‘Save As’ Option (100% Safe Alternative)
As we saw in the table above, just changing the name (extension) doesn’t change the data inside the file. In that case, if you have directly renamed it and now the file is not opening which we call the “can’t change file extension Windows 11” error then it means you will have to change the actual encoding of that file. You don’t need to download any expensive Windows 11 file type converter from the internet for this. We will just be using Windows’ built-in tools like MS Paint or Notepad.
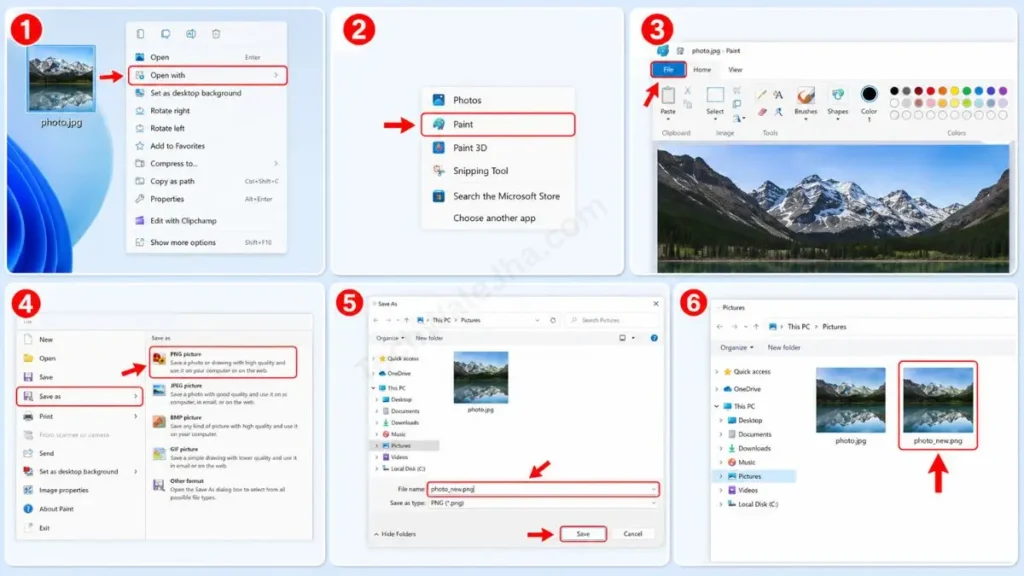
Let’s say you are specifically looking for how to change jpeg to png on Windows 11, then this ‘Save As’ trick is 100% safe and perfect for you:
- To do this, right-click on your .jpeg or .jpg photo, then go to “Open with” and select Paint from the list.
- Once Paint opens, click on “File” in the top-left corner and use your mouse to select “Save as”.
- A list will now open on the side where you can directly select the ‘PNG picture’ or ‘JPEG picture’ format.
- After this, a new box will open. Here you can type your new name and properly save the file as a different file type. Your original file will also be safe, and a new PNG file will be created.
If you want to deeply understand how different extensions work and what their default encodings are, like Zip, PDF, or XML, then you should definitely read Microsoft Support’s Official File Formats in Windows Guide. This trusted and technical documentation clarifies which file types can be smoothly opened with which default apps.
Also Read: How to Turn Off Mouse Acceleration Windows 11 (Fast Fix)
How to Handle the File Extension Warning Error?
When you change a file’s extension using the Method 1 Direct Rename trick, a pop-up warning appears on the screen as soon as you press enter: “If you change a file name extension, the file might become unusable. Are you sure you want to change it?”
New users get scared by this red warning and click ‘No’. But you don’t have to be afraid at all, because this is a default security feature from Microsoft that just reminds you that the file type is changing. If you’re making a safe conversion, like changing .txt to .csv, you can click ‘Yes’ without hesitation. The file will then convert perfectly to the new format.
Frequently Asked Questions
Why won’t my file open after changing its file type, and why has its icon turned white?
This happens when you have directly renamed two completely different (incompatible) formats, such as renaming a video file .mp4 to .pdf. In such a case, go back to the rename and enter the original extension; the file will then work properly. For such heavy files, you should always use a proper third-party converter software.
If you are using an older version of Windows, like Windows 10 or an updated Windows 11 where the UI is a bit different, you can use the old File Explorer view options. Type ‘Folder Options’ in the Windows search bar, open it, go to the ‘View’ tab, and uncheck the box next to “Hide extensions for known file types” and click Apply.
Can I change the format of 50 photos at once?
Yes, but you’ll have to do it one by one with a direct rename. If you want to rename a lot of files at once, you can install the official Windows ‘PowerToys’ app, which has a very advanced and fast tool called “PowerRename.”
Conclusion
Friends, file management in Windows 11 can seem a bit tricky, but once you understand the setting, it becomes very easy. I hope that after reading this detailed guide, you have perfectly learned how to change file type in Windows 11 and how to unhide hidden extensions.
Whenever we write scripts for our platform or save images for social media, this ‘Save As’ trick and the unhide extension setting are the most useful.
What file format were you having trouble changing? A photo, video, or a document? Be sure to let me know in the comments section below so I can bring you even better solutions. To learn more pro-level Windows tricks and PC tutorials easily, stay connected with your own TechWaleJha platform.




