
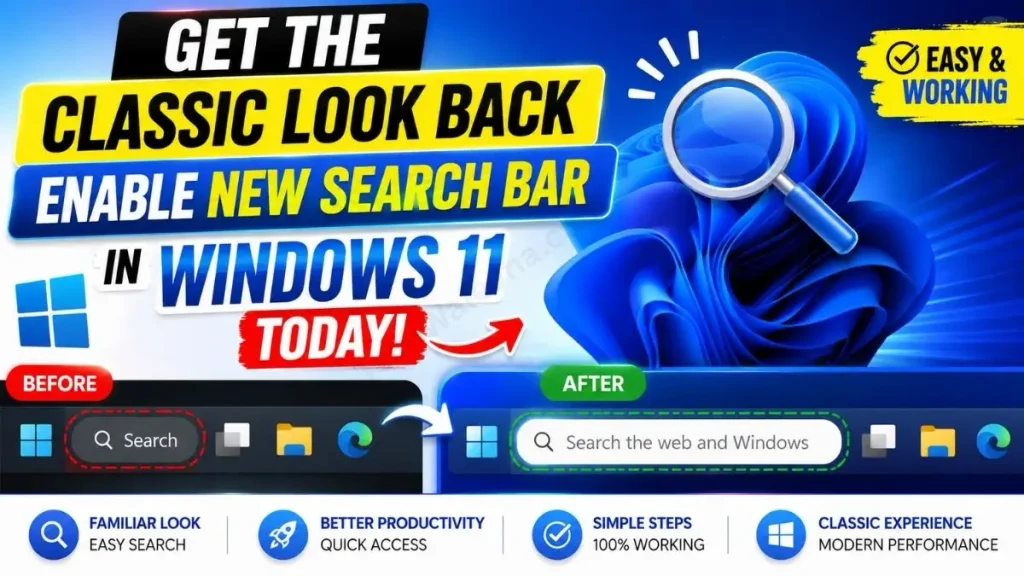
Friends, in the new design of Windows 11, the taskbar has moved to the center, and the old classic search box has been replaced by a small magnifying glass, i.e., a search icon. If you’re also annoyed by this small icon and are searching the internet for “how to enable new search bar in Windows 11,” then the solution is quite simple.
To do this, first, right-click on any empty space on the taskbar and then open Taskbar Settings. Now, in the Taskbar items section here, you will find the Search option. Click on the drop-down menu next to it and select Search box from there. That’s it, as soon as you do this, the small search icon on your Windows 11 taskbar will be replaced by a full-size search bar, allowing you to search directly from the taskbar.
When I’m doing my daily work on my PC, repeatedly opening the Start menu to search feels a bit time-consuming. By using this direct UI trick, you can customize your system to suit your needs. Now let’s dive into the Windows 11 taskbar search bar settings in more detail so you can get the best UI experience.
Also Read: 4 Secret Ways to Change Brightness in Windows 11 (100% Working)
Why Enable New Search Bar in Windows 11?
Microsoft initially removed the search box to keep the taskbar clean. But many PC users, especially those who regularly use heavy software like Photoshop or Premiere Pro, found it irritating to repeatedly click the search icon. The biggest advantage of a full-width search bar is that you get the option to type directly without having to click on it.
If you apply the get new search box Windows 11 trick, it makes your workflow much faster. This is because you can directly move your cursor to the taskbar and find any file, folder, or even a web query in just a few seconds. This feature feels just like the classic Windows 10, making the system even more user-friendly. If your search option has disappeared after an update, this guide will serve as a perfect fix for the missing Windows 11 search bar.
Also Read: How to Check CPU Temperature in Windows 11 Easily
Method 1: Enable Search Bar From the Settings App (Main Method)
If you want to officially change the search icon to a search bar in Windows 11, the Settings app for the Windows 11 22H2 update and later provides a direct option for this. The process is so simple that even a beginner can do it in seconds.
How to Enable It? (Step-by-Step):
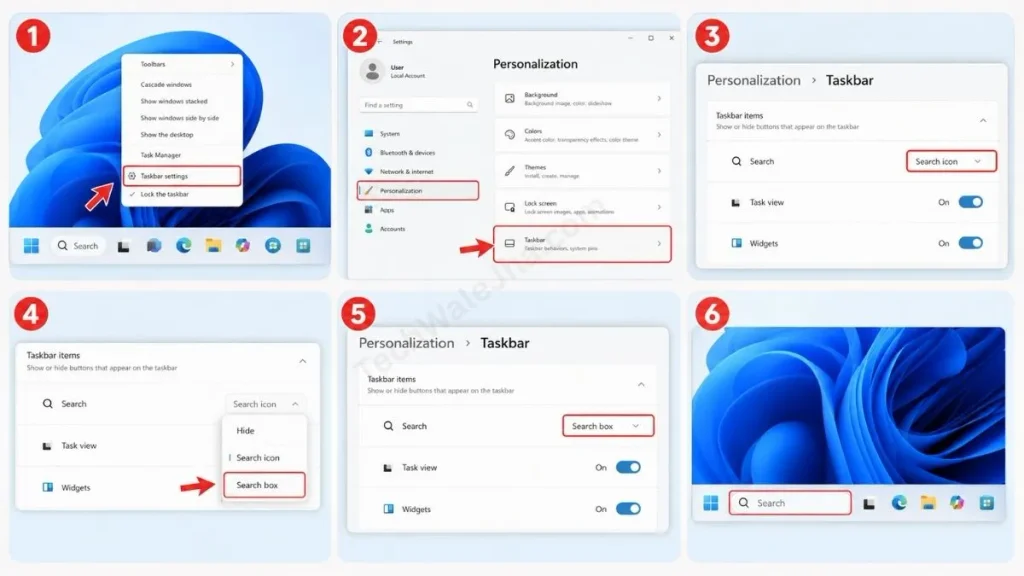
- Now, right-click on any blank space on the taskbar at the bottom of your screen where all the app icons are.
- Then, in the small pop-up menu that opens, click on ‘Taskbar settings’. Alternatively, you can press Windows + I to open Settings, go to Personalization, and then navigate to the Taskbar to get here.
- Then, after the Settings page opens, you will see a ‘Taskbar items’ section at the top, which will have options like ‘Search’, ‘Task view’, and ‘Widgets’.
- Then, click on the box right next to ‘Search’. From the list there, select ‘Search box’.
- After that, just close the Settings app. Now you will see that your long and properly visible search bar has permanently appeared on the taskbar.
Which of the 4 Taskbar Search Options is Best for You?
Windows 11 gives you 4 different UI options for the search button. Use the table below to understand what each option means and which one will be best for your screen size:
| Search Menu Option | How does it look? | Who is it best for? |
|---|---|---|
| 1. Hide | The search button completely disappears. | Minimalist lovers who want a completely clean taskbar. |
| 2. Search icon only | Only a small magnifying glass is visible. | For those who have a small laptop (13-inch screen) and limited space. |
| 3. Search icon and label | There is a small “Search” text written next to the icon. | For those who want a balanced and modern look. |
| 4. Search box (Our Pick) | A full-length typing box where you can type directly. | Jinko likes the fastest workflow and a classic Windows 10–like look. |
Also Read: How to Change File Type in Windows 11 (Fast Fix)
Method 2: Enable Search Box Using Registry Editor (Advanced Trick)
If the latest Windows 11 22H2 search bar update hasn’t reached your PC yet, or if a system bug has hidden the search box’s drop-down menu in the Settings app, there’s no need to worry. We can easily force-enable this feature using the Windows Registry.
Since we are modifying registry files, always check the official Microsoft Support Windows Taskbar Guide before making advanced changes. This trusted page teaches you how to safely customize the system UI without corrupting it.
Enable Full Search Bar in Windows 11 Registry (Step-by-Step):
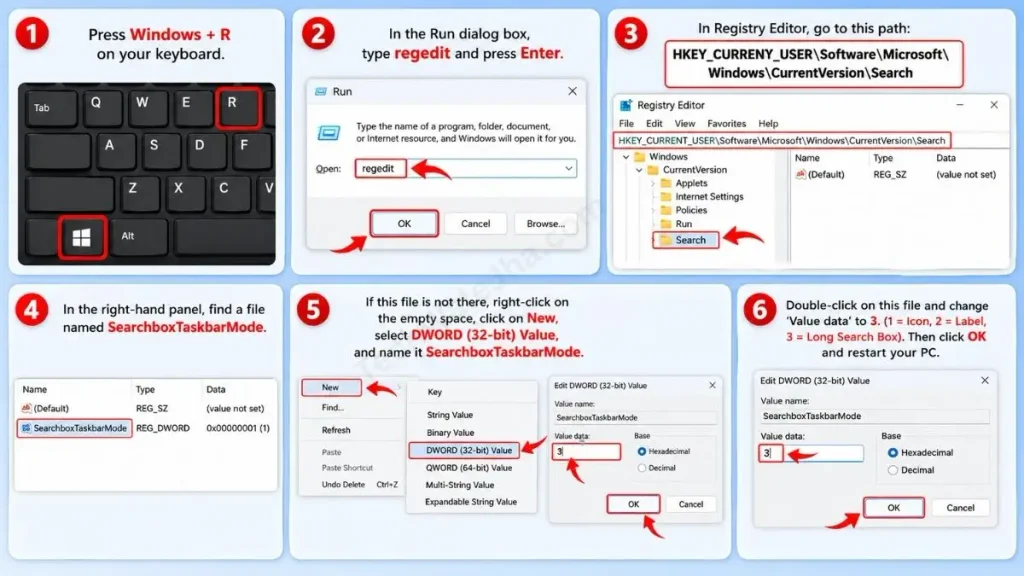
- To do this, press Windows + R on your keyboard, then type
regeditin the dialog box and press Enter to open the Registry Editor. - A window will then pop up. In the left-hand panel, navigate to this exact path:
HKEY_CURRENT_USER\Software\Microsoft\Windows\CurrentVersion\Search - Now, in the right-hand panel, find a file named SearchboxTaskbarMode.
- If this file is not there, right-click on the empty space, click on New, select DWORD (32-bit) Value, and name it SearchboxTaskbarMode.
- Then, double-click on this file and change its ‘Value data’ to 3. Note that 1 means icon, 2 means label, and 3 means a long Search Box.
- Then click OK and restart your PC. After it reboots, your search bar will be back.
Bonus: How to Move the Taskbar to the Left?
After enabling the new search bar, if you want your PC to feel completely like the old, classic Windows 10, you should shift your taskbar icons from the center to the left side. This customization gives the Windows 11 taskbar search setup a perfect finishing touch.
- To do this, go back to the Windows 11 taskbar settings.
- Then, scroll to the very bottom and click on ‘Taskbar behaviors’.
- Here, the very first option will be ‘Taskbar alignment’.
- Change it from ‘Center’ to ‘Left’. After this, your Start menu and the new search bar will immediately shift to the left side.
Also Read: How Long Does it Take to Upgrade to Windows 11? (Time Guide)
Frequently Asked Questions
Why am I not seeing the ‘Search box’ option in Settings?
If this option is missing from your PC, it means you are using a very old version of Windows 11. To properly access this feature, you will need to go to Settings, then to Windows Update, and update your system to the latest version 22H2 or higher.
Can I do a direct web search in this new search box?
Absolutely. This new Windows 11 search bar is directly integrated with Microsoft Edge and Bing. You can type any calculation, weather, or web query into it, and it will show you the results directly from the internet right on the taskbar.
I use two monitors (Dual Screen), can I see the search box on both?
No. By default, you can only see the search box on your primary (main) monitor. It will not appear on the taskbar of your second monitor.
Conclusion
Friends, UI customization is something that can either make your daily PC usage experience very fast or very irritating. I hope you have successfully learned how to enable the new search bar in Windows 11 without any third-party software from this simple and to-the-point guide.
Whether you use the normal route in the Settings app or an advanced Registry trick, a proper search box makes your workflow smooth. To easily learn more such useful Windows 11 UI tricks and hidden settings, stay connected with us.
Disclaimer: This guide is for educational and UI customization purposes. When making changes in the Registry Editor (Regedit), only modify the specified paths and values. Deleting incorrect registry files can lead to system instability or an OS crash. Always be sure to create a backup before modifying the registry.
Do you prefer to keep your taskbar centered or on the left side in classic style? Be sure to let me know in the comments.




