
Friends, if your new Windows 11 laptop keeps crashing and suddenly showing a blue screen (BSOD), or if a virus is badly hanging the system, then there’s absolutely no need to panic. In such situations, when the computer refuses to start normally or doesn’t work properly, there’s only one “Brahmastra” that works, and that is Safe Mode.
But the problem is that the method of pressing the F8 key, which worked back in the Windows 7 days, no longer works at all. Microsoft has made boot times so fast with the new OS and NVMe SSDs that there’s barely any time to press the keyboard keys. That’s why every PC user today should know exactly how to enter safe mode in Windows 11.
So in this article today, I’ll show you the 3 easiest and fastest methods to boot your system into this emergency mode. Whether your PC is running partially, is stuck on the login screen, or is completely frozen on a black screen, the methods mentioned here will 100% solve your problem. So, let’s get started without any further delay.
Also Read: How to Enter BIOS in HP Laptop (Fastest Methods 2026)
What is Safe Mode (And Why You Might Need It)
Before we get to the direct methods, as a smart PC user, we should first properly understand the technical logic behind what Safe Mode actually is and why we need to boot Windows 11 in Safe Mode.
In simple terms, Safe Mode is a diagnostic (checking and fixing) environment for Windows. When you turn on your computer normally, Windows loads thousands of third-party apps, heavy graphics drivers, and fancy animations all at once. But, as clearly stated in Microsoft’s official Safe Mode guide, in Safe Mode, Windows only loads the basic files and default drivers that are absolutely necessary to run the PC. In this mode, your screen will look a bit strange (low resolution) and will have “Safe Mode” written in the corner, which is completely normal.
When do you actually need this mode?
- Virus and Malware Removal: If a stubborn virus has sneaked into your system’s background and won’t delete in normal mode, Safe Mode makes that virus inactive. From there, you can run your antivirus and easily get rid of it.
- Fixing Corrupt Graphic Drivers: Sometimes, a bad update to your graphics card can cause the screen to go completely black. In this case, by using the Windows 11 Safe Mode black screen trick, you can easily and safely uninstall the corrupt display driver.
- Removing Problematic Software: If you have installed a new software that has caused your laptop to restart repeatedly, you can safely remove that app by entering this mode. When do you actually need this mode?
- Virus and Malware Removal: If a stubborn virus has sneaked into your system’s background and won’t delete in normal mode, Safe Mode makes that virus inactive. From there, you can run your antivirus and easily get rid of it.
- Fixing Corrupt Graphic Drivers: Sometimes, a bad update to your graphics card can cause the screen to go completely black. In this case, by using the Windows 11 Safe Mode black screen trick, you can easily and safely uninstall the corrupt display driver.
- Removing Problematic Software: If you have installed a new software that has caused your laptop to restart repeatedly, you can safely remove that app by entering this mode.
Also Read: How to Disable Windows 11 Telemetry (Safe Guide Latest 2026)
How to Enter Safe Mode in Windows 11 with 3 Easiest and Fastest Working Methods
Alright friends, the time has come to fix these problems. Here I’ll show you the two easiest ways to fix how to enter Safe Mode in Windows 11, and the third method will save you when your laptop completely freezes or Windows won’t even start. So first try these two methods, then move on to the third.
Method 1: The Settings App (When Your PC is Working)
If your laptop is running very slowly but still opens at least to the Windows screen, then this method is the best and safest for you. Just follow the steps given below exactly as they are:
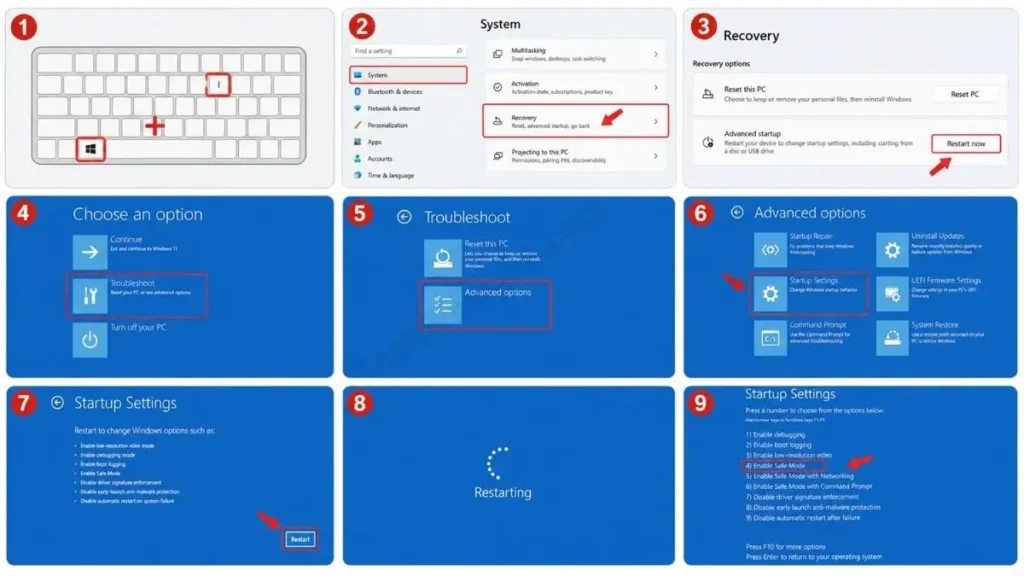
- Now, press the Windows Key + I together on your keyboard. This will open your Settings app.
- In the left-side menu, click on System and scroll to the right to find the Recovery option, then click on it.
- Here you will see a section for advanced startup options in Windows 11. Click the Restart now button located right next to it.
- The PC will restart and a blue screen will appear. Here, click on Troubleshoot.
- Now, go to Advanced options and then click on Startup Settings, and press the Restart button again.
- The laptop will restart one last time and a list will appear. Press 4 or F4 on your keyboard to enter Standard Safe Mode.
Your PC will now safely start in that basic, diagnostic mode.
Method 2: The “Shift + Restart” Trick (From the Login Screen)
Often, our PC will start up but then get stuck on the password lock screen or the mouse pointer will freeze. If you feel like you’re stuck in this situation, this Windows 11 safe mode shift restart trick will be very helpful.
If you want to bypass the lock screen and fix your system in safe mode without logging in, follow these steps:
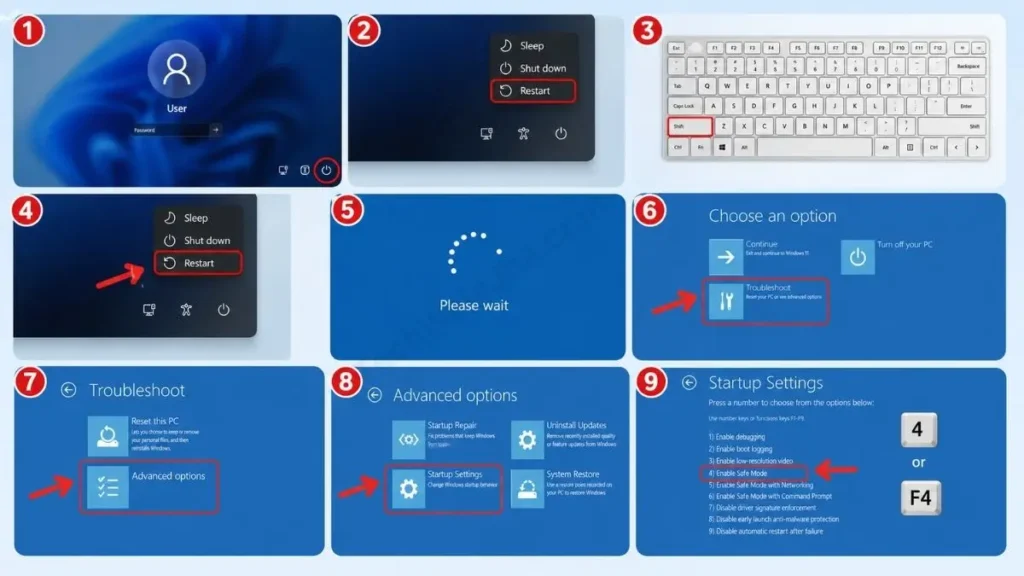
- Now, on your Windows 11 lock or login screen, click the Power icon in the bottom-right corner.
- Now, hold down the Shift key on your keyboard and do not let go.
- Then, while holding the Shift key, click the Restart option from that menu.
- Keep holding the Shift key until the words “Please wait” appear on the screen. After that, release the key.
After using this trick, your PC will return to the same blue “Choose an option” screen that we discussed in Method 1.
- From there, the next steps are exactly the same: click Troubleshoot, go to Advanced options, then click Startup Settings and select Restart. Finally, at the prompt, press 4 or F4 to enter Safe Mode.
Method 3: How to Enter Safe Mode From a Black Screen
If your PC goes completely black as soon as it turns on, or doesn’t proceed past the Windows logo, then the first two methods we mentioned won’t work at all. In such an extreme situation, we have to “Force” the Windows Automatic Repair system.
If you are looking for a solution for the Windows 11 safe mode black screen, then follow these steps exactly as given:
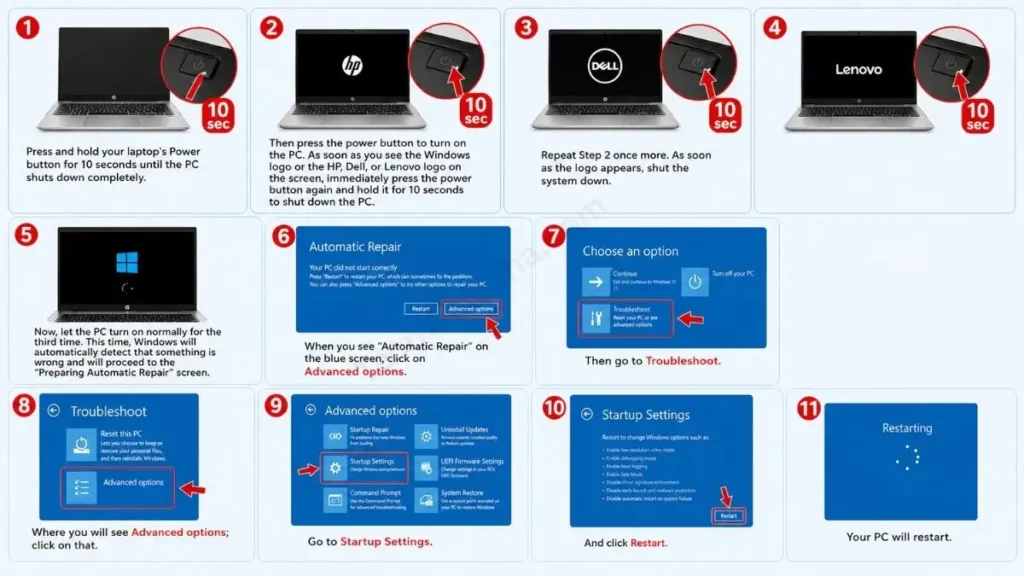
- Now, press and hold your laptop’s Power button for 10 seconds until the PC shuts down completely.
- Then press the power button to turn on the PC. As soon as you see the Windows logo or the HP, Dell, or Lenovo logo on the screen, immediately press the power button again and hold it for 10 seconds to shut down the PC.
- Repeat Step 2 once more. As soon as the logo appears, shut the system down.
- Now, let the PC turn on normally for the third time. This time, Windows will automatically detect that something is wrong and will proceed to the “Preparing Automatic Repair” screen.
- When you see “Automatic Repair” on the blue screen, click on Advanced options. Then go to Troubleshoot, where you will see Advanced options just click on that and go to Startup Settings, and click on Restart.
Important: Choosing the Right Safe Mode Option
When your PC restarts, you will see a menu with options 1 through 9. This is where people get the most confused about which option to choose:
- Press 4 or F4 (Enable Safe Mode): This is the standard mode where the internet doesn’t work. It’s best for basic virus removal.
- Press 5 or F5 (Enable Safe Mode with Networking): If you need to download new graphics drivers or update an antivirus, choose the Safe Mode with Networking option.
Also Read: How to Fix Windows Update Error 0x800f081f Offline Installer
How to Exit Safe Mode and Return to Normal
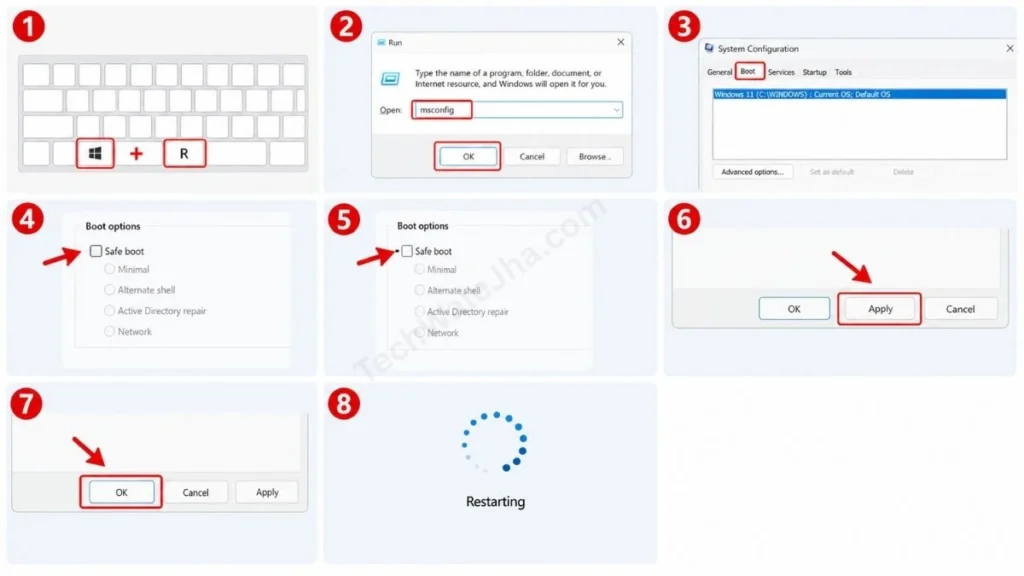
Often, when users enter Safe Mode by following a tutorial, the PC still boots into Safe Mode after a restart. To get out of this Windows 11 troubleshooting loop, you’ll need to use the msconfig safe boot Windows 11 trick:
- To do this, press the Windows Key + R on your keyboard to open the ‘Run’ box.
- Then, type `
msconfig` in the box and press Enter. - After this, the ‘System Configuration’ window will open. Click on the Boot tab at the top.
- Then, under “Boot options,” check for the `Safe boot` box. If it is checked, then uncheck it.
- Then click Apply and then OK.
- Now, restart your PC normally. After doing this, you have successfully completed the process of exiting safe mode in Windows 11.
Also Read: How to Fix Application Error 0xc00007b Windows 11 (Working Fix)
Frequently Asked Questions
Why isn’t the F8 key working in Windows 11?
In older versions of Windows, like Windows 7, pressing F8 at startup would open the Advanced boot menu. But on modern laptops with UEFI BIOS and NVMe SSDs, ‘Fast Startup’ is so fast that the system doesn’t even register the F8 key. That’s why Microsoft introduced the new methods I mentioned above.
Can I use the internet in Safe Mode?
Yes, absolutely! But for that, you’ll need to select Option 5, Safe Mode with Networking, instead of Option 4 in the Startup menu. In this mode, Windows loads the basic drivers for your Wi-Fi and LAN adapters.
Is it safe to uninstall programs in Safe Mode?
Yes! In fact, Safe Mode was created for this very purpose. If stubborn software or an antivirus won’t uninstall or is giving an error in normal mode, then removing it in Safe Mode is a completely safe and recommended practice.
Conclusion: You’re Now a Windows Troubleshooter!
Friends, minor issues with the Windows OS have become very common these days. But if you know how to enter safe mode in Windows 11, you can fix even the biggest system crashes or malware attacks yourself from home, without paying a mechanic.
I hope this detailed guide has solved your PC boot problem. If your laptop is back to working normally, be sure to share your experience in the comments. Don’t forget to bookmark the TechWaleJha blog to keep your PC in optimal condition and for more in-depth tech tips like this. Until we meet again in another detailed tech guide, take care and goodbye.
Disclaimer: This troubleshooting guide is for educational and informational purposes only. Before making any changes to system files, the registry, or drivers in Safe Mode, be sure to back up your important files. TechWaleJha or its author will not be held responsible for any system errors or data loss resulting from incorrect modifications. Therefore, you should troubleshoot your PC at your own risk and discretion.




