
Friends, imagine you’re working on a very important project or want to send a quick screenshot of a system error to your client or friend. And you, as usual, press Win + Shift + S on your keyboard, and… nothing happens! The screen doesn’t dim, and no screenshot capture menu appears at the top. In many cases, the screen even freezes when you directly open the app. This small problem causes a lot of frustration in the middle of work. Am I right?
The Snipping Tool in Windows 11 has become a very essential and powerful utility these days, especially since Microsoft added pro features like screen recording and text extraction (OCR). If you’re also stuck with this sudden problem and are constantly searching online for “how to fix snipping tool not working windows 11,” then there’s absolutely no need to worry anymore.
So in today’s step-by-step troubleshooting guide, we will fix this glitch for good. Whether you’re having an issue with Win + Shift + S not working or the app is crashing, we will use Windows’ internal settings to bring it back to 100% factory condition. So let’s get to fixing our PC without wasting any more time.
Also Read: Ghost Touches? How to Disable Touch Screen on Windows 11 Fast!
Why is your Snipping Tool crashing or freezing?
Before jumping straight to solutions and settings, as a smart PC user you should know why such a stable app suddenly stops working. There are four main technical reasons behind the Snipping Tool crashing on your PC in Windows 11:
- Corrupted App Cache & Data: Just like how the cache data for apps on our smartphones gets full or corrupted, the data for Windows default apps also starts to glitch over time. This causes the app to hang as soon as it launches in the background.
- Expired Microsoft Certificates: Last year, a major Windows 11 bug was reported where one of Microsoft’s hidden digital certificates had expired. This single error caused the Snipping Tool to crash simultaneously for millions of users worldwide. If you want to understand the history and background processing of screenshot utilities in more depth, you can read the entire Wikipedia article on the Snipping Tool.
- Revoked Background Permissions: To save the Windows 11 system’s battery and RAM, apps are often prevented from running in the background (sleep mode). If your background apps permission for the snipping tool has been accidentally disabled, the app won’t immediately wake up (respond) when you press the shortcut keys.
- Shortcut Key Conflicts: Often, third-party software like the Xbox Game Bar or other screen recorders hijack the same keyboard shortcuts. This confuses the system about which app to open when a command is received.
Since we now understand the root cause of the problem, let’s move directly to its solutions and explore them in detail.
Also Read: 4 Secret Ways to Change Brightness in Windows 11 (100% Working)
Method 1: The “Repair & Reset” Trick (Fastest Fix)
If you are continuously searching online for how to fix Snipping Tool not working Windows 11, then the very first logical step is to clear the app’s corrupted data. Microsoft has provided a great built-in feature in Windows 11 to fix any default app without uninstalling it.
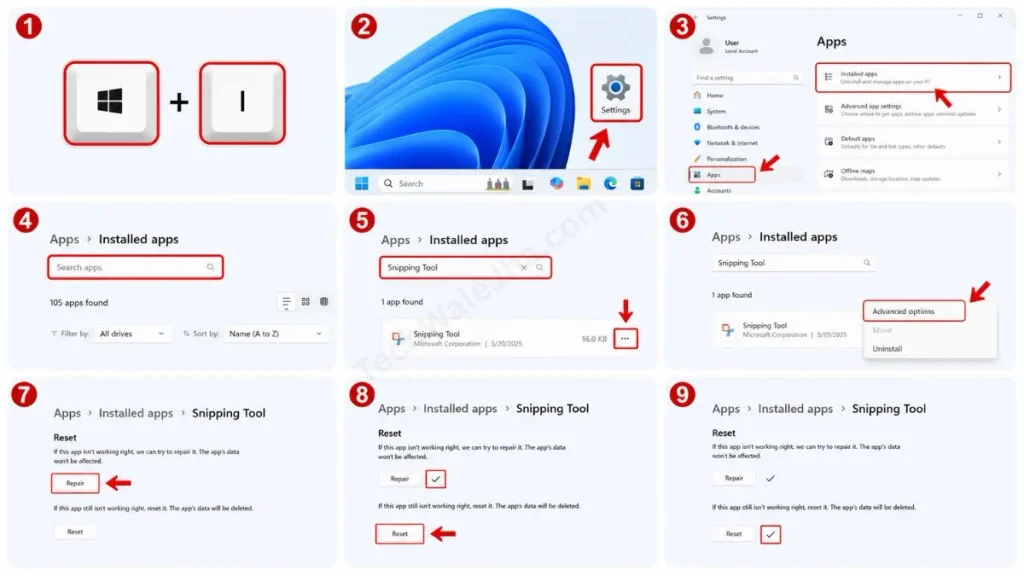
To safely perform the repair and reset process for the Snipping Tool app on your system, follow these simple, step-by-step instructions exactly as provided:
- Now press the Windows Key + I together on your keyboard. This is the fastest shortcut to open the Settings app.
- After the Settings app opens, click on Apps in the left-side panel. Then, in the right-side panel, click on Installed apps or ‘Apps & features’.
- Now you will see a list of all the apps on your PC. Here, type “Snipping Tool” into the search box.
- Once you find the app, click the 3-dots (…) on its right side and select Advanced options from the drop-down menu.
- Now, scroll down until you see the ‘Reset’ section. There, click the Repair button first. Windows will fix the app’s background files without deleting any data. Now, be sure to press Win + Shift + S to check it out.
- If Repair doesn’t fix the issue, click the Reset button located right below it. This will reset the app to its factory state, and your Windows 11 Snipping Tool reset process will be successfully completed.
Also Read: How to Change File Type in Windows 11 (Fast Fix)
Method 2: Re-enable Background App Permissions
Often after a system update or putting the laptop into ‘Battery Saver’ mode, Windows forcibly puts background apps to sleep. If the app isn’t woken up in the background, then no matter how many times you press the shortcut key, you’ll find that the snipping tool shortcut isn’t working.
To make the shortcut keys respond instantly, you need to fix the snipping tool’s background app permission. Let’s turn this setting back on:
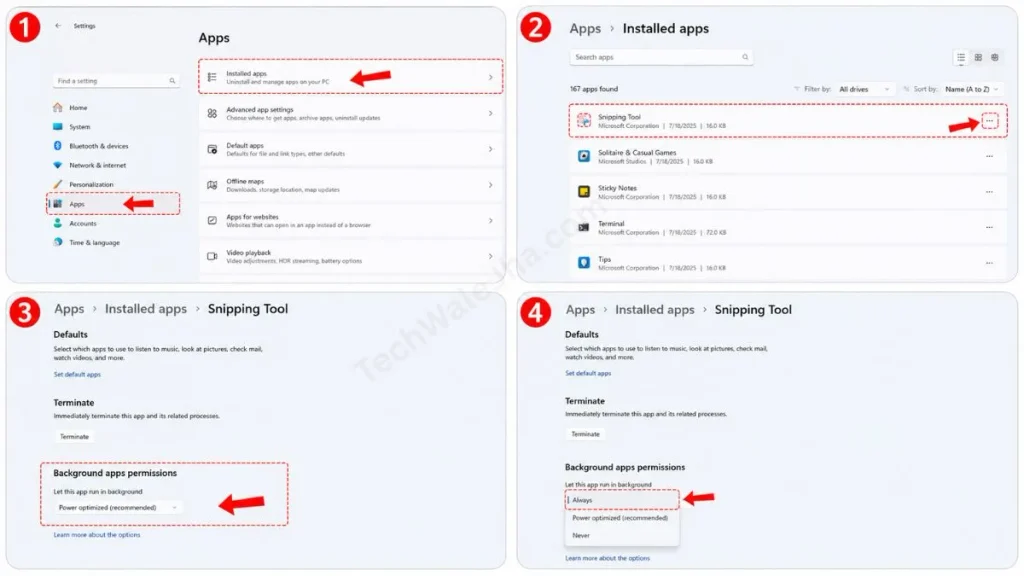
- Stay on the same Advanced options page as in Method 1 above (Settings > Apps > Installed apps > Snipping Tool > Advanced options).
- Scroll up a bit and find the “Background apps permissions” section.
- There, under “Let this app run in background,” you’ll see a drop-down menu. By default, it’s set to “Power optimized (recommended)” or “Never.”
- Click on that drop-down menu and change it to “Always”.
That’s it. Now the Snipping Tool will always be active in the background of your system. As soon as you issue the command from your keyboard, the screen will instantly dim and be ready to take a screenshot.
Also Read: How to Turn Off Smart App Control Windows 11 (Quick Fix)
Method 3: Reinstall Snipping Tool via Microsoft Store
If the app is still crashing even after fixing the system’s internal settings, it simply means that the app’s core installation files have become completely corrupted. In such a case, the best solution is to complete the process of reinstalling the Snipping Tool. A fresh download will clear up all the problems:
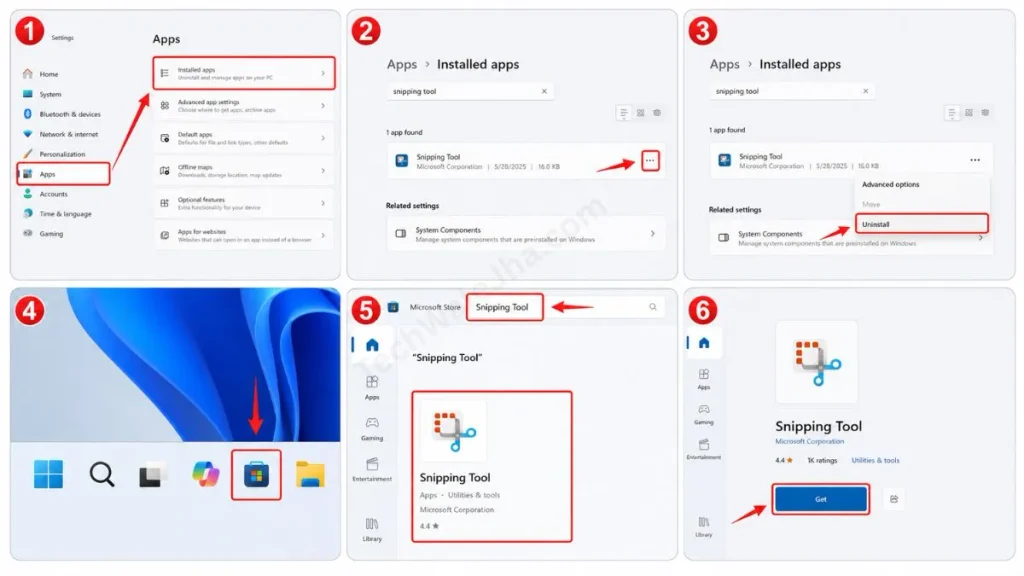
- To do this, first delete the old app. To do so, go to Settings, then click on Apps and select Installed apps. Then, find ‘Snipping Tool’ here, click the 3-dots, and choose Uninstall from the menu.
- After that, click the ‘Microsoft Store’ icon on your taskbar or search for it in the Start menu.
- Then, in the search bar at the top of the Store, type “Snipping Tool”. And make sure to select the official app from Microsoft Corporation.
- Then, go to the app page and click the Get or Install button.
As soon as the fresh installation is complete, your system will create new cache files. Now you will be able to use your screenshot tool perfectly without any errors.
Also Read: How to Show Hidden Files in Windows 11 (2 Easy Methods)
Method 4: Fix the “Print Screen” Key Shortcut Settings
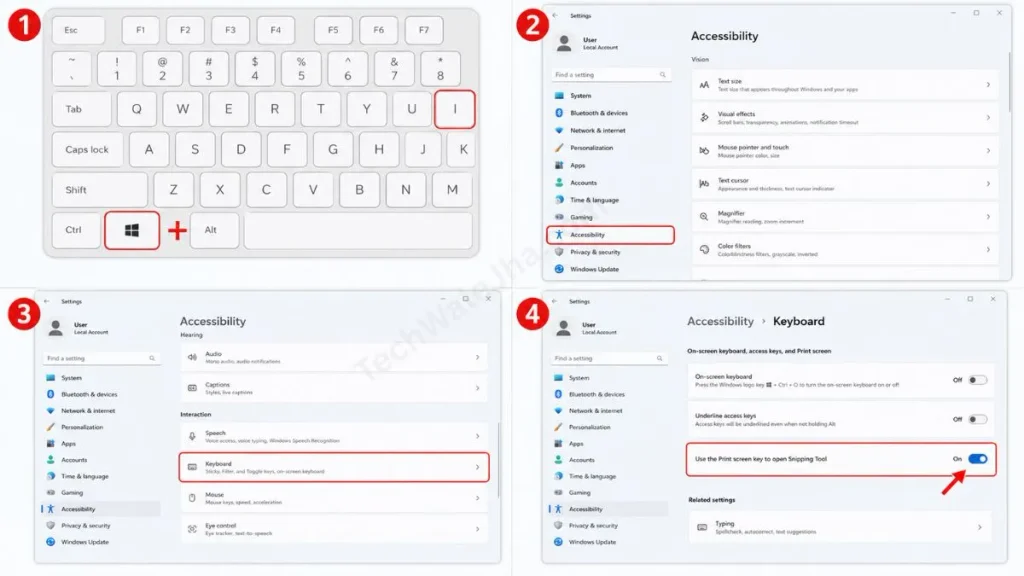
Many times, users complain that they are getting a “Windows 11 screen print not working” error. Friends, in Windows 11, Microsoft has introduced a new feature where you don’t even need to press three buttons (Win + Shift + S) to take a screenshot. You can set your keyboard’s single Print Screen (PrtScn) button to open the Snipping Tool directly.
If this setting has been accidentally turned off, here’s how to turn it on:
- To turn it on, press the Windows Key + I on your keyboard to open Settings and click on the Accessibility tab from the left menu.
- Now, scroll down a bit and click on the Keyboard option under the ‘Interaction’ section.
- Then you will see an option here, “Use the Print screen key to open Snipping Tool”. Turn the toggle switch next to it to On.
That’s it. Now, as soon as you press the ‘PrtScn’ key on your keyboard, your Windows 11 screenshot shortcut will be instantly activated and the Snipping Tool will smoothly appear on the screen.
Also Read: Windows 11 Complete Guide: Install, Setup & Optimize Fast
Frequently Asked Questions
Why isn’t Win + Shift + S doing anything on my laptop?
There are two main reasons for this. First, the Snipping Tool might not have permission to run in the background, which we fixed in Method 2. And second, a gaming app like “Game Mode” or the Xbox Game Bar might be running, which has blocked that shortcut key.
Where are Snipping Tool pictures automatically saved?
The Snipping Tool in Windows 11 has become quite smart. When you capture a screenshot, it not only copies it but also automatically saves it to a folder. To check this, go to your ‘File Explorer’, then go to Pictures and open the Screenshots folder. There you will find all your captured images.
Can I completely remove the Snipping Tool and use third-party apps?
Yes, absolutely. If you want to use an advanced software like Lightshot, ShareX, or Snagit, you can go to the ‘Installed Apps’ section and permanently uninstall the official Snipping Tool so that the shortcuts for both apps don’t conflict.
Conclusion: Capture Your Screen Without Freezes!
Friends, I hope that after reading this practical and detailed troubleshooting guide, you’ve found the perfect solution to the “Fix Snipping Tool Not Working Windows 11” issue. Whether you used the repair method or performed a fresh reinstall, your screenshot feature should now be running as smooth as butter.
For more awesome tricks like these to fix Windows glitches and optimize your PC to a pro level, stay tuned to the TechWaleJha blog. If you’re facing a similar problem with any of your other default apps, be sure to let me know in the comments below. I’ll provide a solution for that too.
Disclaimer: This guide is for educational and troubleshooting purposes only. Always be careful when modifying system settings and apps. Although the steps provided (Repair, Reset, Uninstall) are completely safe, TechWaleJha or its author will not be held responsible for any system errors that occur if you accidentally delete another essential app. Please follow the process with caution and at your own risk.




