
Is your PC or laptop lagging when you run new games, even though it has good hardware? Does this happen to you too? Often we buy an expensive graphics card and a fast processor, but when we open a game, we start experiencing frame drops (low FPS) and random screen freezes. If you’re also experiencing stuttering while playing Valorant, GTA V, or Cyberpunk, there’s no need to worry it’s not a hardware issue. The problem actually lies in Windows’ default settings, which you can easily fix.
Windows 11 is set up right out of the box for office work, browsing, and battery saving. By default, it’s not optimized for gaming. That’s why all the unnecessary background apps, automatic updates, and power-saving modes limit your CPU and GPU’s full power. This leads many gamers to believe they need to install new hardware in their PC, when the truth is that you can fully unlock the power of your existing machine by manually optimize Windows 11 for gaming without spending a single penny.
By using the right settings and tweaks, you can easily boost FPS in Windows 11. In this complete guide, we’ll practically show you how, with just a few clicks, you can take your computer’s Windows 11 gaming performance to a whole new level. So let’s get started and turn your PC into a proper gaming beast!
Quick Answer: How to Optimize Windows 11 for Gaming?
To quickly optimize Windows 11 for gaming, turn on Game Mode, hardware-accelerated GPU scheduling (HAGS) enabled, and set your monitor to its highest refresh rate. Additionally, switch to the High-Performance power plan and disable the Xbox Game Bar to boost FPS.
If you want to see an immediate difference in your system, keep this quick checklist in mind. As soon as you change these settings, you’ll notice a massive jump in your gameplay and frame rates:
| Quick Gaming Tweak | Where will I find it? | What is its benefit? |
|---|---|---|
| Enable Game Mode | Settings > Gaming | Blocks background apps and updates. |
| Turn On HAGS | Settings > Display > Graphics | The GPU gives me the freedom to manage its memory. |
| Set Max Refresh Rate | Settings > Display > Advanced | Preventing screen tearing provides smooth gameplay. |
| Change Power Plan | Control Panel > Power Options | It lets my CPU run at full speed. |
You’ll feel the impact of these basic steps immediately. As soon as you turn on Windows 11 Game Mode, your operating system understands that you’re playing a heavy game, and it shifts its full focus to that game. When you enable hardware-accelerated GPU scheduling, your graphics card works more efficiently than before.
For deeper technical knowledge about gaming performance and hardware optimization, you can also refer to authority sites like Intel’s Official PC Optimization Guide, where the workings of the CPU and GPU are explained in detail.
Also Read: How to Free Up Disk Space in Windows PC (2026 Guide)
Core Windows Settings: Game Mode and Graphics Tweaks
Quick Answer: To apply the best Windows 11 gaming settings, first enable ‘Game Mode’ so that PC games get full priority. After that, go to Settings, then System, then Display, and then Graphics to turn on ‘Hardware-accelerated GPU scheduling’ so that your graphics card can work smoothly.
Enable Windows 11 Game Mode
In the past, Game Mode wasn’t very effective, but now Windows 11 Game Mode has become an essential and powerful feature. When you turn it on, Windows immediately understands that you are gaming. This causes the system to automatically block background Windows updates and unnecessary background processes, so that the full power of your processor (CPU) and RAM goes directly to the game.
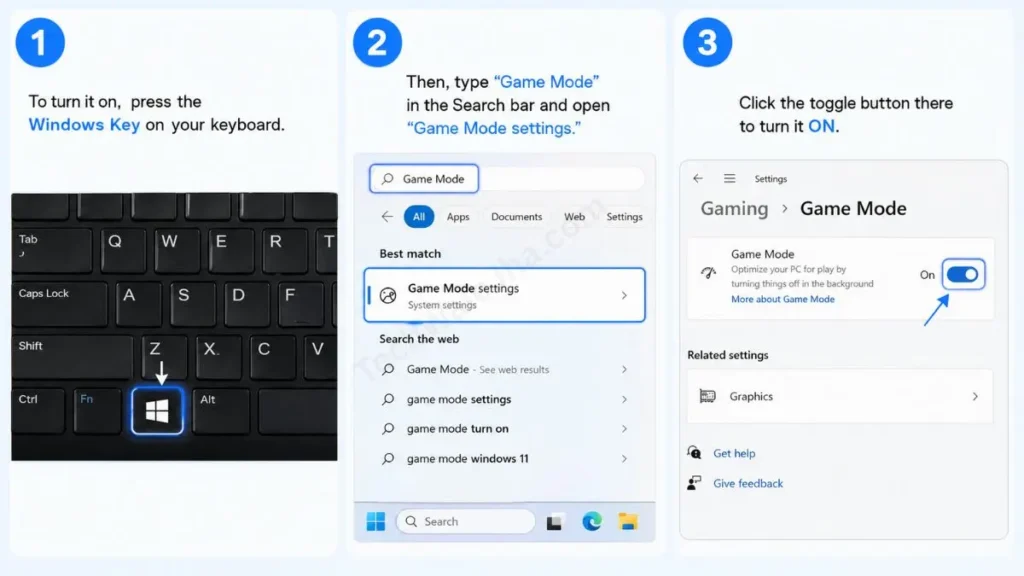
- To turn it on, press the Windows Key on your keyboard.
- Then, type “Game Mode” in the Search bar and open “Game Mode settings.”
- Click the toggle button there to turn it ON.
Turn On Hardware-Accelerated GPU Scheduling (HAGS)
If you want to practically optimize Windows 11 for gaming, you need to manage the load on your GPU (Graphics Card). Enabling Hardware-accelerated GPU scheduling allows your GPU to smartly manage its own video memory, which reduces input lag and gives a significant boost FPS in Windows 11.
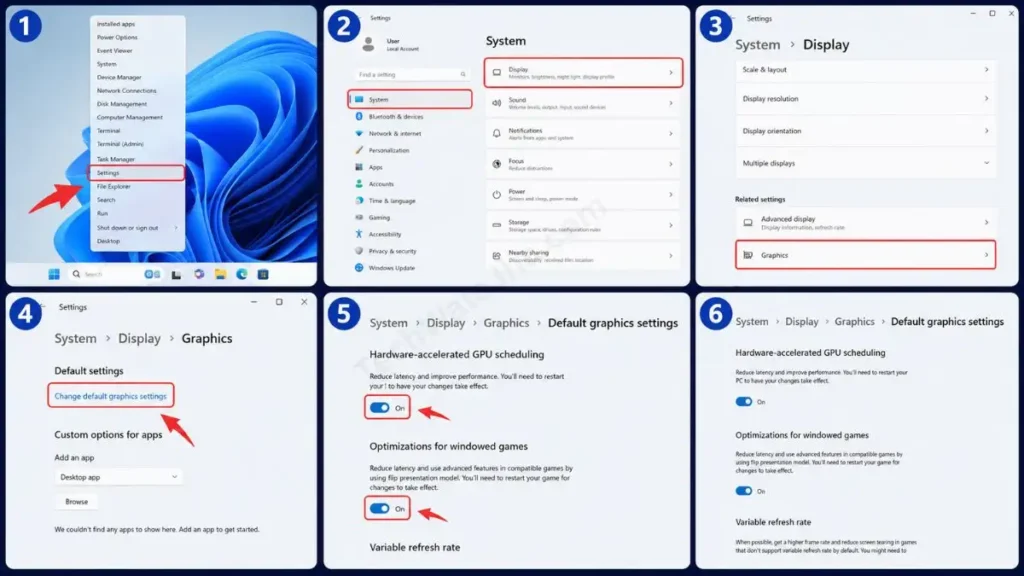
- To do this, open your PC’s Settings, go to System, then Display, and select Graphics.
- There, under the blue text, click on ‘Change default graphics settings’.
- Then, turn ON the toggle for Hardware-accelerated GPU scheduling.
- On the same page, scroll down a bit and turn on ‘Optimizations for windowed games’ to prevent frame drops when playing in borderless mode. (Note: You will need to restart your PC for the HAGS setting to apply properly).
Also Read: How to Reduce RAM Usage in Windows 11
Display & Overlays: Essential Settings for Smooth Gameplay
Quick Answer: For stutter-free gaming, go to Settings, then System, then Display, and select your monitor’s Highest Refresh Rate under Advanced display. After that, go to Settings, then Gaming, then Xbox Game Bar and turn OFF the overlay to completely eliminate random screen stuttering.
Set Monitor to Highest Refresh Rate
Many times, people buy expensive 144Hz or 240Hz gaming monitors, but Windows by default only runs them at 60Hz! If you see screen tearing or your mouse movement feels slow, you should definitely fix your refresh rate setting.
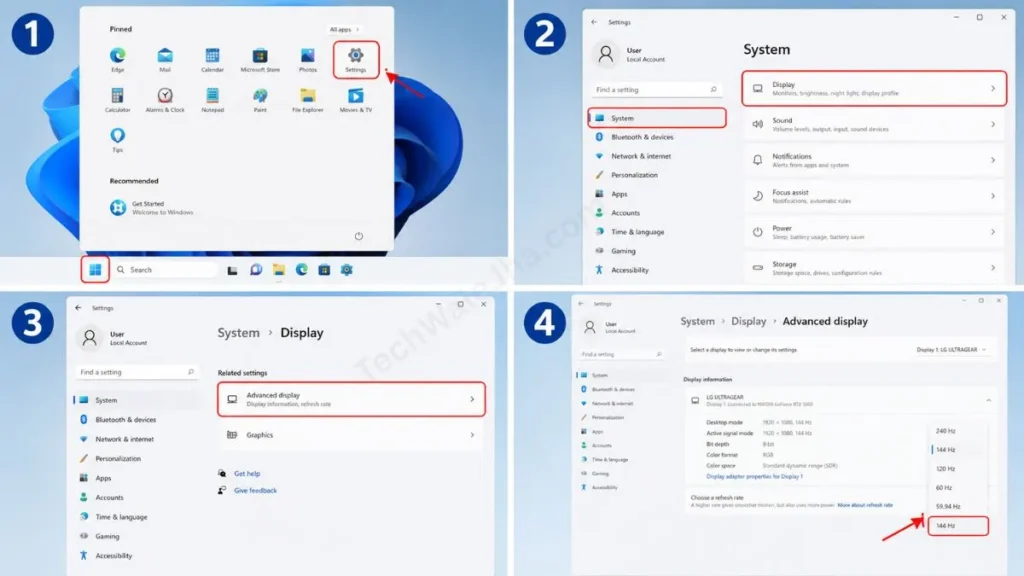
- To do this, go to Settings, then System, and select Display.
- Then, scroll down and click on ‘Advanced display’.
- And click on the ‘Choose a refresh rate’ drop-down menu (box).
- There, from the list, immediately select the highest available number, such as 120Hz, 144Hz, or 240Hz.
Turn Off Xbox Game Bar (To Fix Stuttering)
Microsoft by default wants you to use their Xbox Game Bar so you can record gameplay. But in reality, this feature consumes a lot of memory (RAM) and CPU resources in the background, which causes sudden random stuttering and lag when running heavy games. Disabling the Xbox Game Bar is the most common and effective FPS fix.
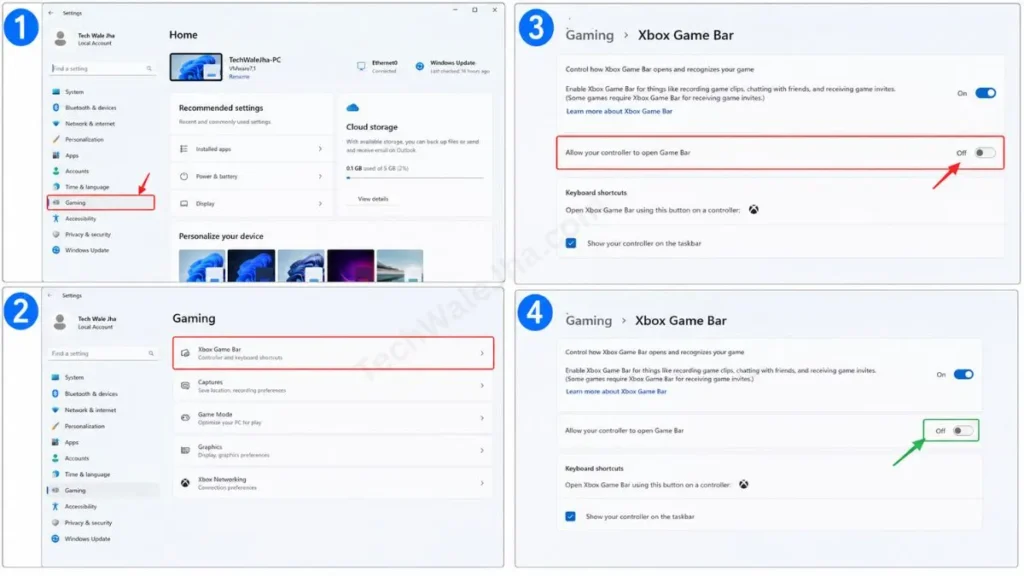
- Open Windows Settings and click on Gaming from the menu on the left side.
- Select the Xbox Game Bar option first.
- There, turn the ‘Allow your controller to open Game Bar’ toggle completely off so that it doesn’t record in the background. After this one step, you will see that your gaming has become much smoother and lag-free.
Also Read: How to Make Windows 11 Faster
System Performance & Power Optimization
Quick Answer: To get the most out of your system, go to the Control Panel and select the ‘High Performance’ or ‘Ultimate Performance’ power plan. Then, open the Task Manager with Ctrl + Shift + Esc and disable unnecessary startup apps. Finally, be sure to optimize (trim) your SSD to speed up game loading times.
Switch to the High or Ultimate Performance Power Plan
Windows is set to the ‘Balanced’ power plan by default to conserve electricity or laptop battery. But when you’re gaming, you need more performance than battery life. To turn this setting ON, you can follow the steps given below:
- Open the Start menu, search for “Choose a power plan,” and open it.
- Here you will see the High Performance option; select it. If the option is hidden, click on ‘Show additional plans’ and the option will appear.
Pro Tip: If you have a powerful desktop, you can also unlock a hidden Ultimate Performance power plan by opening CMD in Administrator mode and running powercfg -duplicatescheme e9a42b02-d5df-448d-aa00-03f14749eb61, which will prevent your processor from ever throttling.
Disable Unnecessary Startup Apps via Task Manager
Many software programs like Skype, Spotify, or remnants of recently uninstalled apps start running in the background as soon as your PC turns on and quietly consume RAM. It’s very important to disable them. To do this, you can use the Task Manager.
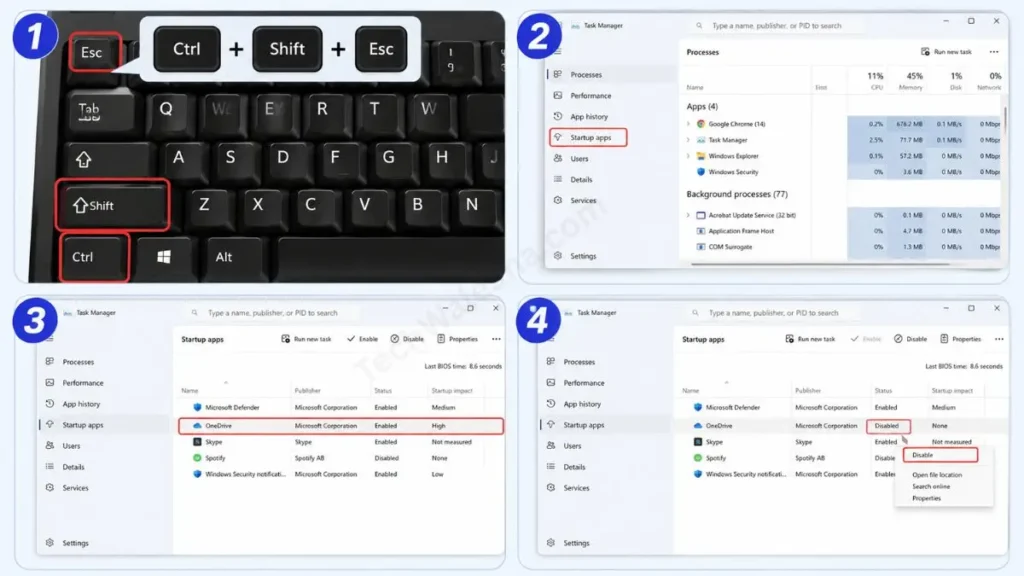
- Press Ctrl + Shift + Esc on your keyboard at the same time to open your Task Manager.
- Then, click on Startup apps from the icons on the left side.
- This is a list of all the apps that start when your PC starts up. For apps you don’t need during gaming, like OneDrive or a browser, right-click on them and select Disable. This will also make your system boot faster.
Optimize (Trim) Your SSD for Faster Load Times
Nowadays, most games require an SSD to load quickly. But an SSD also needs maintenance from time to time. If you want the loading screen for GTA V or Cyberpunk to finish faster, you need to complete the process of optimizing your SSD for gaming. You can follow the steps given below to do this.
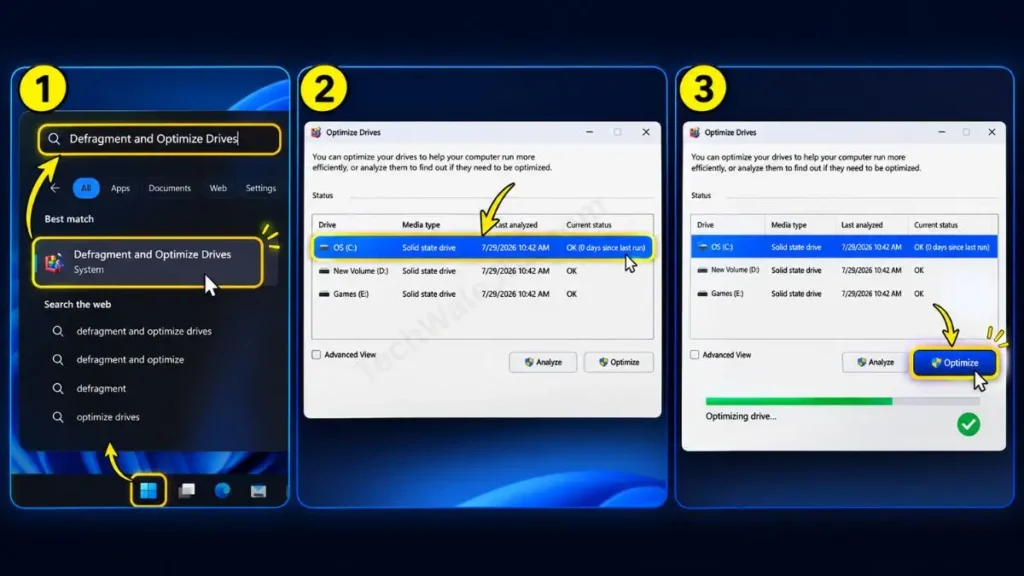
- In the Start menu, search for “Defragment and Optimize Drives” and open it.
- In the list, select your OS drive, such as the C: Drive, or the SSD where the game is installed.
- Then, click the “Optimize” button at the bottom. This will run Windows’ built-in TRIM feature, which cleans the SSD’s empty cells so the drive can once again provide fast read and write speeds.
Also Read: How to Check if Your PC Supports Windows 11
Frequently Asked Questions
Does enabling Game Mode really increase FPS?
Yes! Windows 11 Game Mode temporarily suspends background updates and system notifications, freeing up more resources for the CPU and GPU to render the game, resulting in better FPS.
Should I defragment my SSD for gaming?
Absolutely not! SSDs should never be manually defragmented as it shortens their lifespan. Windows 11 is smart; when you click ‘Optimize,’ it performs a Trim instead of defragmenting the SSD, which is perfectly safe and necessary for the drive.
I game on a laptop, is the High Performance plan safe?
The High Performance power plan is perfectly safe on a laptop, but it will drain the battery very quickly. Always keep your laptop connected to its power adapter (charger) while gaming to get maximum FPS.
Final Thoughts
It’s very frustrating when games start to stutter, even on an expensive and powerful PC. But now you know that the real problem wasn’t the hardware, but rather those small background settings that were consuming system resources.
By applying all the steps mentioned above, you have successfully completed the process of optimize Windows 11 for gaming. Enabling HAGS has freed up your GPU, Game Mode and the Ultimate Power Plan have given your CPU full priority, and disabling unnecessary overlays completes your Windows 11 graphics tweaks. Now, restart your computer, open your favorite game, and enjoy that buttery-smooth, high FPS gameplay.
Did you notice a FPS boost in your Valorant, CS:GO, or GTA after changing these settings? Which trick made the biggest difference? Be sure to share your experience in the comments below, and if you have a friend who’s struggling with lag, don’t forget to share this article with them! 👇
Disclaimer: All gaming settings and PC tweaks mentioned in this guide are for educational purposes only. While these methods are safe, modifying system settings, Power Plans, or CMD commands carries some risk. Please apply these steps at your own risk. We will not be liable for any data loss, system crash, or hardware issues.




