
Does a “Low Disk Space” warning pop up on your screen every time you turn on your laptop or PC? Or has the storage bar on your C: drive turned completely red? We’ve all experienced this at least once in our lives. A fully loaded hard drive or SSD not only limits your storage but also drastically slows down your entire system. When your system is low on space, you can’t install new applications, your browser starts to lag, and even essential Windows updates begin failing midway.
In such situations, many people think their only option is to buy a new, expensive SSD or delete their important photos and videos. But the truth is, you don’t need to buy new hardware right away. Windows 11 has several smart built-in utilities that can safely remove junk files hidden in every corner of your system.
Believe it or not, by using the right Windows 11 storage cleanup techniques, you can save GBs of space without losing your personal data. In this guide, we’ll walk you through exactly how to free up disk space in Windows PC. We’ll target all those hidden system files, update leftovers, and browser cache that are quietly eating up your storage. So let’s get your PC back to being as fast and spacious as it was when it was new.
Quick Answer: How to Free Up Disk Space in Windows PC?
To quickly free up disk space in Windows PC, follow these steps carefully:
- To automatically delete temporary files in Windows 11, go to Settings, then System, and select Storage.
- Run the Disk Cleanup utility in Windows 11 to clear heavy system junk.
- Enable Windows 11 Storage Sense to automate the daily cleanup process.
- Uninstall heavy, unused games and apps.
Pro Tip: The steps above are the fastest and safest way to clean your drive. If you want to learn more in-depth about these tools and how Microsoft manages files in the background, you can read Microsoft’s Official Storage Guide. This will help you keep your system secure.
Also Read: How to Reduce RAM Usage in Windows 11 (Easy Fixes)
Basic Cleanup: Delete Temporary Files and System Junk
Quick Answer: To instantly clean up your C: drive, you can use these two tools:
- Go to your system’s Settings, then to System, then to Storage, and under Temporary files, remove error reports and browser cache.
- Go to Disk Cleanup and click on ‘Clean up system files’ to delete old Windows update files.
When we use the system, Windows automatically accumulates some junk. In this Windows 11 storage cleanup process, we will use two of the most powerful built-in tools.
Step 1: Remove Temporary Files via Settings
Every time you browse the internet or install new software, Windows creates some temporary files. If you don’t delete them for months, they can take up a lot of space. You can easily delete temporary files in Windows 11:
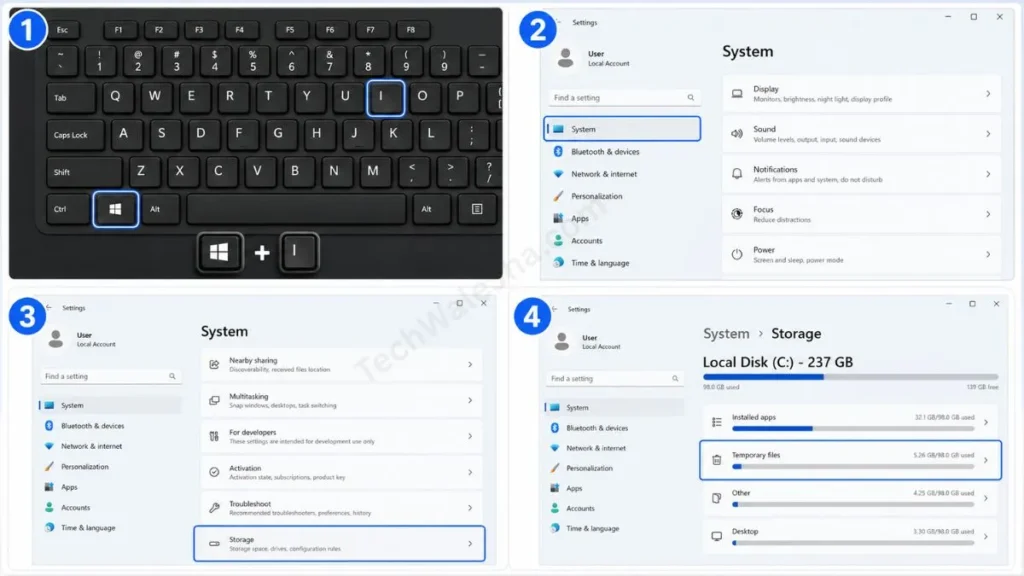
- Open Settings by pressing Windows + I on your keyboard.
- Then, go to System and click on Storage.
- Here you will see an option for Temporary files and click on it.
- After that, Windows will automatically scan and show you where the junk is stored. Here, select the update leftovers, error reports, and then the browser cache.
- Click the Remove files button at the top. This one step will easily free up 2-5 GB of your space.
Step 2: Use Disk Cleanup for Windows.old & Update Data
If you want a more in-depth cleanup, then the Disk Cleanup Windows 11 utility is the best option.
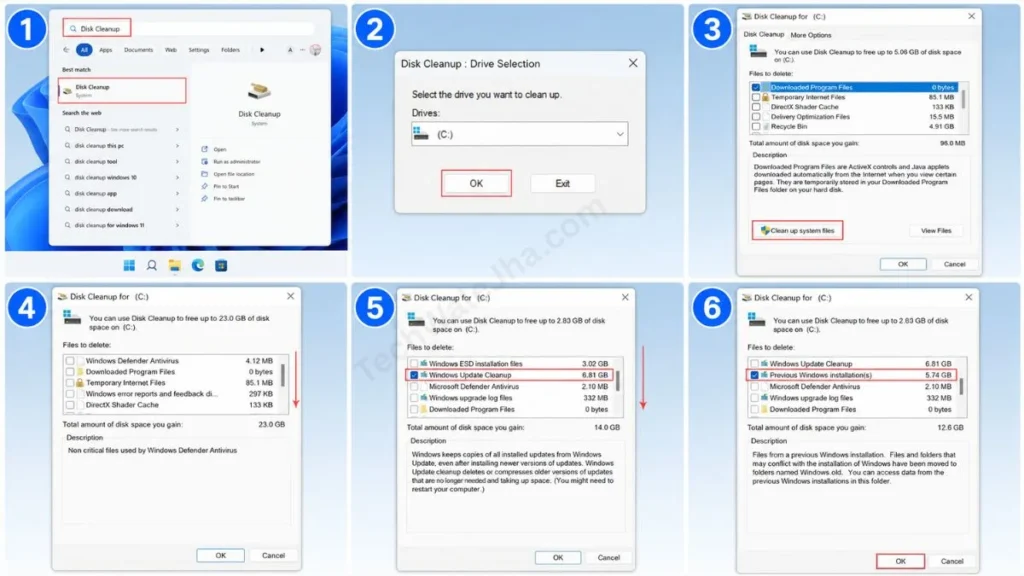
- Now, go to the Start menu, search for Disk Cleanup in the search bar, and open it.
- Now, select your C: drive and click OK.
- After that, in the pop-up window, click the “Clean up system files” button. Note: This step is very important.
- Scroll through the list and check the boxes for “Windows Update Cleanup” and “Previous Windows installation(s)” (Windows.old).
- Click OK to delete the files.
Note: The Windows.old folder is created when you upgrade from a previous OS to Windows 11. Deleting it can easily free up 15-20 GB of space.
| Junk Type | Where will I find it? | How much space can be saved? |
|---|---|---|
| Browser Cache / Temp Files | Storage Settings | 1GB – 5GB |
| Error Reports & Logs | Storage Settings | 500MB – 2GB |
| Windows Update Leftovers | Disk Cleanup | 3GB – 10GB |
| Windows.old Folder | Disk Cleanup | 15GB – 30GB |
Also Read: How to Make Windows 11 Faster (Top 7 Easy Tricks)
Smart Automation: How to Enable Storage Sense
Quick Answer: If you don’t want to clean up manually over and over, turn on Windows 11 Storage Sense. This feature automatically empties your Recycle Bin and sends unused files to the cloud.
Searching for and deleting files every day can be a very boring task. That’s why Microsoft has provided a smart solution called Storage Sense. After enabling it, Windows will automatically work in the background to free up disk space on your behalf, and you won’t have to worry about it.
To set up Storage Sense, follow the step-by-step process below carefully:
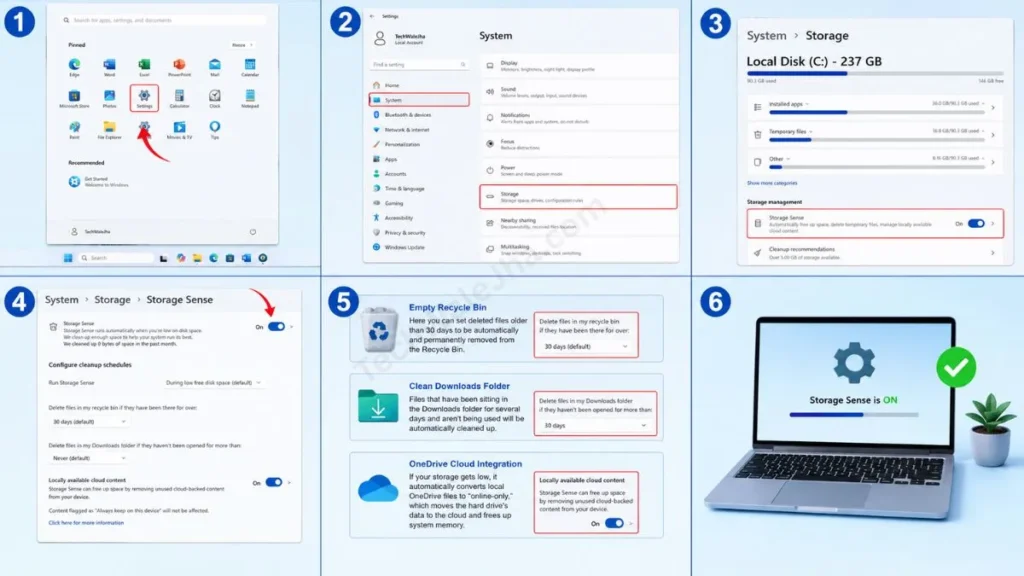
- Go back to Settings, click on System, and then go to Storage.
- Right at the top, you will see the Storage Sense toggle; turn it ON.
- To customize it to your liking, click on the Storage Sense text.
- From here, you can automate these smart features, such as:
- Empty Recycle Bin: Here you can set deleted files older than 30 days to be automatically and permanently removed from the Recycle Bin.
- Clean Downloads Folder: Files that have been sitting in the Downloads folder for several days and aren’t being used will be automatically cleaned up.
- OneDrive Cloud Integration: If your storage gets low, it automatically converts local OneDrive files to “online-only,” which moves the hard drive’s data to the cloud and frees up system memory.
With this automation, you’ll never have to see a “Low Disk Space” notification again and you’ll be stress-free.
Also Read: How to Check if Your PC Supports Windows 11 (Easy Guide)
Find and Remove Space Wasters: Uninstall Heavy Apps
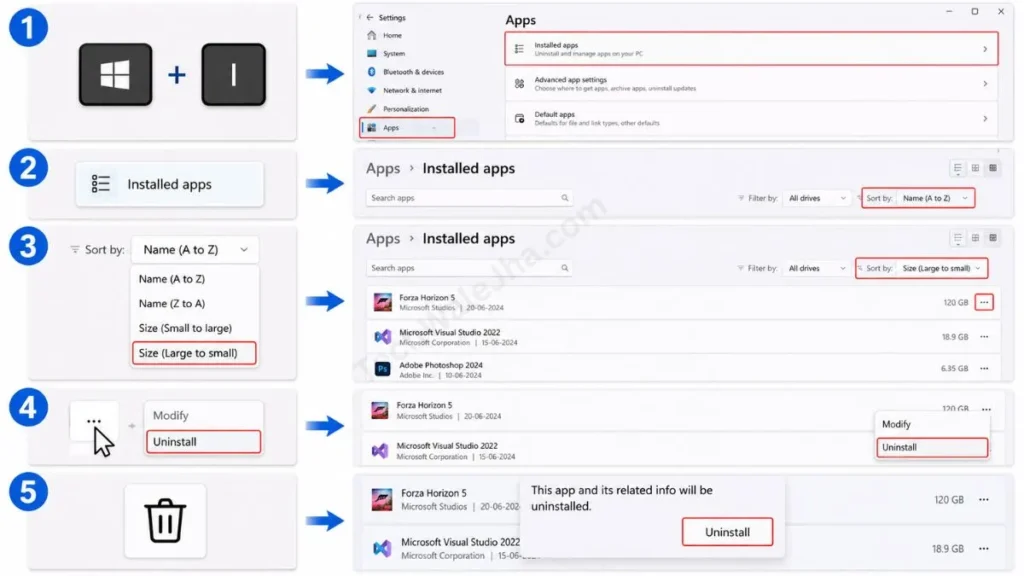
Quick Answer: Save GBs of space by removing heavy, unused games and apps from your PC. To do this, go to Settings, then Apps, then Installed apps, sort the list by ‘Size,’ and uninstall the programs you no longer need.
Often, we install a heavy video game or professional software, like video editing tools, and then don’t use it for months. These programs quietly take up a large portion of your drive and keep your PC slow by running background processes. If you really want to free up C drive space on Windows 11, it’s very important to remove these.
The method to easily find and remove heavy apps is given below. To do this, you can:
- Press Win + I on your keyboard to open Settings.
- From the left menu, click on Apps and then go to Installed apps.
- Here you will see all the software on your PC. At the top of the list, there will be a “Sort by” filter; click on it and select Size (Large to small).
- As soon as you do this, the software that takes up the most space will appear at the top of the list.
- For any software or game you don’t need, click the 3 dots (options) next to it and select Uninstall. This small habit can save you a lot of space.
Also Read: How to Reset Windows 11 Without Losing Data (Easy Steps)
Advanced Tricks: Using Hibernation and Compact OS (For Power Users)
Quick Answer: Advanced users can disable Hibernation to increase storage by running powercfg /hibernate off in the Administrator Command Prompt. Additionally, the Compact OS feature can be used to compress system files, freeing up several GBs on your system.
If you still need more space after following the basic and smart steps above, these two advanced technical methods can be a “Game Changer” for you.
Disable Hibernation for Instant Space Recovery
Windows has a ‘Hibernation’ mode that saves your open work to memory and puts the PC to sleep. To keep this feature enabled, Windows creates a hidden file named hiberfil.sys. This file takes up space equal to approximately 40% of your system’s installed RAM. If your system has 16GB of RAM, it takes up approximately 6-7GB of space.
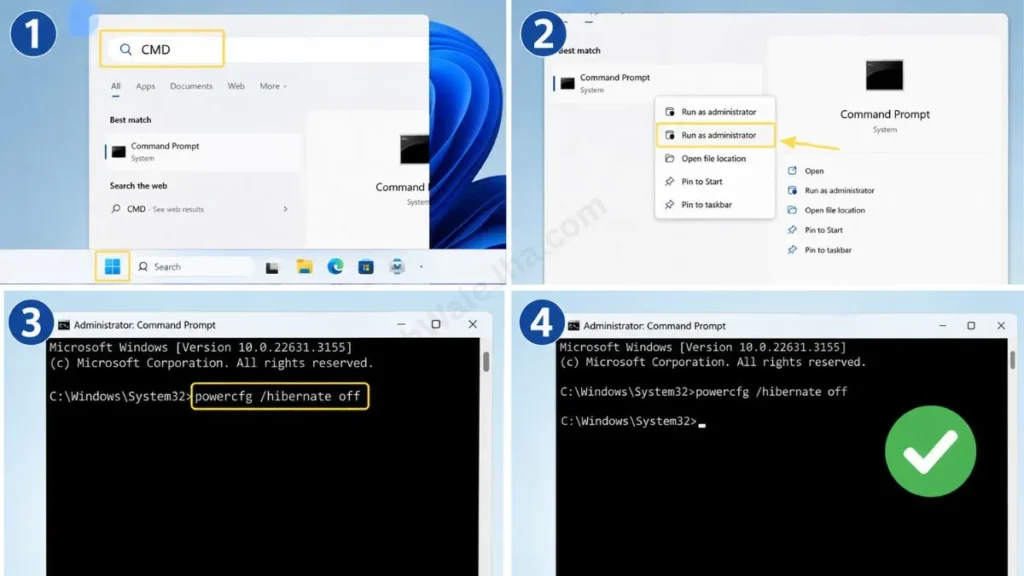
If you don’t use this feature, you can disable hibernation by following the Windows 11 process:
- Open the Start menu and search for CMD or Command Prompt.
- Right-click on it and select “Run as administrator” to open it.
- On the black screen, type this exact command: powercfg /hibernate off
- or press Enter. That’s it, your hibernation is turned off and the storage will be immediately returned.
Use Compact OS to Compress System Files
Windows 11 Compact OS is an excellent hidden tool. It deeply compresses Windows’ main system files, allowing you to save several gigabytes of space. However, this can have a minor impact on PC performance, so only use it when you are completely out of storage space.
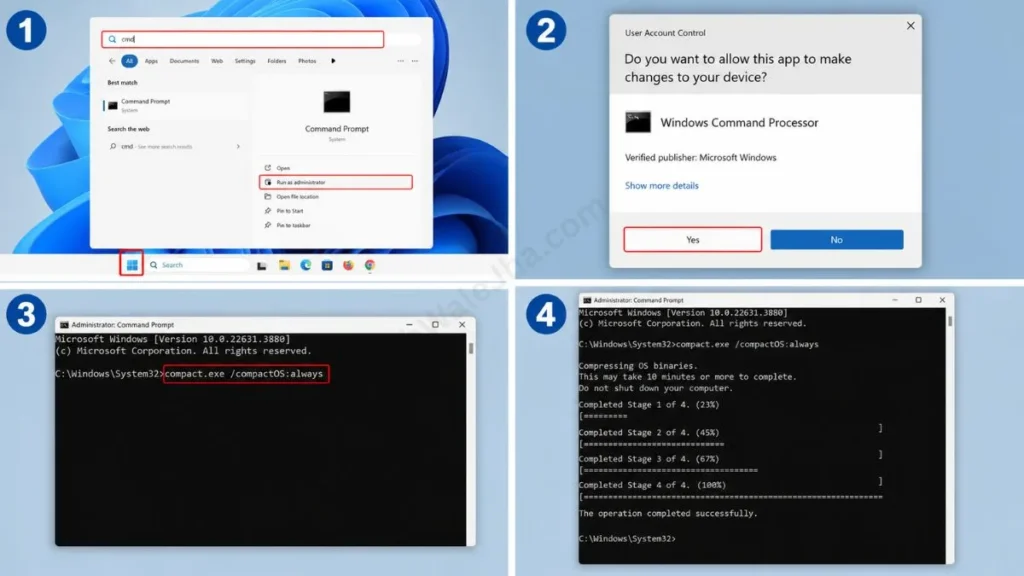
- Now, go to the Start menu again, search for CMD, and open it as an administrator.
- Now type: compact.exe /compactOS:always and press Enter.
- This process may take 10-20 minutes to complete, so do not shut down your PC or laptop.
Also Read: How to Install Windows 11 Without TPM 2.0 (Easy Guide)
Frequently Asked Questions
Does Storage Sense delete personal files?
No, Windows 11 Storage Sense only deletes temporary and junk files that aren’t necessary for the system. However, if you’ve manually turned on the option to clean the Downloads folder, it will indeed delete old files there, so check your settings carefully and pay attention when configuring it.
Is the process of removing the Windows.old folder completely safe?
Yes, it’s completely safe. But keep in mind that after removing the Windows.old folder, you won’t be able to “rollback” to your old Windows version. If your new Windows 11 is running fine, then you should delete this folder, as it’s the best way to save storage space.
Why is the space on my system drive continuously decreasing?
When Windows updates download in the background, browsers continuously accumulate cache, and the system generates error logs, it can cause your space to decrease. That’s why we always recommend regularly running the built-in Disk Cleanup tool in Windows 11.
Final Thoughts
Optimizing your computer’s storage is just as important these days as protecting your PC from viruses. When you properly free up disk space in Windows PC, you not only extend your PC’s life but also significantly improve its speed and performance.
Of the methods mentioned above, the delete temporary files Windows 11 process and the Windows 11 storage cleanup tools are the most reliable because they are provided directly by Microsoft. Check your apps every month, uninstall unused games, and take advantage of more advanced fixes for low disk space in Windows 11, such as turning off hibernation. Always keep your drive clean, so your computer will always run smoothly and you can work stress-free.
If you have any questions Were you able to free up a few GBs on your PC using the built-in Windows tools? Which trick saved the most space (Storage Sense, Windows.old, or Temp files)? Be sure to share your experience in the comments below, and if you’re getting any error messages during the cleanup, don’t forget to ask! 👇want to offer any advice, you can ask or share it in the comments below.
Disclaimer: The storage cleanup methods and command-line tweaks (such as disabling Hibernation and using Compact OS) provided in this 2026 guide are strictly for educational and troubleshooting purposes. While built-in Windows 11 tools are generally completely safe, modifying system settings, deleting deep system files, or running advanced Administrator commands always carries a small risk of system instability if done incorrectly.
Always double-check the files and folders you are deleting (especially in the Downloads folder) and ensure you have a complete backup of your important personal data on an external drive or cloud service before performing a deep system cleanup. We are not responsible for any accidental data loss, software malfunction, or hardware damage that may occur. Proceed carefully and at your own risk.




