
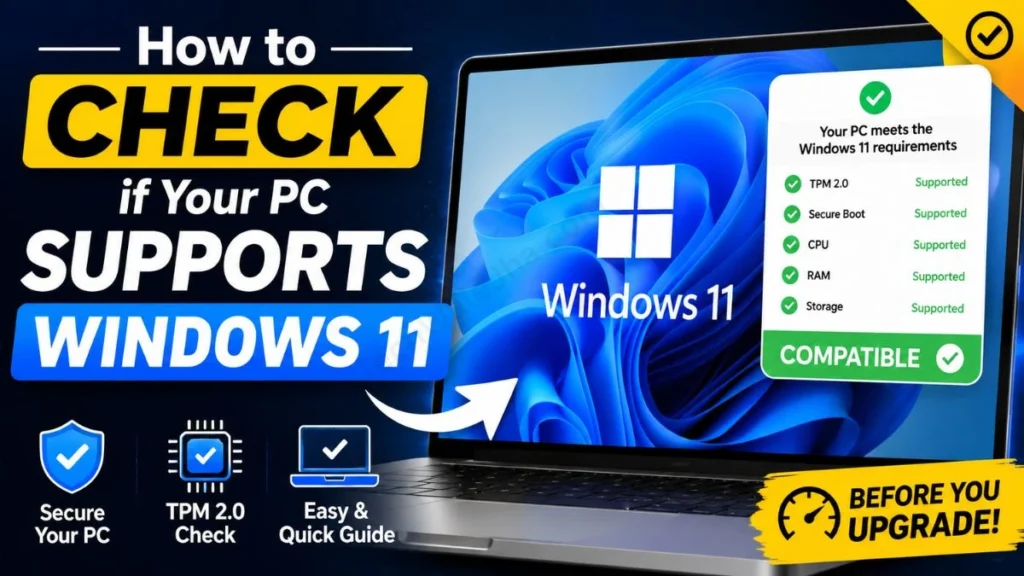
Friends, ever since Microsoft launched Windows 11 on the market, everyone has gone crazy for its new sleek design, centered taskbar, and cool gaming features. But as soon as we think about upgrading our old or current laptop, the biggest question becomes whether our hardware can handle this new OS or not.
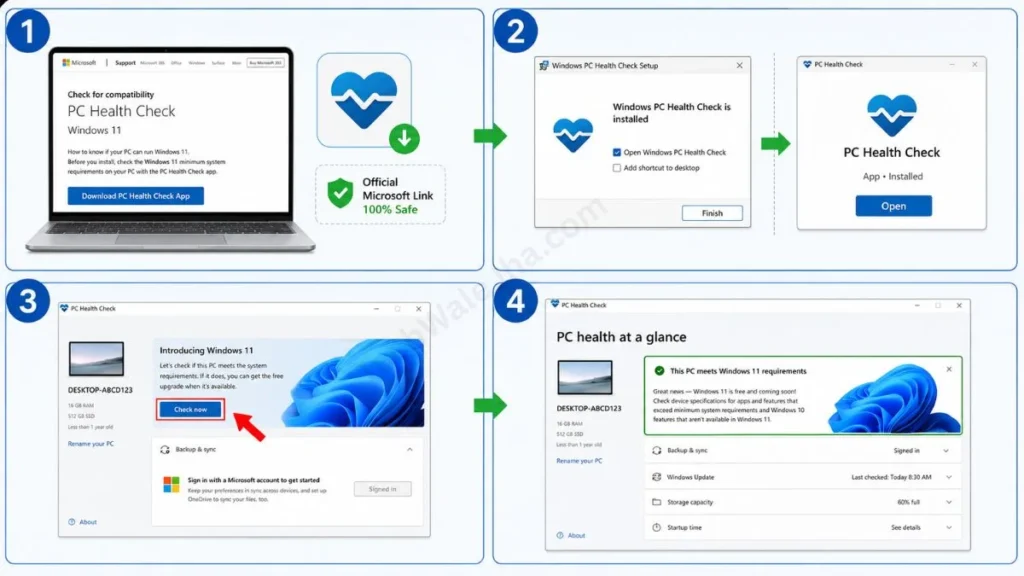
If you’re looking for a straightforward, quick, and 100% accurate answer on how to check if your PC supports Windows 11, the simplest and most official method is to download and install Microsoft’s built-in tool, the ‘PC Health Check app for Windows 11,’ on your PC or laptop. After opening the app, click the ‘Check now’ button that appears on the screen. In just a second, the app will scan your entire system and tell you in a pop-up whether your PC is ready for Windows 11 or not.
In the world of tech, many users are constantly asking, “Can my PC run Windows 11?” This is because this time Microsoft has made some very strict hardware rules regarding security, which can seem a bit technical to understand in plain language. But there’s no need for you to worry. As a tech expert, in this guide, I will explain to you in a very simple way how you can check your Windows 11 compatibility yourself from home, without having to go to a computer mechanic.
What are the minimum system requirements for Windows 11?
Before using any app or tool, it’s very important to know what level of hardware Microsoft is demanding from you. If you want to manually check your Windows 11 system requirements, your system must have at least the following hardware:
Here I have created a quick and scannable table for you, so you can easily match your specifications:
| Hardware Component | Minimum Requirement |
|---|---|
| Processor (CPU) | 1 GHz or faster, with at least 2 cores (64-bit compatible processor). |
| RAM (Memory) | At least 4 GB of RAM (though 8 GB is best for a smooth experience). |
| Storage (ROM) | Your hard drive or SSD should have at least 64 GB of free space. |
| System Firmware | UEFI with the ability to enable Secure Boot. |
| Security Chip (TPM) | Trusted Platform Module (TPM) version 2.0 (This is the most important and strict rule). |
| Graphics Card | With DirectX 12 compatible graphics and a WDDM 2.0 driver. |
| Display (Screen) | A high-definition (720p) display with a diagonal of more than 9 inches. |
In the list above, the biggest problem people face is checking for TPM 2.0 and Secure Boot. TPM 2.0 is a small security chip embedded on your laptop’s motherboard, whose job is to protect your PC from ransomware and hacking attacks. If your laptop is from 2017 or later, there’s a 99% chance that both TPM 2.0 and Secure Boot are present on your system; they may just be disabled in the BIOS settings.
Also Read: How to Free Up Disk Space in Windows 11 (2026 Guide)
Method 1: Use the PC Health Check App (The Easiest Way)
Friends, if you’re feeling a bit confused after reading the hardware list in the previous section, don’t worry. Microsoft has created an official tool for the convenience of regular users that verifies your Windows 11 upgrade eligibility with just one click.
Here are the step-by-step instructions for using this tool safely:
- Download the App: First, open your internet browser and go to the official Microsoft Support PC Health Check page. From there, download this free app to your system. This is an authorized Microsoft link, so there is no risk of viruses.
- Install and Open: Double-click the downloaded file to install it, and then open the PC Health Check app.
- Start the Scan: As soon as the app opens, you will see a “Introducing Windows 11” banner at the top. Right below it, there will be a blue ‘Check now’ button. Click on it.
- View the Result: In just 2-3 seconds, the app will show you the final result to see if your system is ready or not.
What to Do When You Get the “This PC can’t run Windows 11” Error in the App?
If an error with a red cross appears after the scan, people get worried immediately and think, “Why is my PC not eligible for Windows 11?” Friends, in 90% of cases, this doesn’t mean your laptop is junk. Most of the time, this error only appears because TPM 2.0 and Secure Boot is disabled in your system settings. By clicking the “See all results” button, you can find out exactly which hardware requirement is being missed.
Also Read: How to Install Windows 11 Without Microsoft Account
Method 2: How to Manually Check TPM 2.0 and Secure Boot?
If you want to understand the tech in a bit more detail, or if the PC Health Check app isn’t working, you can manually check your system settings without any software. This is the best option for those looking for a direct shortcut to check the TPM status on Windows 10:
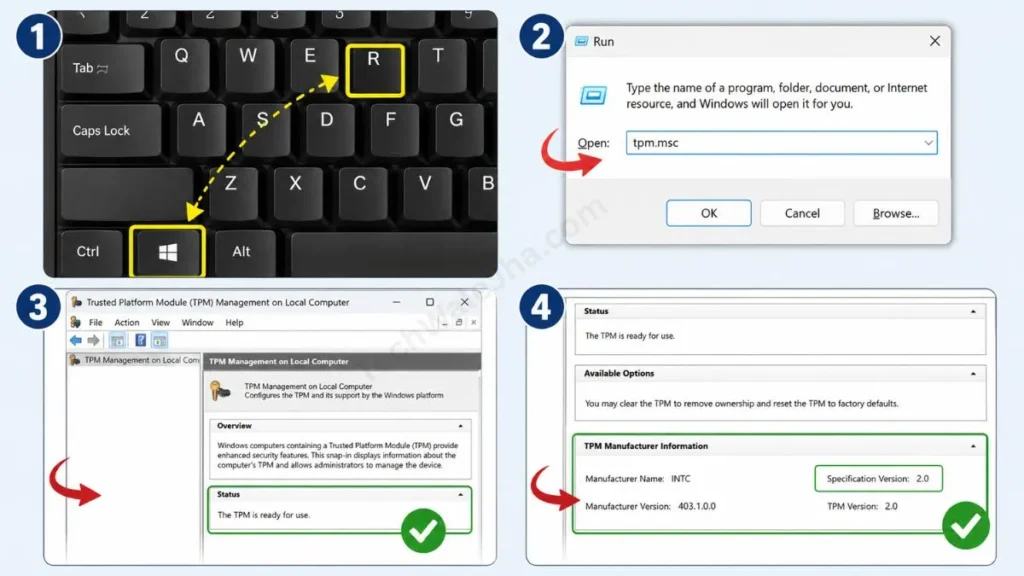
Step 1: How to Check TPM 2.0
- Press the Windows Key + R together on your keyboard to open the ‘Run’ dialog box.
- Then type tpm.msc in the box and press Enter.
- After that, a new window will open. Here, look at the ‘Status’ section. If it says “The TPM is ready for use,” it means the chip is present.
- Now look a little further down under ‘TPM Manufacturer Information’. It must say Specification Version: 2.0. If it says 1.2, then your PC is not officially supported.
Step 2: How to Check Secure Boot
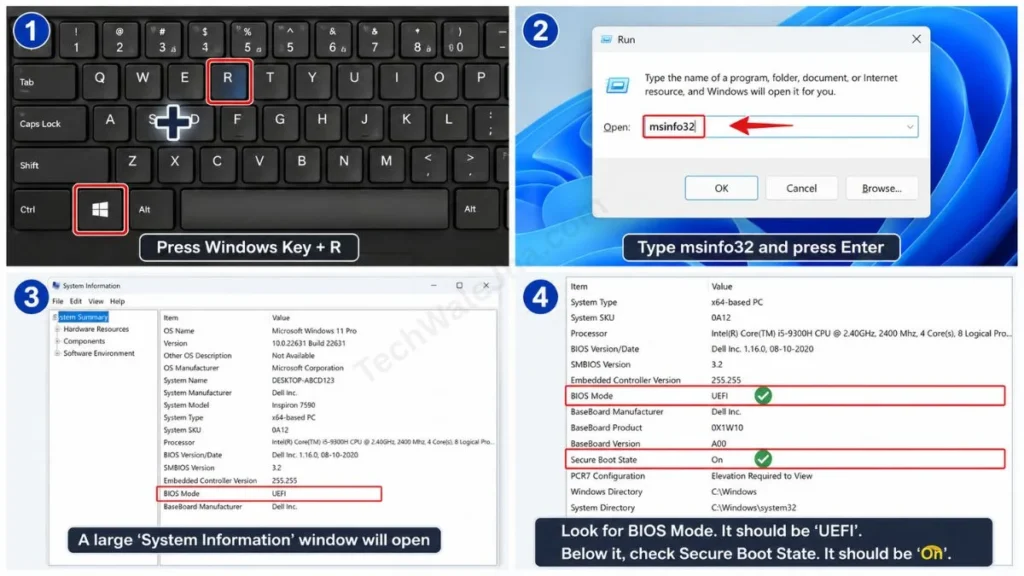
- Go back to your keyboard and press Windows Key + R, and this time type msinfo32, then press Enter.
- After this, a large ‘System Information’ window will open.
- Now, in the list on the right side, look for BIOS Mode. It should say ‘UEFI’ (not Legacy).
- Right below it, check the Secure Boot State. It should be ‘On’. If it’s ‘Off’, you will need to go into your system’s BIOS menu and turn it on.
Also Read: How to Install Windows 11 Without TPM 2.0 (Easy Guide)
Frequently Asked Questions
If my laptop doesn’t have TPM 2.0, will I never be able to run Windows 11?
Officially, Microsoft says that you cannot install Windows 11 on your PC or laptop without TPM 2.0. But in the tech world, there’s always a “workaround.” You can use a third-party tool like Rufus to create a custom bootable pen drive that bypasses the TPM and Secure Boot requirement. However, this bypass trick carries a slight risk of blocking future security updates.
Is it completely free to upgrade from Windows 10 to Windows 11?
Yes, absolutely! If you have an original (genuine) digital license or product key for Windows 10, and your hardware meets the Windows 11 minimum requirements, then this upgrade is 100% free for you. This way, you’ll get a new OS for free.
My laptop only has 4GB of RAM, will the new Windows 11 run smoothly on it?
Well, according to Microsoft’s list, 4GB of RAM is the minimum requirement, so the installation will be successful. But the new animations and features in Windows 11 are quite heavy. If you open a lot of tabs in Chrome or run heavy software, the system might lag (slow down) with just 4GB of RAM. So, for a smooth and fast experience, I’d advise you to upgrade your laptop to 8GB of RAM.
Conclusion
Friends, whether you’re thinking of getting a new laptop or upgrading your old one, checking your Windows 11 compatibility is the first and most important step. With the arrival of the PC Health Check app, this process has become so easy that any regular user can get a report on their hardware with just one click.
If your scan result is green, congratulations! But if you get a red cross, there’s no need to panic. Just go into your BIOS and turn on TPM and Secure Boot; that will solve your error in 90% of cases.
Since we’re now in 2026 and Windows 10’s official support has ended, it’s wise to switch to Windows 11 to protect your system from new security attacks. Hope this easy guide has cleared up your tech stress, friends. If you’re facing any issues with the BIOS settings or installation, be sure to ask in the comments below. Your brother here is all set to help!




