
Is a “Low Disk Space” pop-up repeatedly appearing on your PC screen? Or has the storage bar on your C drive turned completely red, causing your laptop to become extremely slow and unresponsive? A fully loaded hard drive or SSD not only slows down your PC but also completely prevents you from installing new applications and Windows updates.
Often, people think that in such a situation they have to immediately buy a new and expensive hard drive. But the truth is that Windows itself has several hidden tools that can make your job easier. By using the right Windows 11 storage cleanup techniques, you can free up a lot of space on your PC without spending a single penny.
In this step-by-step guide, we will practically learn how to free up disk space in Windows 11 without losing any of your essential personal data. Whether you need to manually free up C drive space or want a permanent fix for low disk space, this guide will help you completely. So, to understand it well, be sure to read this guide to the very end. So, let’s get started.
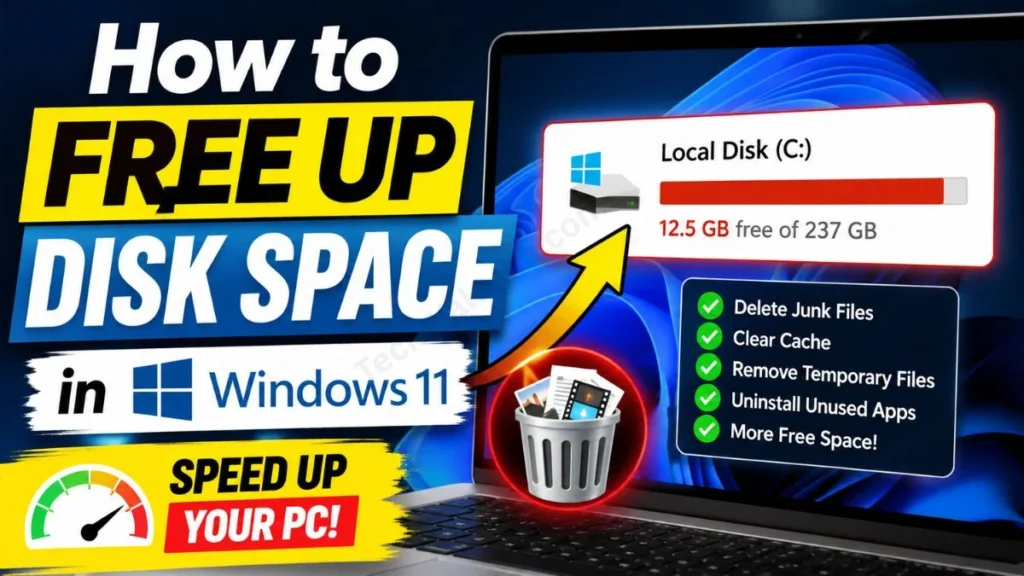
Quick Answer: How to Free Up Disk Space in Windows 11?
If you’re short on time and don’t want to read through the details, and you want to instantly free up space on your hard drive, then directly apply the proven steps given below:
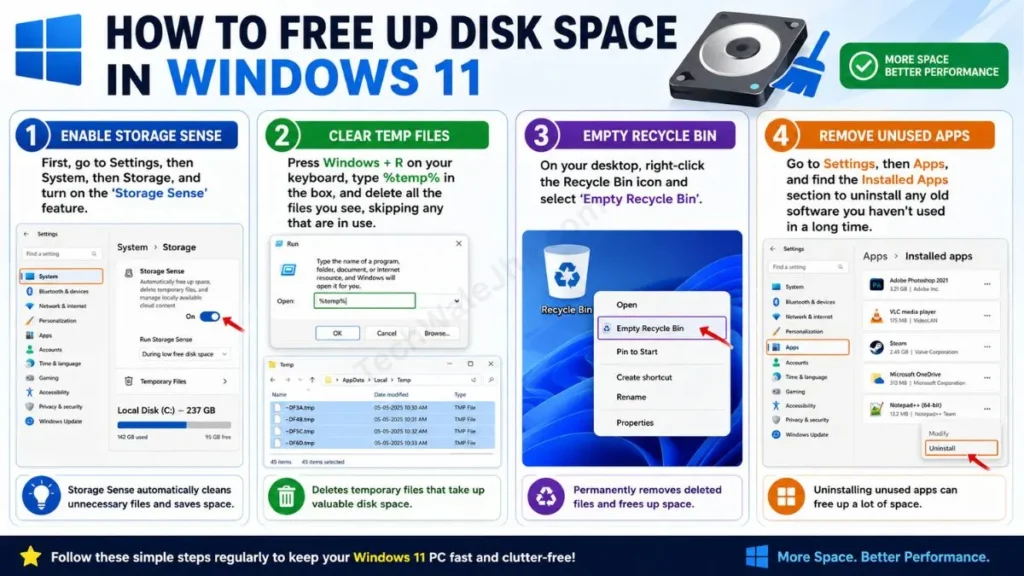
- Enable Storage Sense: First, go to Settings, then System, then Storage, and turn on the ‘Storage Sense’ feature.
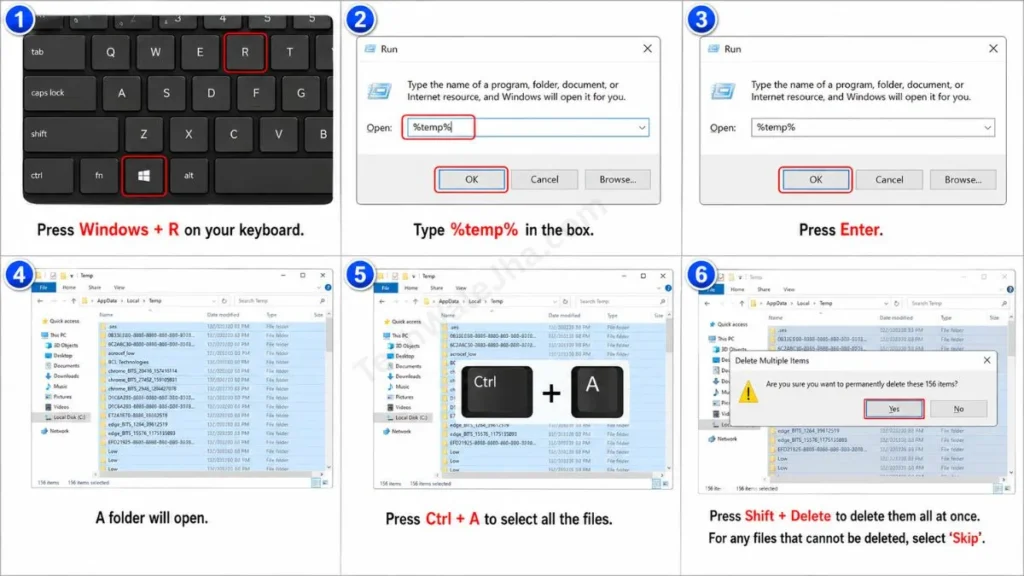
- Clear Temp Files: Press Windows + R on your keyboard, type %temp% in the box, and delete all the files you see, skipping any that are in use.
- Empty Recycle Bin: On your desktop, right-click the Recycle Bin icon and select ‘Empty Recycle Bin’.
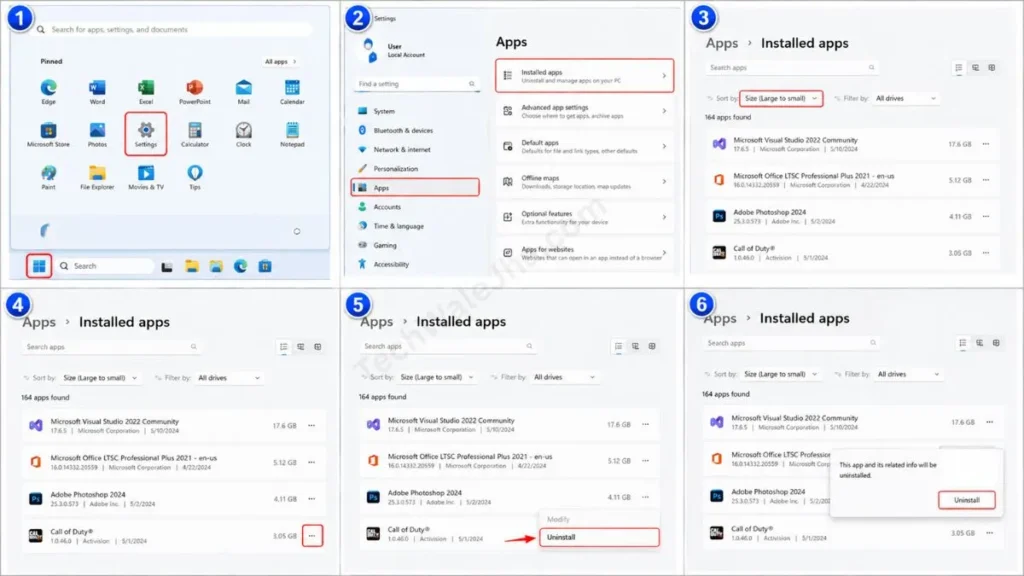
- Remove Unused Apps: Go to Settings, then Apps, and find the Installed Apps section to uninstall any old software you haven’t used in a long time.
Pro Tip: To keep your PC running smoothly and avoid freezing errors, you should always keep at least 15% to 20% of your C: Drive free. And yes, if you want to understand storage management and system requirements in more detail, be sure to check out Microsoft’s official drive space guide.
Also Read: How to Reset Any Application on Windows (2026 Quick Guide)
Basic Cleanup: The Easiest Ways to Instantly Save Space
To keep your PC free from daily maintenance and save space, be sure to adopt these 3 basic habits:
- Storage Sense: Let Windows automatically delete junk files.
- Temp Files: Manually clean the %temp% folder every week.
- Downloads & Bin: Keep the Recycle Bin empty by deleting unnecessary installers and old files.
Method 1: Turn On Storage Sense (Auto-Cleanup)
Windows 11’s Storage Sense is a smart feature that automatically deletes unnecessary junk and temporary files from your PC. To enable it:
- Press Windows + I on your keyboard to open Settings. Then, go to System and select Storage. Turn the ‘Storage Sense’ toggle on.
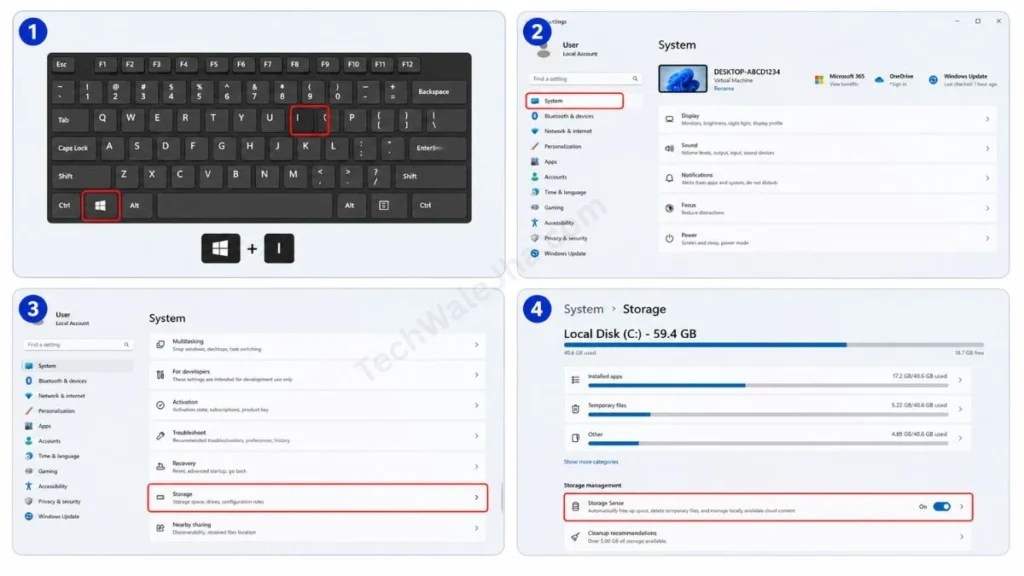
- You can also click on it to customize how often Windows automatically cleans up, such as every month or when storage is low.
Method 2: Safely Delete Temporary Files
Whenever you run an app or browse the internet, Windows creates some temporary files. If you want to manually delete temporary files in Windows 11, there are two ways to do it:
- Through Settings: First, go to Settings, then System, then Storage, and then Temporary Files. Here, Windows will automatically scan and select files that are no longer needed, such as DirectX Shader Cache, Delivery Optimization Files, etc. Select them and click ‘Remove files’.
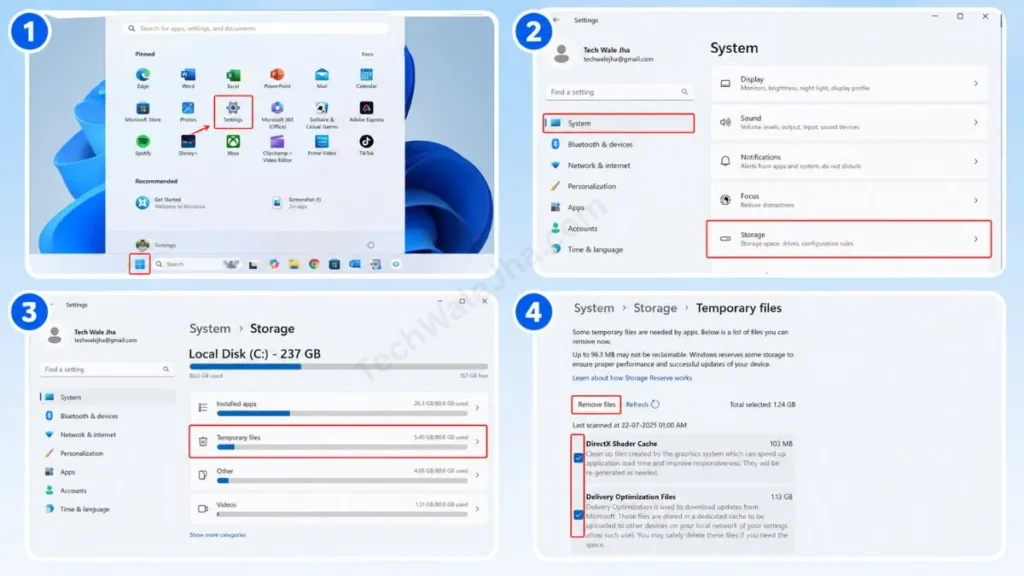
- Via the Run Command: For this, press Windows + R on your keyboard, type %temp% in the box, and press Enter. A folder will open. Then, press Ctrl + A to select all the files and press Shift + Delete to delete them all at once. For any files that cannot be deleted, select ‘Skip’.
Method 3: Empty the Recycle Bin & Downloads Folder
We often delete files from our PC or laptop, but they aren’t actually removed from the computer; they just go into the Recycle Bin.
- To do this, right-click the Recycle Bin icon on your Desktop and select “Empty Recycle Bin” to delete everything at once. This single step can often recover 5-10 GB of storage.
- Also, check your Downloads folder. Delete old software installers (.exe files), PDFs, and ZIP files that you no longer need.
Also Read: How to Repair a USB Flash Drive (2026 Quick Guide)
Advanced Cleanup: Remove Large Files and Unwanted Apps
If a basic cleanup doesn’t do the trick, you can easily fix major space problems with these advanced methods:
- Uninstall Apps: Remove heavy and unused software from your system.
- Find Large Files: In File Explorer, search for files larger than 1 GB to locate hidden heavy files.
- Move to Cloud/Drive: Transfer your videos and large data to an external SSD or OneDrive.
Method 4: Uninstall Unused Applications
On everyone’s PC, there are some apps or games that we haven’t opened for months. These wasteful apps consume background memory and storage. To delete them:
- Go to Settings, then Apps, then Installed Apps, and sort this list by “Size (Large to Small).”
- This will bring the largest apps to the top. For the apps or games you don’t use, click the 3 dots next to them and select “Uninstall.”
Method 5: Find and Delete Large Files
Often, we save large movies or project files in a folder and then forget about them, wondering how to increase disk space in Windows 11. There’s a smart way to find these hidden files. To do so, follow the steps below:
- Open your File Explorer (This PC). Then, click in the Search bar at the top right corner and type: size:>1GB. If you want, you can also type 500MB instead of 1GB.
- Windows will now search your entire PC for all files larger than 1GB. Carefully review them and permanently delete any unwanted files by pressing Shift + Delete.
Method 6: Move Files to External Storage or Cloud
If you have important documents, videos, or photos that you can’t delete, the best way to fix low disk space is to move them off the C: Drive.
- External Storage: Move your heavy files to an external hard drive (HDD) or a USB flash drive.
- Cloud Storage: You can use Google Drive or Microsoft OneDrive to upload your data to the cloud, which will completely free up your local PC storage.
Also Read: How to Install Windows 11 Without Microsoft Account
Deep System Cleanup: Delete Hidden Space Wasters
To reclaim your system’s deeply hidden storage, you can follow these 3 advanced steps:
- Remove Windows.old: Permanently delete the backup files of the old OS update from your storage settings.
- Clear Browser Cache: Remove months-old cached images and cookies from Google Chrome and Edge.
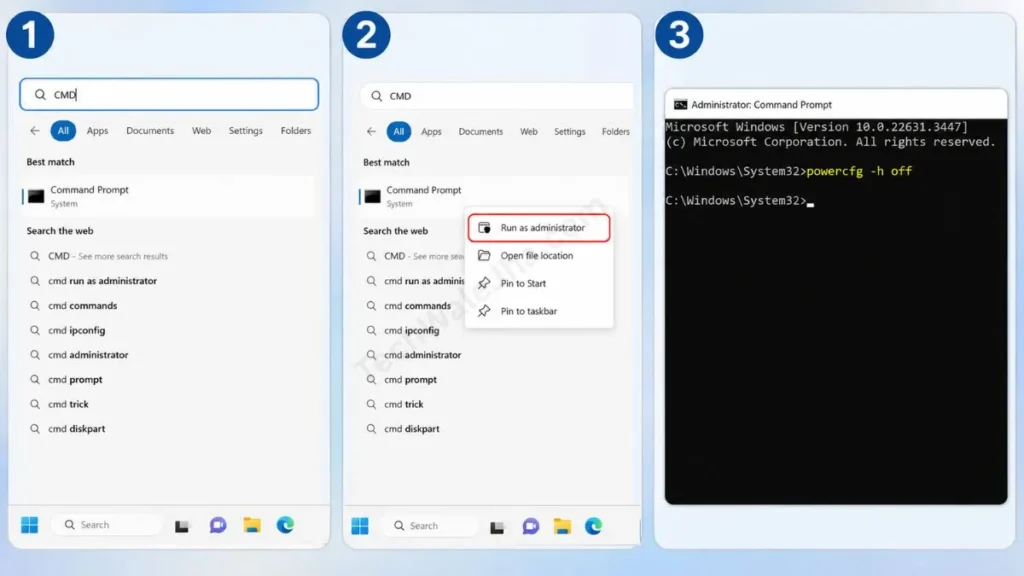
- Disable Hibernation: Type powercfg -h off in the Command Prompt, delete the hiberfil.sys file, and save GBs of space on your PC.
Method 7: Remove Previous Windows Installation (Windows.old)
When you upgrade your PC from Windows 10 to 11 or install a major update, Windows creates a backup of the old system called the Windows.old folder. This folder can easily take up 15 GB to 30 GB of space on your PC or laptop!
If your new update is working fine and you don’t want to go back to the old version, then be sure to use this process to remove the Windows.old folder. You can follow the steps given below for this:
- First, go to Settings, then System, then Storage, and then Temporary Files.
- In the list, find “Previous Windows Installation(s)” and check it. Then click ‘Remove files’.
- This one click will significantly solve your Windows 11 disk space problem.
Method 8: Clear Browser Cache (Chrome, Edge)
We use the internet daily, and our browsers like Chrome, Edge, or Firefox save images and data in a ‘cache’ to load websites faster. After months, this cache can grow to several GBs.
- To do this, open your browser and press Ctrl + Shift + Delete at the same time. Then, select “All time” in the time range. Check the box for “Cached images and files” and click the Clear Data button. You can also untick the cookies option if you don’t want to be logged out of your browser.
Method 9: Disable Hibernation (Advanced CMD Tweak)
If you don’t use the ‘Hibernate’ feature on your laptop, you can easily save 3-5 GB of space by deleting a hidden file named ‘hiberfil.sys’.
- Go to the Start menu and search for CMD in the search bar, then right-click on it and click ‘Run as administrator’ to open it.
- Then, when the black screen (Command Prompt) opens, type: powercfg -h off and press Enter. That’s it, hibernation is disabled and the system has automatically deleted that large hidden file.
Also Read: How to Improve CPU Health: 5 Tips to Keep PC Fast
Best Practices: Avoid Mistakes and Keep Your PC Maintained
Quick Answer: You should definitely avoid common mistakes like deleting system files while cleaning your drive. Always keep your C: Drive at least 15% free, and start the habit today of cleaning your storage sense, recycle bin, and temp files once a month.
Common Mistakes to Avoid During Cleanup
In the rush to free up space, we often end up doing more harm than good. So, you should be careful about the following:
- Don’t Touch System Folders: Do not manually delete any files from inside C:\Windows or C:\Program Files. This can cause Windows to crash.
- Avoid Junk “PC Cleaners”: Third-party cleaners found on the internet often slow down your PC and can introduce malware to your system. Instead, always use the built-in Windows 11 disk cleanup tools.
- 100% Full SSD: Never let your SSD fill up completely, as this reduces both its lifespan and speed.
Monthly Disk Cleanup Checklist
If you want to keep your PC or Laptop fast and free of clutter, be sure to follow this short checklist on the first Sunday of every month:
- Check if Storage Sense is ON.
- Clear %temp% files and Windows temporary files.
- Empty the Recycle Bin and Downloads folder.
- Clear the cache for the Chrome and Edge browsers.
Frequently Asked Questions
How much free space is needed for Windows 11 to run smoothly?
For good performance and future updates, you should always keep 15% to 20% of your C: Drive free.
Is it completely safe to delete temporary files in Windows?
Yes, it’s completely safe! These files are only used during installation and loading. If you manually delete temporary files by following the Windows 11 process, your personal data, such as photos, documents, or any other files, will not be affected at all.
What is the fastest way to free up storage?
The fastest method is to empty the Recycle Bin and uninstall old, heavy software or games from the ‘Installed Apps’ section.
Final Thoughts
Running out of storage doesn’t mean your PC is old or broken. By following a proper and smart Windows 11 storage cleanup routine, you can make your system run as fast as new. To do this, use the built-in tools mentioned above, such as Storage Sense and the Temporary Files manager. With these simple steps, you can effectively and easily solve the problem of how to free up disk space in Windows 11 for good. Keep backing up to your external drive and say goodbye to storage warnings forever.
Were you able to free up a few GB on your C: drive with these tips? Which trick saved the most space Windows.old or the Temp files? Be sure to share your experience in the comments below, and if you’re running into any new errors, don’t forget to ask! 👇
Disclaimer: The storage cleanup methods provided in this 2026 guide are for educational and troubleshooting purposes. While built-in Windows tools are generally safe to use, manually deleting files, altering system folders, or running command-prompt tweaks carries a risk of accidental data loss or system instability if done incorrectly. Always double-check files before deleting them, especially in the Downloads or custom folders, and ensure you have a complete backup of your important personal data. We are not responsible or liable for any lost files, software malfunction, or hardware damage. Proceed at your own risk.




