
Is your PC constantly hanging, or has some stubborn malware slowed down your system? Often you run into situations where Windows Update keeps failing or apps won’t open properly. And yes, if you’re giving your old laptop to a friend or selling it on the market, you’d never want your personal data to fall into someone else’s hands and be misused. The most solid and ultimate solution to all these problems is one thing: a factory reset Windows 11.
A factory reset brings your computer back to the same “brand new” condition it was in when it came out of the box. In this step-by-step guide, we’ll show you exactly how to safely factory reset Windows 11.
The best part is that Microsoft gives you a choice! Whether you want to save your important files or permanently delete everything for a fresh start, after reading this guide you’ll easily complete the reset process on your Windows 11 PC.
Quick Answer: How to Factory Reset Windows 11?
If you’re in a lot of hurry and want to get started right away, you can follow this quick checklist:
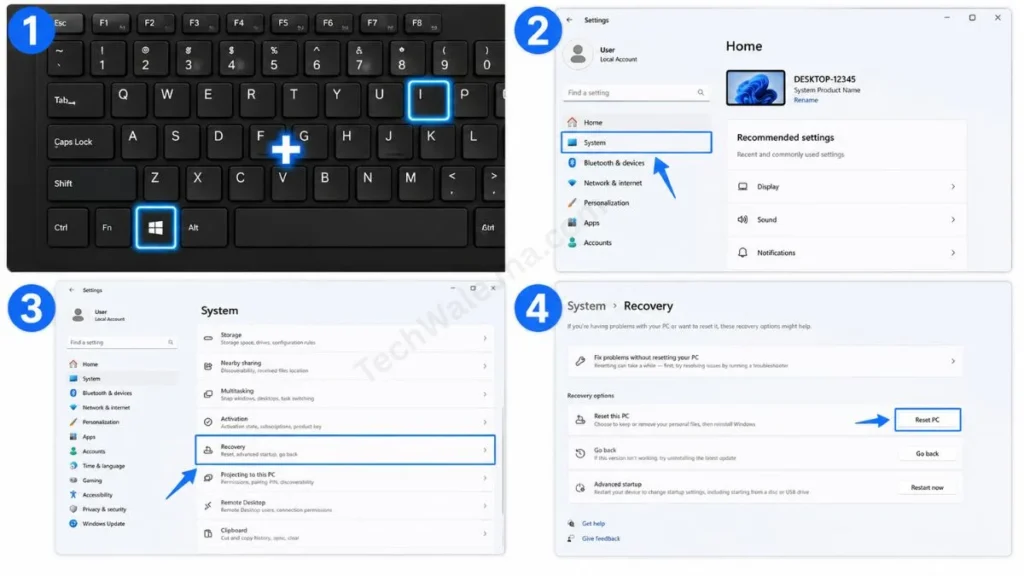
Steps to factory reset Windows 11:
- Press Windows + I to open Settings.
- Navigate to System and click on Recovery.
- Click the Reset PC button under recovery options.
- Choose either Keep my files or Remove everything.
- Select Cloud download or Local reinstall, then click Reset.
Pro Tip: This process might sound technical, but there’s nothing to worry about. Just make sure not to turn off your laptop during the reset. Microsoft’s official Windows recovery guide also strongly recommends that you always start the reset process with your laptop connected to its power adapter (charger).
Also Read: How to Free Up Disk Space in Windows 11 (2026 Guide)
Pre-Requisites: Be Sure to Do This Before Resetting
In the rush to get your system back to like-new condition, we often make a mistake. And one small error can cause your important data to be lost forever. Therefore, before you start your Windows 11 factory reset process, be sure to tick off this short checklist:
- Back up Your Data: Copy your important photos, videos, and project files to an external hard drive or a cloud service like Google Drive or OneDrive. This is especially important if you’re going to delete everything.
- Plug in Your Charger: Always keep the laptop connected to its power adapter. If the battery dies in the middle of the reset, Windows can become permanently corrupted.
- Save Product Keys: Write down the license keys for MS Office or any paid premium software in a notebook or take a photo of them on your phone.
- BitLocker Recovery Key: If your laptop has BitLocker, also known as Device Encryption, enabled, be sure to log in to your Microsoft account and save its 48-digit recovery key. Otherwise, your drive may get locked after the reset.
Step-by-Step Guide: How to Reset Windows 11 from Settings
Quick Answer: To properly reset your computer, press Win + I to open Settings, then click on System, go to Recovery, and click the ‘Reset PC’ button under ‘Reset this PC’.
If you can log in, the safest and easiest way to reset a Windows 11 PC is from within the Windows Settings. Let’s go through this process step-by-step.
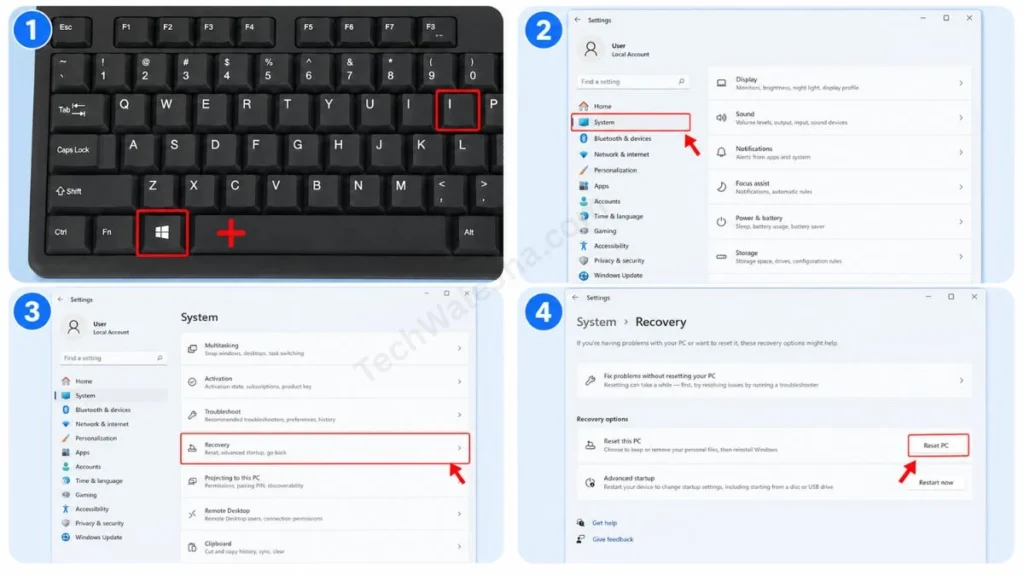
Step 1 & 2: Open Windows Recovery Settings
First, to get to the recovery menu:
- Press the Windows key + I on your keyboard at the same time to open the Settings app.
- Then, in the left-side menu, click on System.
- Now, scroll down a bit and click on the Recovery option.
- Here you will see “Reset this PC”. Click the Reset PC button right next to it.
Step 3: Choose “Keep My Files” vs. “Remove Everything”
As soon as you click the button, a blue pop-up window will open asking you to choose between two options. This step is the most important because this selection will decide what to keep and what to delete. Let’s clear up this confusion:
| Feature | Keep My Files | Remove Everything |
|---|---|---|
| Personal Data (Photos, Docs) | Safe | Deleted (Permanently gone) |
| Installed Apps & Games | They will be deleted | They will be deleted |
| Windows Settings | It will reset to default | It will reset to default |
| Best For (When to use?) | Fixing the PC for your use | Sell the laptop or donate it to someone |
- If you’re fixing your own PC: Always choose the “Keep my files” Windows 11 option. This will allow you to easily reset Windows without losing files. Your personal files on the C: Drive, like Desktop, Documents, and Downloads, will remain as they are; only apps and viruses will be deleted.
- If you are selling your PC: Then select the “Remove everything” Windows 11 option. This will erase every trace from your PC, such as accounts, history, and data, and will return it to a completely brand-new condition.
Also Read: How to Install Windows 11 Without Microsoft Account
Crucial Choices: Cloud Download vs Local Reinstall
Quick Answer: If your PC has an internet connection and the system is severely corrupted, choose Cloud Download because it downloads a fresh copy of Windows from the internet. But if you don’t have internet and want to finish the process quickly, you can choose Local Reinstall.
To reinstall Windows, you need the setup files. The difference between these two options is quite simple, as outlined below:
| Feature | Cloud Download | Local Reinstall |
|---|---|---|
| Do you need the internet? | Yes (Fast Wi-Fi is necessary) | No (Will work without a network) |
| How does it work? | It downloads a completely fresh Windows file of about 4 GB from Microsoft’s server. | It uses the old recovery files hidden on your hard drive to build the OS. |
| How much time will it take? | More (Depends on download speed) | Kam (Because the file is already inside) |
| Best For | When the PC has a severe virus or Windows has become completely corrupted. | When the PC is fine, you just need a normal, quick fresh start. |
Carefully select the recovery options in Windows 11. After selecting, you’ll see a final screen. Just click “Reset.” Your PC will restart two or three times, and in about 30 to 60 minutes the Windows 11 clean reset process will be complete!
Advanced Methods: How to Reset a PC Without a Password or Login
Quick Answer: If you’ve forgotten your PC password, click the Power icon on the Lock Screen. Then, hold down the Shift key on your keyboard and click Restart. After the Advanced Startup menu opens, click Troubleshoot, then select Reset this PC to begin your reset process.
Many times, the situation is such that we can’t even get to the Desktop, for example, if we’ve forgotten the password or are getting a blue screen error. In such cases, the Settings method won’t work.
Method 1: Reset from the Lock Screen (Shift + Restart)
If you are stuck at the login screen where you enter your password, you can do the following:
- Click the Power button icon in the bottom right corner.
- Then, press and hold the Shift key on your keyboard and click Restart.
- The PC will restart and go to a blue screen.
- Then, click on Troubleshoot and select the Reset this PC option.
- The process from here is the same as the one we described for “Keep my files vs. Remove everything.”
Method 2: Reset from Windows Recovery Environment (WinRE)
If your computer is not turning on properly and crashes before you can reach the Desktop, then for that you can:
- Turn on the laptop. As soon as the Windows logo appears on the loading screen, press and hold the power button for 10 seconds to force a shutdown.
- Repeat this process three times in a row.
- On the fourth attempt, Windows will detect that something is wrong and will automatically boot into the Windows Recovery Environment (WinRE).
- The screen will say “Preparing Automatic Repair.” After that, click on ‘Advanced options.’
- Then, click on Troubleshoot and go to Reset this PC to fix your Windows.
Common Reset Problems & Solutions
- Error: “There Was a Problem Resetting Your PC”
- Solution: This is the most common error caused by corrupted system files. To fix it, always select the ‘Cloud Download’ option when resetting. If Windows is opening, run CMD as an administrator and type the sfc /scannow command so that the damaged files can be repaired.
- Reset Process Stuck (Spinning Circle Stops)
- Solution: If your reset is stuck at 30% or 99% for a long time, don’t panic. Especially with older hard drives (HDDs), this process can take over two hours. Keep the system plugged in and wait patiently. If it still doesn’t move after 3–4 hours, force-restart the laptop and perform a clean install of Windows from a USB.
Also Read: How to Create a Windows 11 Bootable USB (2026 Guide)
Frequently Asked Questions
Will a factory reset permanently delete Windows 11?
Absolutely not! A reset doesn’t mean wiping the OS. The process simply removes the old, corrupted Windows installation and reinstalls a completely clean and fresh copy of Windows 11 in its place.
How long does it take to factory reset Windows 11?
It depends on your PC’s speed and the options you choose. Typically, it takes 20 to 40 minutes on a system with an SSD, while an older system with an HDD can take anywhere from 1 to 2 hours.
Will my Windows activate automatically after the reset?
Yes, on most modern laptops and PCs, a digital license is tied to the motherboard. As soon as your Windows 11 clean reset is complete and you are connected to the internet, Windows will activate automatically. You won’t need to enter a separate product key.
What is the difference between a Clean Install and a Factory Reset?
A factory reset repairs Windows using the system’s pre-existing internal files, which includes the option to reset Windows without losing files. On the other hand, a Clean Install uses a bootable USB drive to permanently format (erase) the entire hard drive and install the OS from scratch.
Final Thoughts
When your system is crashing repeatedly, a new update is giving an error, or you’re planning to sell your laptop, a safe factory reset on Windows 11 is always the easiest and most reliable fix. Microsoft has made it very easy for every user by providing reset Windows 11 PC options in both the Settings app and the Recovery Environment.
Always remember, whether you’re choosing ‘Keep my files’ on Windows 11 to fix your own system or ‘Remove everything’ on Windows 11 to sell it, be sure to back up your important data to an external hard drive or the cloud. A little precaution and this guide will make your PC fast and smooth like new again.
Did this step-by-step guide help you make your slow PC fast again like new? Or did you run into any “Stuck at 99%” issues during the reset? Be sure to share your experience or any errors you encountered in the comments below, and I’ll personally try to solve your problem! 👇
Disclaimer: The steps and methods provided in this 2026 guide are for educational and troubleshooting purposes. While the built-in Windows 11 reset feature is generally safe, resetting your PC (especially choosing ‘Remove everything’) will permanently delete files, applications, and settings. Always ensure that you have securely backed up your important documents, photos, and BitLocker recovery keys to an external drive or cloud service before initiating a reset. We are not responsible for any data loss, system errors, or hardware issues that may occur during or after the reset process. Proceed carefully and at your own risk.




