
Are you building a new PC? Or is your current laptop crashing repeatedly and you want to do a fresh clean install of Windows 11? There was a time when you needed a CD or DVD to install Windows, but nowadays you can do the whole job with a small USB flash drive.
If your system has become completely corrupted or is suddenly showing the “Blue Screen of Death” (BSOD), a bootable USB drive can be your greatest savior. It not only installs Windows quickly but is also the best tool for system repair and troubleshooting.
In this step-by-step guide, we’ll learn exactly how to create a Windows 11 bootable USB. We’ll cover every step, from downloading the official Windows 11 ISO to setting up Rufus, the Windows 11 software. That way, you can complete the Windows 11 USB installer creation process perfectly and safely boot Windows 11 from USB without any errors.
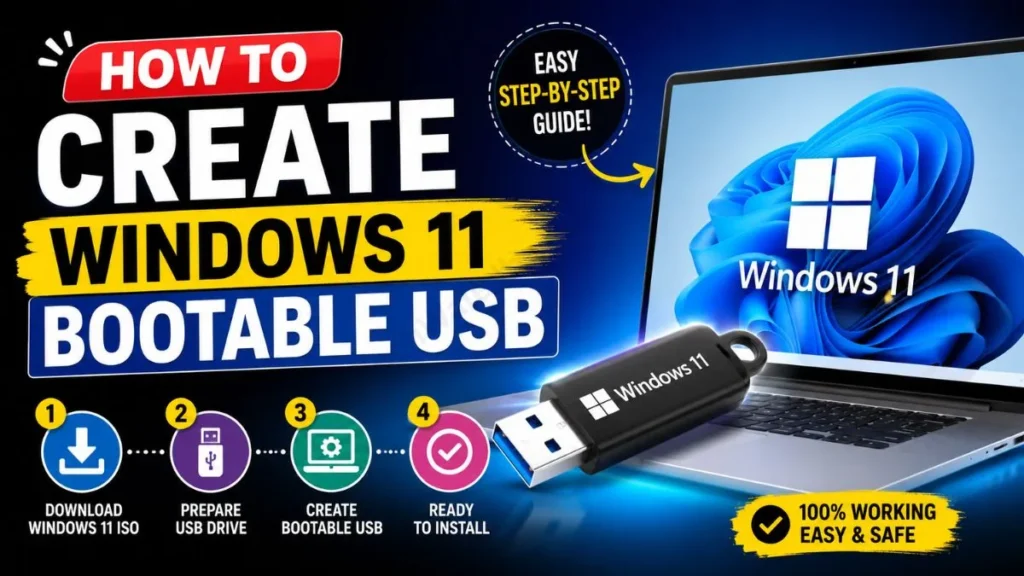
Quick Answer: How to Create a Windows 11 Bootable USB?
If you’re short on time and just want the action steps, you can follow the quick checklist below:
Steps to create a Windows 11 bootable USB using Rufus:
- Download ISO: Get the official Windows 11 Disk Image (ISO) from Microsoft’s website.
- Insert USB: Plug an empty USB flash drive (at least 8GB) into your PC.
- Open Rufus: Launch the Rufus tool and select your connected USB drive.
- Select ISO: Under ‘Boot selection’, browse to and select your downloaded Windows 11 ISO file.
- Configure & Start: Choose GPT (for UEFI/modern PCs) or MBR (for legacy BIOS), then click START to begin the formatting and burning process.
Pro Tip: When creating a bootable USB, all the data on the pendrive will be permanently formatted, so be sure to back up your files. Also, always download the official file from Microsoft’s official Windows 11 download page to prevent any malware from entering your system.
Prerequisites: What Do You Need to Create a Bootable USB?
Before starting a perfect and error-free process to create a Windows 11 USB installer, you will need to prepare a small tech toolkit. Don’t worry, all of these items are readily available to you.
Minimum System Requirements & Tools
- USB Flash Drive: You will need a USB flash drive with at least 8 GB of storage. A 16 GB or 32 GB drive is even better. Try to use a USB 3.0 drive for a faster process.
- Internet Connection: A stable and fast internet connection (around 5-6 GB of data) is required to download the Windows 11 ISO.
- Rufus Software: This is the free tool that will make a normal USB drive bootable. We use Rufus for Windows 11 because it is quite fast and reliable.
- Working PC: A running computer with Administrator privileges (rights) to download the ISO file and run Rufus.
Important Data Backup Warning
Please Note: When you create a bootable USB, all the old data on that flash drive is permanently deleted (formatted). Therefore, before starting this process, be sure to copy (backup) any important photos, videos, or documents from your flash drive to your PC’s D: drive or Google Drive.
Step-by-Step Guide: How to Create a Bootable USB with Rufus
After preparing your materials, it’s time for the actual process. Follow these steps carefully to avoid any errors during the installation.
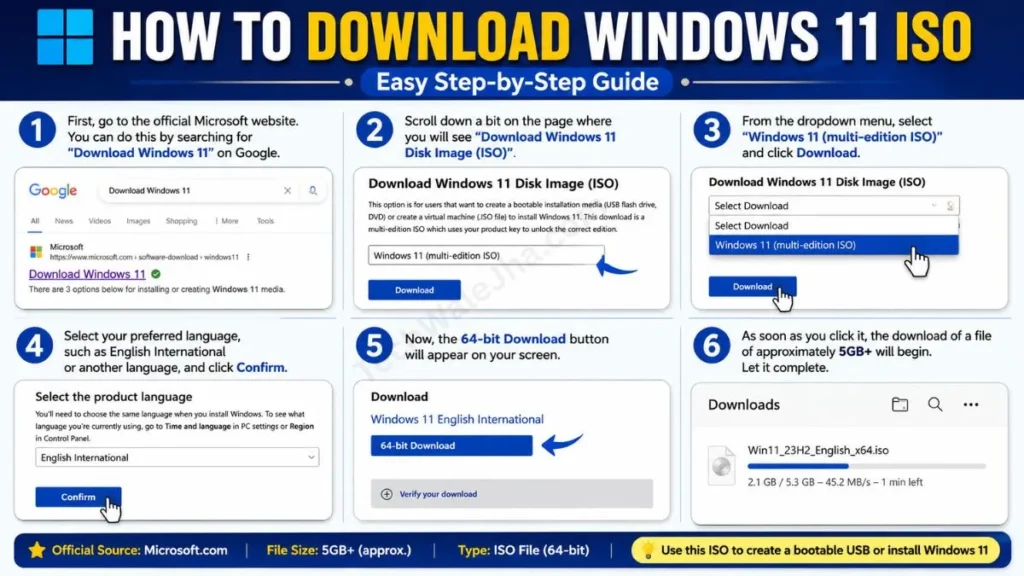
Steps 1 & 2: Prepare USB & Download Windows 11 ISO
First, properly insert the USB drive into your PC’s USB port. Then, follow these steps correctly:
- First, go to the official Microsoft website. You can do this by searching for “Download Windows 11” on Google.
- Scroll down a bit on the page where you will see “Download Windows 11 Disk Image (ISO)”.
- Then, from the dropdown menu, select “Windows 11 (multi-edition ISO)” and click Download.
- Select your preferred language, such as English International or another language, and then click Confirm.
- Now, the 64-bit Download button will appear on your screen. As soon as you click it, the download of a file of approximately 5GB+ will begin. Let it complete.
Step 3 & 4: Download Rufus & Detect Your Drive
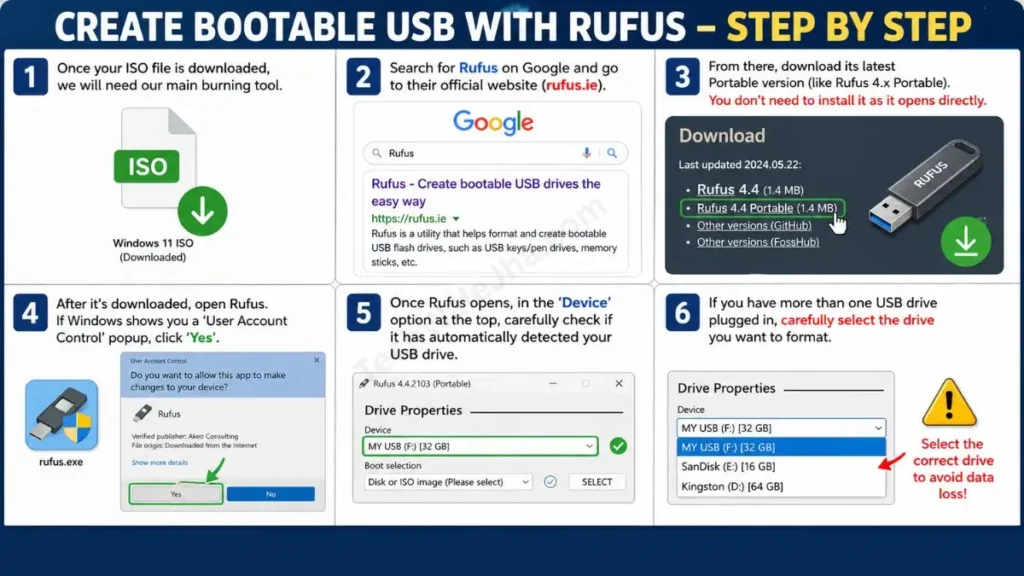
- Once your ISO file is downloaded, we will need our main burning tool.
- Search for Rufus on Google and go to their official website (rufus.ie).
- From there, download its latest Portable version (like Rufus 4.x Portable). You don’t need to install it as it opens directly.
- After it’s downloaded, open Rufus. If Windows shows you a ‘User Account Control’ popup, click ‘Yes’.
- Once Rufus opens, in the ‘Device’ option at the top, carefully check if it has automatically detected your USB drive. If you have more than one USB drive plugged in, carefully select the drive you want to format.
Crucial Settings: GPT vs MBR and UEFI vs Legacy BIOS
The Rufus software might look a bit complex, but we only need to focus on 2-3 things.
Step 5: Configure Rufus Settings Correctly
After verifying your pendrive (Device) in Rufus, click the SELECT button next to the ‘Boot selection’ section. From here, choose the Windows 11 ISO file that you downloaded from Microsoft’s website a little while ago.
Understanding GPT vs MBR (Which one to choose?)
As soon as you select the ISO, Rufus will automatically adjust most of the remaining settings, but you have to check the ‘Partition Scheme’ yourself. Let’s clear up this confusion in simple terms:
| Feature | GPT (GUID Partition Table) | MBR (Master Boot Record) |
|---|---|---|
| Best For | New Computers and Laptops (Windows 11) | Old PCs (pre-2012) |
| Boot Mode | It supports UEFI boot from a USB | Legacy BIOS is supported |
| Storage Limit | Best for hard drives larger than 2 TB | For hard drives up to 2 TB only |
Pro Tip: If you’re installing Windows 11, choose GPT over MBR without hesitation in the Windows 11 GPT vs. MBR debate. Windows 11 strictly requires UEFI boot mode, which only runs on GPT. As soon as you select it, the Target System will automatically set to “UEFI (non-CSM).”
Step 6 & 7: Start the Burning Process
Once everything is set (leave the file system as NTFS), click the START button below. Rufus will now give a warning that all the data on the pendrive will be erased (deleted). Click OK. Now, sit back and wait for 10-15 minutes. When the green progress bar is full and “READY” appears on top, your bootable USB is ready! You can then safely eject it.
Next Steps: How to Install Windows 11 by Booting from USB
Once the pendrive is ready, it’s time to test it on a real PC and install the new OS by following the Windows 11 installation guide.
How to Access the Boot Menu
First, insert the bootable pendrive into the computer or laptop where you want to install Windows, and restart (or start) the PC. As soon as the screen turns on and you see your PC brand’s logo, like HP, Dell, or Asus, immediately keep pressing the Boot Menu Key on your keyboard repeatedly.
- Common Boot Keys: F12, F9, F10, F8, or ESC. This depends on your laptop’s brand; you can search for your model’s boot key on Google and use it accordingly.
When the menu opens, select ‘USB Flash Drive’ (or the name of your pendrive) from the list and press Enter. If you have done everything correctly, you have successfully booted Windows 11 from USB.
Quick Installation Steps
After booting from the USB, the Windows Setup screen will open in a moment:
- After that, select your language, time format, and keyboard method correctly, and then click Next.
- Then, click Install Now.
- If you are asked for a Product Key and you don’t have one, click on “I don’t have a product key” below.
- Then, choose the version of Windows 11 (Home or Pro).
- After that, in the Setup type, select “Custom: Install Windows only (advanced)”. This option performs a completely fresh and clean install of Windows 11.
- Now, select your main (C:) drive, format it, and click Next.
After that, Windows will do the rest of the work on its own. During this process, your PC will restart 2 to 3 times, which is completely normal. Do not remove the USB drive until you see the final desktop or the setup wizard.
Also Read: How to Reset Any Application on Windows (2026 Quick Guide)
Troubleshooting & FAQs: How to Fix Errors
If you’re getting an error message on your screen during setup, there’s no need to panic. Most problems are caused by minor settings issues.
Common Problems (USB Not Showing, No Bootable Device)
Error 1: USB Not Showing in Boot Menu
Solution: Remove your USB drive and plug it into a different USB port, preferably one on the back of the motherboard. If it still doesn’t show up, go into your PC’s BIOS menu and check if the “USB Boot” option is enabled.
Error 2: “No Bootable Device Found”
Solution: This error occurs when you have selected the wrong settings in Rufus. If your PC is old, create a bootable USB again by selecting MBR instead of GPT in Rufus. If it’s a new PC, go into the BIOS and temporarily disable ‘Secure Boot’.
Error 3: Windows Can’t Be Installed on This Disk
Solution: This is the most common error. If you see “The selected disk is of the GPT partition style,” it means your system is running on Legacy BIOS but you created a UEFI (GPT) pendrive. To fix this, select the ‘MBR’ scheme in Rufus and burn the drive again.
Frequently Asked Questions
How much storage is needed to create a bootable USB drive?
You need at least 8 GB of storage. The Windows 11 ISO file is about 5-6 GB, so an 8 GB or 16 GB USB drive is best.
Can I use the pendrive for normal storage again after creating a bootable USB?
Yes, you can. Once your clean install of Windows 11 is complete, plug the USB drive into your PC and simply format it. It will turn back into a normal USB drive where you can store your songs, photos, or movies.
Can I create a bootable USB without Rufus?
Yes, you can use Microsoft’s official ‘Media Creation Tool’. However, Rufus is more popular for Windows 11 because it’s faster and has advanced features like TPM 2.0 bypass.
Final Thoughts
Creating a Windows 11 bootable USB might seem a bit technical at first, but if you follow the steps above carefully, it’s a piece of cake. The days of DVDs are over, and with a USB drive, you can set up your new PC or bring a dead laptop back to life in just a few minutes.
Always remember to download the ISO file only from the official Microsoft website and carefully select the GPT/MBR setting in Rufus according to your system. Once you have successfully created a bootable USB, formatting your system will become very easy for you in the future. Happy installing!
Did you successfully create a bootable USB? Or are you getting a new error code during installation? Be sure to share your questions in the comments below, and I’ll do my best to help you solve your problem! 👇
Disclaimer: The information provided in this guide is for educational and instructional purposes only. Creating a bootable USB drive will permanently format and erase all existing data on that flash drive. Furthermore, modifying BIOS/UEFI settings or installing a new operating system carries a significant risk of data loss on your computer’s hard drive if the wrong partition is selected. Always ensure you have fully backed up your important files and data to an external drive or cloud storage before proceeding with a clean installation. We are not responsible or liable for any accidental data loss, hardware issues, or system instability that may occur while following these steps. Proceed at your own risk.




