
Do you also share your PC or laptop with your family members, roommates, or friends? If so, the biggest worry is that someone might accidentally open your private photos, important office files, or sensitive financial documents. Nowadays, maintaining your digital privacy is extremely important. That’s why every Windows user should know exactly how to lock a folder in Windows 11 so their personal data always stays safe.
Many people think you need expensive premium software to set up a password-protected folder in Windows 11. But the truth is you can make your files hack-proof using completely free tools and the system’s built-in features in a smart way. Whether you want to create a highly secure vault or just temporarily hide and lock a folder on Windows 11 from friends, this in-depth guide will show you the easiest and most effective methods to keep all your important folders completely hidden.
The technique we use to protect our data is called encryption. If you want to learn in-depth details about data security and the Advanced Encryption Standard (AES) and how banks and governments use it, you can read about it on Wikipedia. Now let’s see in practice how to lock the folders on your PC.
Quick Answer: How to Lock a Folder in Windows 11?
To instantly lock any folder in Windows 11, follow these proven methods given below:
- 7-Zip Method: Right-click the folder you want to lock, select “Show more options,” then “7-Zip” and “Add to archive.” In the Encryption section, enter your password, select AES-256, and click OK.
- Windows Pro method: Right-click the folder again, click Properties, then click the Advanced tab. Check “Encrypt contents to secure data,” click OK, and then click Apply.
The list above is the direct and fastest way to apply security to any folder. If you want to deeply encrypt a folder in Windows 11, you’ll need to choose the right tool for your needs. Let’s take a quick look at a comparison of these three main methods so you can easily select the best method for you:
| Folder Lock Method | Is a password necessary? | Windows Version | Security Level |
|---|---|---|---|
| Lock folder using 7-Zip | Haan (Custom Password) | Windows 11 Home & Pro | Very High (AES-256) |
| Built-in Windows Encryption | Nahi (Account Linked) | Windows 11 Pro Only | Medium (Protect from other users) |
| Batch Script (Notepad) | Haan (Custom Password) | All Windows Versions | Low (Basic hiding technique) |
As you can see in the table, each method has its own distinct advantage. 7-Zip is the most powerful, while Windows’ built-in feature is the fastest. Now we’ll go over these methods one by one in detail so you can apply them easily without any errors.
Also Read: How to Optimize Windows 11 for Gaming
Method 1: Lock Folder Using 7-Zip (Free, Easy & 100% Secure)
If you want to ensure that no one can open your folder even with a brute-force attack, you need strong AES-256 folder encryption. For this, we will use a completely free and lightweight software called 7-Zip. This tool turns your regular folder into a password-protected “archive,” like a digital locker.
Let’s look at the complete step-by-step process for locking a folder using 7-Zip:
Step-by-Step 7-Zip Encryption Process
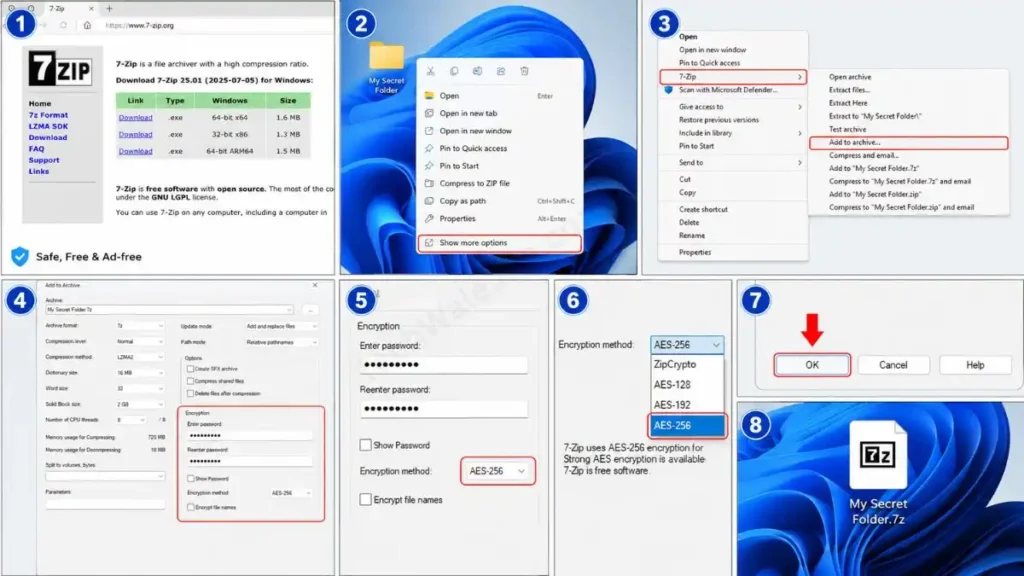
- First, download and install 7-Zip from its official website on your PC. This software is completely safe and ad-free.
- Right-click on the folder you want to hide and lock.
- Then, in the new Windows 11 menu, click on “Show more options” at the bottom.
- Now, move your mouse to 7-Zip and select the “Add to archive…” option.
Choose AES-256 Encryption
- After that, a new window will open. In this window, look carefully on the right side and you will see an Encryption section.
- In the ‘Enter password’ and ‘Reenter password’ boxes, type a strong and memorable password, because if you forget this password, recovering your data will be nearly impossible.
- Now, in the ‘Encryption method’ drop-down box below, make sure that AES-256 is selected, as it provides military-grade security.
- Once everything is set, click the OK button below.
Crucial Pro Tip: As soon as you click OK, 7-Zip will create a locked copy of your original folder as a ZIP or 7z file. But be aware that your original, unencrypted folder is still there. To complete the process, be sure to permanently delete (Shift + Delete) the old, unencrypted folder so that only the secure archive file remains on your PC.
Also Read: How to Free Up Disk Space in Windows PC
Method 2: Use Built-in Encryption (Windows 11 Pro Only)
If you don’t want to download software like 7-Zip and you have the Pro version of Windows 11 (not the Home version), then you can take advantage of Microsoft’s built-in EFS (Encrypting File System). This is the most seamless way to encrypt a folder in Windows 11.
Enable EFS (Encrypting File System)
Using this feature is very simple; to do so:
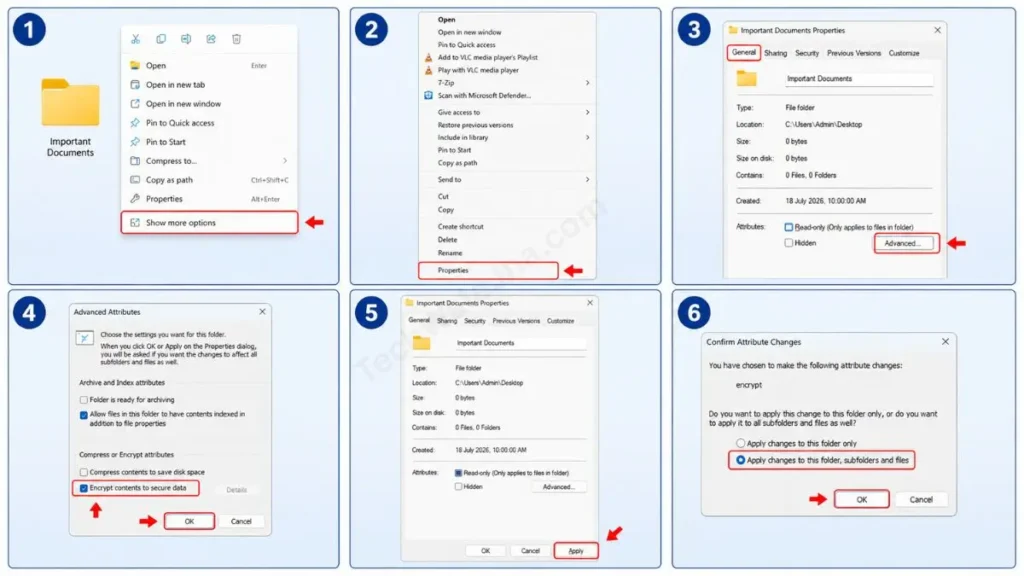
- Right-click the folder you want to secure and select “Show more options,” or press Alt + Enter directly.
- Then, click on “Properties” at the bottom.
- Go to the “General” tab and click the “Advanced…” button on the bottom right.
- A small box will open. There, check the box next to “Encrypt contents to secure data” and click OK.
- Go back to the Properties window and click Apply.
- Windows will ask if you want to encrypt subfolders and files as well. Select “Apply changes to this folder, subfolders and files” and click OK.
That’s it! Now, a small padlock icon will appear on your folder icon. This indicates that the Windows 11 Pro folder lock is enabled.
Important Note About This Method
Many people get confused after using this method because the folder doesn’t ask for a password when they click on it. It’s very important for you to understand the reason for this:
- How it works: This EFS method is linked to your User Account. As long as you’re logged into your PC with your password or PIN, this folder will open normally without any extra password.
- So where is the protection?: If your PC has more than one user account, like a separate login for your brother or friend, and they try to open your folder, they will get an “Access Denied” error. This method directly protects against other accounts and keeps data secure in case of hard drive theft.
Also Read: How to Reduce RAM Usage in Windows 11
Method 3: The Secret Batch Script Method (No Software Needed)
Many users ask if it’s possible to hide and lock folders in Windows 11 without any third-party apps. The answer is yes! You can use Notepad to create a small batch script to lock a folder. This method doesn’t heavily encrypt the files, but it completely hides your folder from the system and requires a password to unhide it. This is the best way to hide files from kids or roommates.
Create the Lock Folder Code
To use this trick, carefully follow the steps given below:
- Now, open Notepad on your PC.
- Copy the standard ‘Folder Lock Batch Script’ code, which is easily available on the internet, and paste it into your Notepad. If you want, you can search for “Folder lock batch code” on Google to find the standard script.
- In that code, there will be a line that says: if NOT %pass%== YOUR-PASSWORD goto FAIL. Replace YOUR-PASSWORD with your own secret password.
- Now, in Notepad, go to File at the top and click on Save As.
- Set the ‘Save as type’ to All Files and save the file with the name FolderLock.bat or any other name ending in .bat.
How to use it?
- As soon as you double-click the .bat file, a new folder named “Private” will be created.
- After that, you can put all your private photos and documents inside that Private folder.
- Now, double-click the .bat file again. A black (CMD) screen will appear asking you: “Are you sure you want to lock the folder? (Y/N)”. Press Y on your keyboard and then press Enter.
- Now your Private folder will disappear from there. To bring it back, double-click the .bat file, enter your password, and your folder will reappear. This is the coolest and smartest way to set up a password-protected folder in Windows 11.
Also Read: How to Make Windows 11 Faster
Frequently Asked Questions
What will happen if I forget the 7-Zip password?
If you’re using the 7-Zip method to lock a folder and have chosen AES-256 encryption, recovering the data if you forget the password is almost impossible. That’s why you should always pick a password you can remember or save it in a secure password manager.
Is the Batch Script method really secure?
No. This method only hides the folder. A smart user with good computer knowledge can right-click the .bat file, select ‘Edit,’ and easily see your plaintext password. This is only for basic privacy.
Can I use EFS (Windows Pro encryption) in Windows 11 Home?
No, the EFS feature is not available in the Windows 11 Home edition. Home users will have to use 7-Zip or some other external software to secure their data.
Final Thoughts
Protecting your privacy and sensitive data has become a basic necessity for people these days. In this guide, we have seen that there are several ways to lock a folder in Windows 11.
If you have bank details or highly confidential data, there is no better free tool for Windows 11 folder encryption than 7-Zip. If you’re in an office environment and need to protect files from other user accounts, Windows 11 Pro’s built-in encryption works very fast. And if you just need to hide photos from friends, a Batch script will easily get the job done. Always choose the right method according to your needs and security level, and keep your digital data safe.
Which method did you try to hide your private files and folders? The strong lock with 7-Zip or the secret Batch script? If you’re facing any problems setting up encryption, be sure to share it in the comments below, and I’ll help you! 👇
Disclaimer: The folder locking and encryption methods mentioned in this guide, such as 7-Zip, EFS, and batch scripts, are for educational and privacy purposes only. Please always remember your password or write it down in a safe place. We will not be liable for any password forgotten, script edited, or any kind of data loss. Please apply these security tricks at your own risk.




