
Have you ever, in a hurry, hit the “Delete” or Shift + Delete button on your PC and lost your most important office presentation or your family’s old photos? When essential data suddenly disappears from your screen, it’s completely normal to panic. Many times, while clearing up unnecessary storage on our computer, we accidentally delete important files too. In such scary moments, most users think they’ll have to call in an IT expert or buy expensive premium recovery software to get their data back.
But you don’t need to worry! If you have a bit of tech know-how and the right steps, you can recover deleted files for free without spending a single penny. Whether you’re using the latest system and need to restore deleted files on Windows 11, or you’re a Mac user, all these operating systems have amazing built-in “lifesaver” settings that can quickly bring back your accidentally deleted data.
In this deep-dive guide, we’ll show you the simplest, most effective, and 100% free methods to recover your lost files in minutes. This data recovery process is based on advanced computer science techniques used by tech experts, but we’ll break it down into very simple terms for you. So let’s see how to regain control of your files without any external software.
Also Read: How to Free Up Disk Space in Windows PC
Quick Guide: How to Recover Deleted Files for Free?
To instantly recover deleted files on your computer for free, try these three built-in methods given below:
- First, check the Recycle Bin: open the bin, find your lost item, right-click, and select “Restore” to safely recover files from the Recycle Bin.
- Third, use File History: right-click the original folder, select Properties, and use the Previous Versions feature to restore to an earlier state.
- Third, use System Tools: run Command Prompt as an administrator and use the chkdsk and attrib commands in CMD to recover deleted files that may be hidden or corrupted.
The bullet list above provides a direct solution. If you want a quick overview of which method will be best for your current situation, be sure to check the comparison table below:
| Recovery Method | When should this be used? | Technical Difficulty |
|---|---|---|
| Recycle Bin / Mac Trash | When the file is normally deleted | Very Easy |
| Previous Versions | When the file has been overwritten or edited | Easy |
| Cloud Trash (Drive/iCloud) | When the file saved online is deleted | Easy |
| Command Prompt (CMD) | When files on a USB drive or SD card are hidden or corrupted. | Medium to Advanced |
One of the most important “Pro Tips” to always remember: when you need to restore deleted files on Windows 11, immediately stop saving any new data or files to the drive where the data was deleted, such as the C: or D: drive. Saving new files can permanently overwrite the old data.
Now let’s go through all these methods step by step so you can easily recover your data.
Also Read: How to Optimize Windows 11 for Gaming
Built-in Recovery Methods (Windows, Mac & Cloud)
First, let’s talk about the methods that are directly available on your computer or account. These methods are the safest, fastest, and best ways to recover deleted files for free, without any risk.
Restore from Recycle Bin or Trash
Unless you permanently delete a file, such as by pressing Shift + Delete, every file you delete first goes to the Recycle Bin.
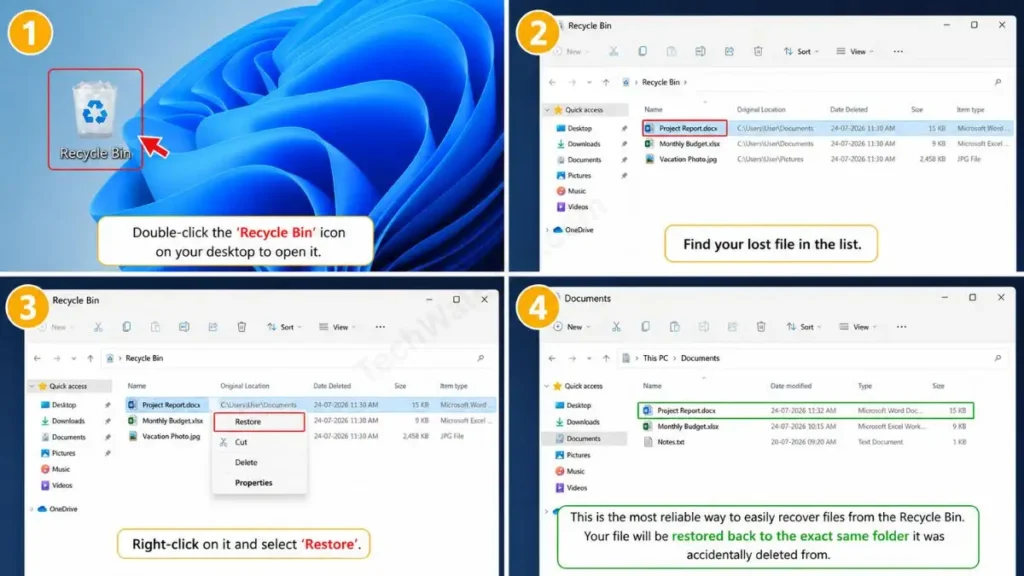
- Windows Users: Double-click the ‘Recycle Bin’ icon on your desktop to open it. Find your lost file in the list. Right-click on it and select ‘Restore’. This is the most reliable way to easily recover files from the Recycle Bin. Your file will be restored back to the exact same folder it was accidentally deleted from.
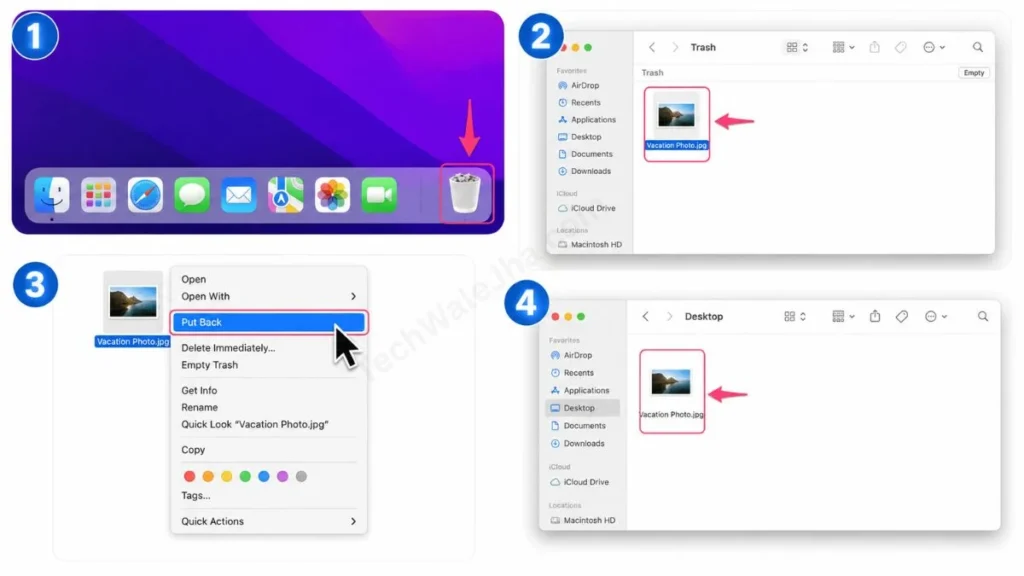
- Mac Users: Click the ‘Trash’ icon in your Mac dock. When you find the file, right-click on it or two-finger tap and select the ‘Put Back’ option. This way you can smoothly recover deleted files from the Mac Trash.
Use the ‘Previous Versions’ Feature (Windows)
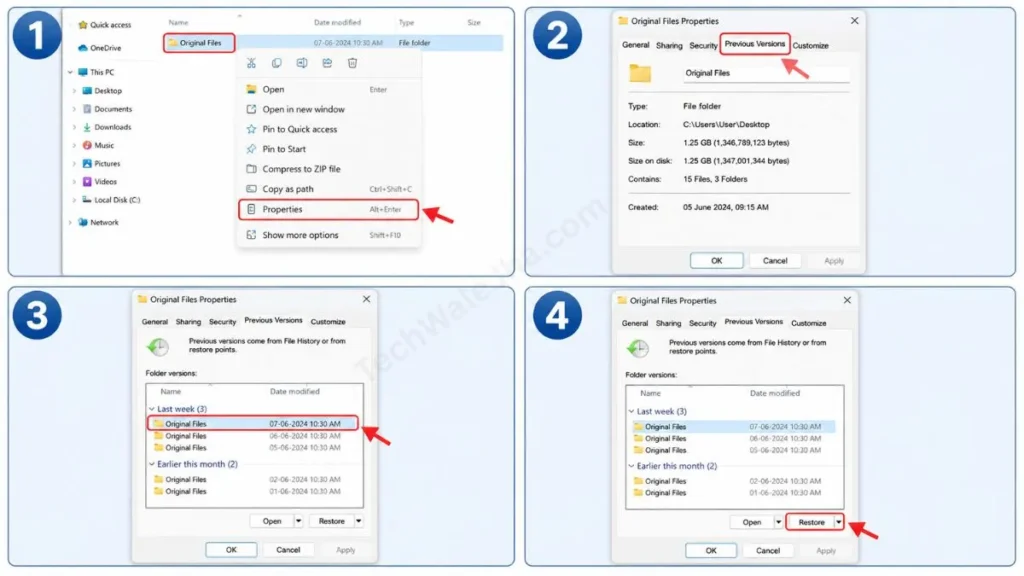
Many times we think we’ve deleted a file, but in reality, we’ve saved some incorrect changes to it or overwritten an old folder. In such situations, the Windows Restore previous versions feature works like magic.
- Right-click on the folder where your original file was saved.
- Then, click on Properties from the drop-down menu.
- Now, click on the Previous Versions tab.
- Here, you will see the folder’s previous states for different dates and times. Select a previous version you want and click Restore. This method will help you seamlessly restore deleted files on Windows 11.
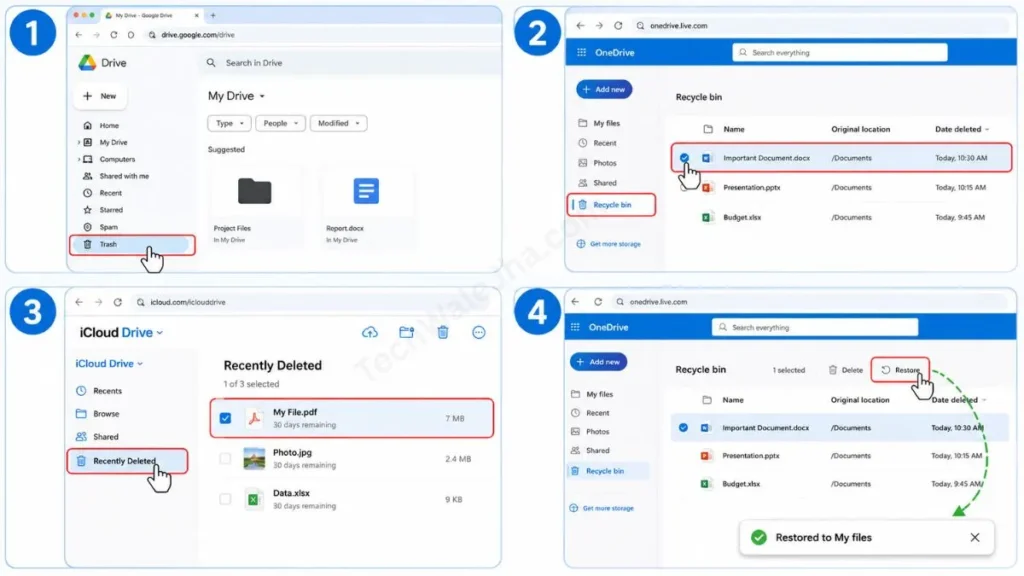
Recover from Cloud Trash (Google Drive/iCloud)
If your file was in cloud storage instead of on a physical hard drive, then recovering it from the cloud trash is even easier, because the cloud always keeps a backup. For this,
- Log in to your Google Drive, OneDrive, or iCloud account in your web browser.
- Then, in the left-side menu, find and click the Trash or Recently Deleted folder.
- Now, select your file, right-click, and click “Restore” to send your file back to the cloud storage.
Also Read: How to Check If Someone Used Your Computer
Advanced Method: Using Command Prompt (Windows Only)
If the Recycle Bin is completely empty, or if the data was deleted from an external device like a USB flash drive or an SD card, then you’ll need to use some of the system’s more advanced tools. For this, Windows has a command-line interface that allows us to easily execute the process CMD to recover deleted files. This is especially useful when files on a USB drive are suddenly hidden or corrupted due to a virus or malware.
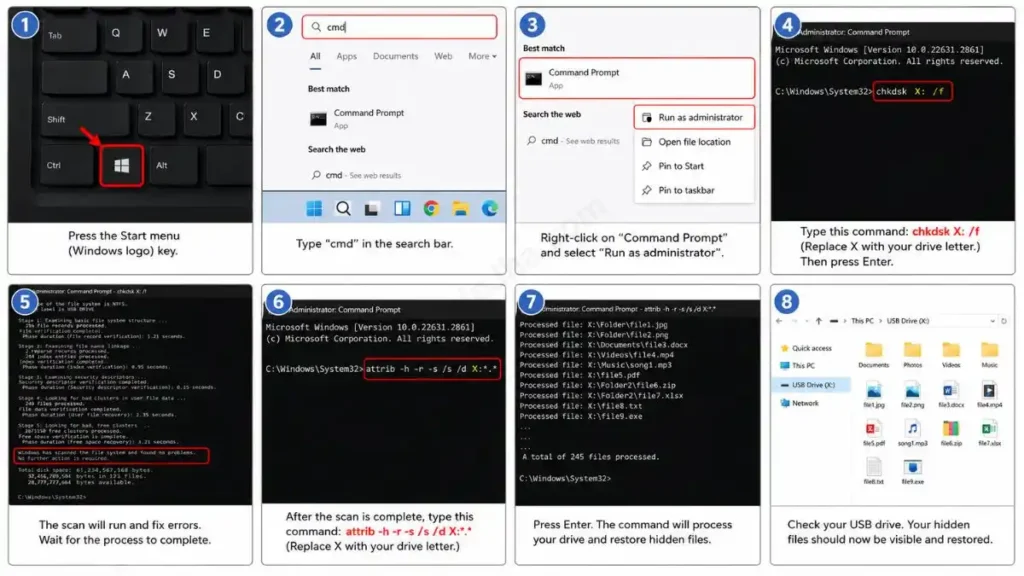
Run CMD as Administrator
To recover deeply hidden files from your system, you need to open Command Prompt with admin powers so that the system runs your command directly. To do this:
- On your keyboard, press the Start menu (Windows logo) key.
- Then, simply type “cmd” in the search bar.
- The results will then show “Command Prompt”; right-click on it and select “Run as administrator” to open it.
Run the Check Disk (chkdsk) Command
When the black CMD screen opens, the first thing we need to do is fix the drive’s errors and bad sectors.
- Type the following code exactly on the black screen: chkdsk X: /f (Replace X with your drive letter. If your USB drive is named D:, then you would type chkdsk D: /f).
- After typing, press Enter. This command will thoroughly scan your drive and fix errors, allowing the undelete files Command Prompt process to complete without any interruption.
Change Attributes to Unhide Files
After the scan is successfully complete, we will run the final and most important recovery command that brings back the hidden files. To do this:
- In the same CMD window, carefully type this command: attrib -h -r -s /s /d X:*.* (Again, be sure to carefully replace X with your correct drive letter).
- Then, after typing the entire command correctly, press Enter.
This process may take some time to complete, depending on the size of your drive. So, be patient and let it finish. When the CMD process is finished, go back to your drive, like the D: drive, and you will see that your lost data has been recovered. Yes, many times these files are saved in a new folder. This is the most professional way to recover your pen drive or hard drive without any third-party software.
Also Read: How to Check If Someone Used Your Computer
Frequently Asked Questions
If I’ve already emptied my Recycle Bin or Mac Trash, can I recover the data?
When you empty the bin by using Shift + Delete, the file is usually permanently deleted. In such cases, built-in methods don’t work. To recover permanently deleted files, you’ll need to download some good free data recovery methods from the internet or third-party software like Recuva or the free version of Disk Drill and run a deep scan.
Will the CMD attrib command work on a formatted USB drive as well?
No. If you’ve completely formatted your pendrive or hard drive, the Command Prompt trick for undeleting files won’t work. The CMD attrib command only restores files that have been hidden by a virus or system error. For a formatted drive, you always need a dedicated recovery tool.
How long can a deleted file be recovered?
There is no fixed time limit for this; rather, it depends on the ‘overwrite’ rule. When a file is deleted, it doesn’t completely disappear from the system; its space is just marked as ‘free’ (available) and the file is still recoverable. As long as you don’t save a new file, movie, or game to the same drive, you can 100% safely recover the file you deleted by mistake.
Final Thoughts
Losing your important data is nothing short of a nightmare, but if you don’t panic and take the right steps, recovery is very easy. In this ultimate guide, we’ve learned that instead of panicking, we can easily recover deleted files for free just by smartly using the Recycle Bin, Previous Versions, and Command Prompt.
Whether you need to restore deleted files on Windows 11 in the future or check your Mac’s Trash, always remember that the first step should be using the built-in tools. And the most important thing is that the only surefire way to permanently avoid all these problems is regular backups. Always keep your important files synced to an external hard drive or cloud services like Google Drive or OneDrive so that your data is always 100% safe.
Did you manage to recover your accidentally deleted important file with these methods? Which method worked best for you: the Recycle Bin, Cloud Trash, or the magic of CMD? If you’re facing any errors during the recovery process, be sure to let me know in the comments below, and I’ll help you! 👇
Disclaimer: The data recovery methods and CMD commands like chkdsk and attrib described in this guide are for educational and informational purposes only. Although these built-in methods are completely safe, a mistake while running system commands can permanently overwrite or corrupt your data. Please apply these steps carefully and at your own risk. We are not liable for any permanent data loss, drive issues, or technical errors.




