
Does it ever happen to you that you press your PC’s power button and then go make a cup of tea because the Windows screen is taking forever to load? Whether it’s a new laptop or an old PC, a slow Windows boot is a very common and frustrating problem. But there’s no need to panic, because you’re not alone in looking for ways to make Windows 11 boot faster.
When this happens, most people think their hardware is outdated or that there’s an issue with their hard drive, and that they’ll have to spend thousands of rupees on a new PC. But the truth is that by making a few simple software tweaks and changing some hidden settings, you can easily speed up your Windows 11 startup. Windows 11 natively comes with a lot of modern features, widgets, and heavy animations. When you turn on your PC, all of these things try to start at once in the background, which consumes a lot of system resources and significantly slows down the computer’s boot process.
In this step-by-step guide, I’ll share some practically tested and proven methods that will help you seamlessly optimize Windows 11 performance. We’ll stop heavy apps from launching unnecessarily in the background, enable the hidden fast boot option in power settings, and optimize visual graphics, these all without any external software or hardware upgrades. So let’s quickly make your system fast and snappier than ever.
Also Read: How to Find Hidden Viruses Using CMD
Quick Guide: How to Speed Up Windows 11 Startup?
To quickly increase the startup speed of Windows 11, follow these 3 most effective system tweaks:
- First, Disable Startup Apps: Open your Task Manager (Ctrl + Shift + Esc), then click on the Startup tab, and disable unneeded background apps.
- Second, Enable Fast Boot: Now, open the Control Panel, go to Power Options, then select “Choose what the power buttons do,” and enable “Turn on Fast Startup.”
- Third, Adjust Visual Effects: Press Win + R, type sysdm.cpl in the dialog box, and press Enter. Then, go to the Advanced tab and select “Adjust for best performance.”
This list of 3 points above is a direct, tested, and quick answer that will significantly reduce your boot time. However, if you are changing these advanced settings for the first time, you should have a clear idea of how these changes will affect the system’s behavior.
Let’s understand the major difference between a non-optimized PC and an optimized PC through this short comparison table:
| Windows 11 Setting | Slow Boot (Without Optimization) | Fast Boot (After Tweaks) |
|---|---|---|
| Startup Apps Load | As soon as the PC boots up, more than 10 apps like Skype and Spotify start loading at once. | Only the most essential Windows services will be loaded, making the chance of lag zero. |
| Power State | The PC completely reboots from scratch every time (time-consuming). | Windows saves its core state, making wake-up superfast. |
| Visual Graphics | Heavy shadows and transparent effects slow down the processor. | You get a cleaner, snappier, and instant UI response. |
Once you’ve successfully completed the process of disabling startup apps in Windows 11, the sudden load on your processor is completely eliminated. The combined effect of these tweaks can bring your boot time down to mere seconds.
Also Read: How to Recover Deleted Files for Free
Step 1: Disable Unnecessary Startup Apps (Task Manager)
When you turn on your PC, it’s not just Windows that starts up; many hidden third-party apps also try to activate suddenly. As soon as the desktop screen appears, chat applications like Skype or Microsoft Teams, game launchers like Steam or Epic Games, and cloud storage apps start running automatically in the background. These heavy programs keep your processor and RAM completely busy, causing the computer to lag for a few minutes.
If you really want to speed up Windows 11 startup, you need to stop this crowd. To do this, we’ll use the built-in Windows Task Manager. You can successfully disable startup apps in Windows 11 by following the easy steps below:
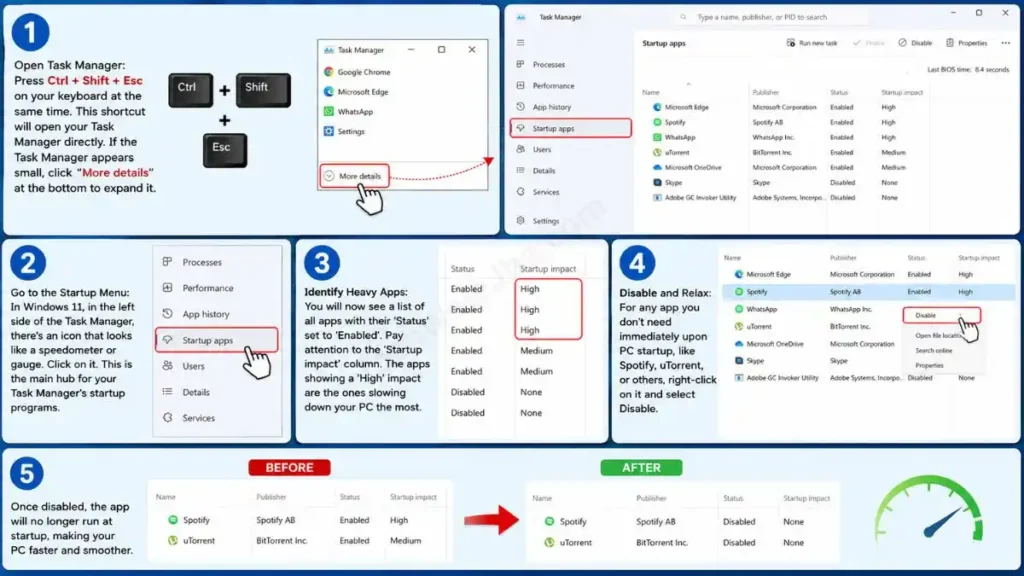
- Open Task Manager: Press Ctrl + Shift + Esc on your keyboard at the same time. This shortcut will open your Task Manager directly. If the Task Manager appears small, click “More details” at the bottom to expand it.
- Go to the Startup Menu: In Windows 11, in the left side of the Task Manager, there’s an icon that looks like a speedometer or gauge. Click on it. This is the main hub for your Task Manager’s startup programs.
- Identify Heavy Apps: You will now see a list of all apps with their ‘Status’ set to ‘Enabled’. Pay attention to the ‘Startup impact’ column. The apps showing a ‘High’ impact are the ones slowing down your PC the most.
- Disable and Relax: For any app you don’t need immediately upon PC startup, like Spotify, uTorrent, or others, right-click on it and select Disable.
Important Note: Disabling an app doesn’t mean it will be uninstalled. It simply means that the app won’t start in the background and slow down your system unless you manually open it. This is a basic Windows 11 slow boot fix that is 100% safe.
Also Read: How to Lock a Folder in Windows 11
Step 2: Turn On Fast Startup in Power Settings
After controlling startup apps, our second most powerful weapon is ‘Fast Startup’. This feature comes enabled by default on most new laptops, but it often gets quietly disabled after custom PC builds or updates.
So how does this actually work? Let’s find out. In a normal shutdown, your PC closes everything and restarts from scratch, right? But, when you turn on fast startup in Windows 11, Windows saves the system’s core state and necessary kernel files to the hard drive (hibernate) before shutting down. When you turn on the PC again, instead of loading everything from scratch, the system immediately pre-loads those saved files, which significantly reduces boot time.
To enable this great setting on your PC, follow the steps below:
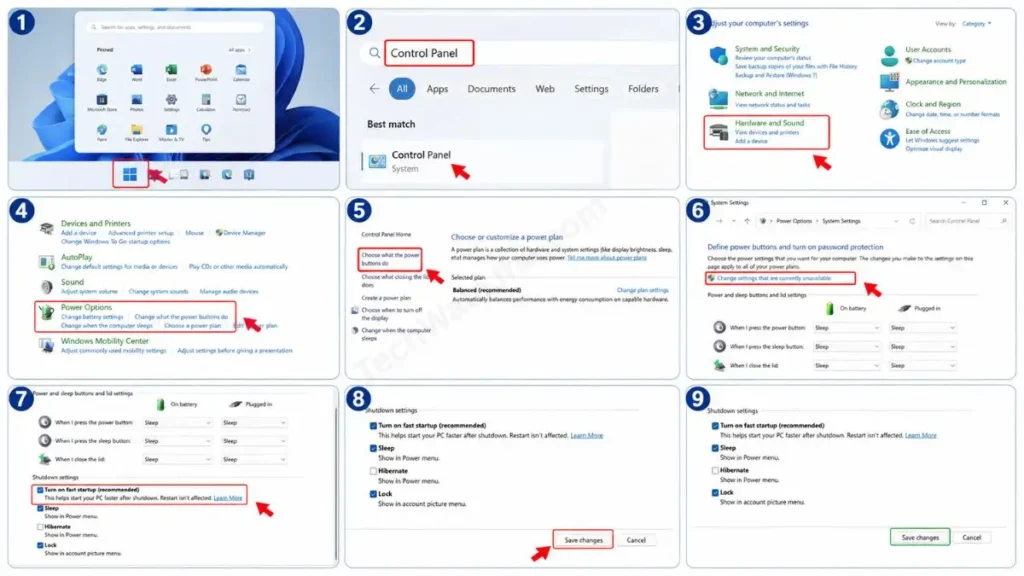
- Open Control Panel: Click the Start menu (Windows logo) on your desktop, then type Control Panel in the search bar, and open it.
- Navigate to Power Options: Inside the Control Panel, click on ‘Hardware and Sound’ and then select Power Options.
- Access Hidden Settings: Now, in the left-hand panel, click on the “Choose what the power buttons do” option.
- Unlock Admin Controls: You will see some options on the screen that are greyed out (locked). To unlock them, click on “Change settings that are currently unavailable” at the top. You must have administrator rights to do this.
- Enable Fast Boot: Scroll down and check the box for “Turn on fast startup (recommended).” After that, click “Save changes” below.
This small power tweak is a game-changer for PCs running on older hardware. It can practically boost your computer’s boot speed by seconds.
Also Read: How to Reduce RAM Usage in Windows 11
Step 3: Adjust Visual Effects for Peak Performance
Windows 11 is the most beautiful operating system to date. It makes extensive use of rounded corners, transparent taskbars (Mica effect), minimize/maximize animations, and soft shadows. All these “Eye Candy” features look very premium, but they continuously put extra load on your system’s processor and graphics card (GPU).
If your computer is a bit old or doesn’t have a dedicated graphics card, these heavy animations can make your PC feel laggy even after it boots. By turning off these effects, you can instantly apply the Windows 11 visual effects adjustment, making your PC feel snappier and ultra-fast right away.
To optimize these visual effects, you can follow the steps given below:
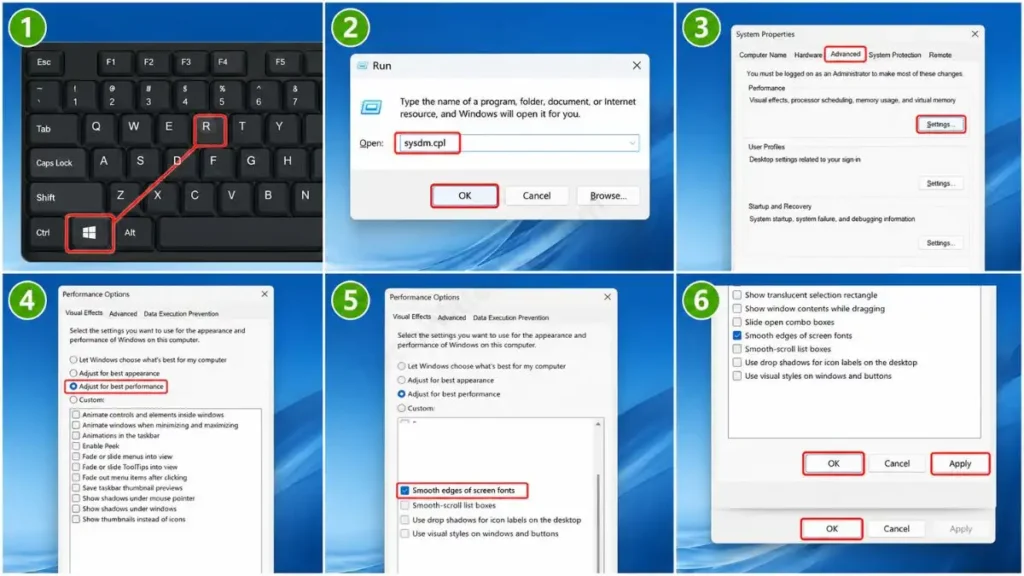
- Open System Properties: Press Win + R together on your keyboard to open the ‘Run’ dialog box. Type sysdm.cpl in it and hit Enter.
- Go to Advanced Settings: In the small window that opens, click the Advanced tab.
- Open Performance Settings: At the top, you will see the ‘Performance’ section. Click the Settings… button right below it.
- Adjust for Best Performance: Here you will see 4 options. For the fastest speed, select “Adjust for best performance.” If you want the fonts not to be blurry, leave “Smooth edges of screen fonts” manually checked in the list.
- Apply and Save: Click ‘Apply’ and then ‘OK’.
As soon as you apply this setting, you’ll notice that the time it takes for windows and folders to open and close is virtually zero. This is practically a hidden gem for improving Windows 11’s boot time and boosting overall responsiveness.
Does Hardware Matter? (SSD vs HDD & RAM)
No matter how many software tweaks you apply, hardware plays the biggest role after a certain point. If your Windows 11 is still installed on an old Hard Disk Drive (HDD), the system will always boot slowly because an HDD has a physical spinning disk that reads data slowly.
If you seriously want to make Windows 11 boot faster, replace your HDD with a modern NVMe SSD (Solid State Drive). SSDs use flash memory that is up to 10 times faster than an HDD. Also, make sure your system has at least 8GB (ideally 16GB) of RAM so that background processes can run smoothly.
Also Read: How to Make Windows 11 Faster
Frequently Asked Questions
Does keeping ‘Fast Startup’ on damage the PC or SSD?
Not at all! However, keeping the fast boot setting in Windows 11 always on means your system never fully shuts down from scratch. That’s why tech experts recommend manually restarting your PC once a week instead of shutting it down, so that old cache files can be completely cleared.
I’ve tried everything, but my PC is still starting slowly. What should I do?
If the hardware is fine and the settings are optimized, there might be some hidden malware or virus on your system that’s interfering with the boot process in the background. In that case, you should immediately run a ‘Full Scan’ with Windows Defender or a reliable antivirus.
Final Thoughts
A slow computer can instantly ruin both your productivity and mood. But as we’ve seen in this guide, you don’t always need to go to a computer mechanic to speed up Windows 11 startup.
Clearing out the clutter of unnecessary startup apps in your Task Manager, unlocking the hidden power of Fast Boot from the Control Panel, and disabling extra visual animations are three simple steps that have the potential to take any average PC’s performance to the next level. So, try these steps on your laptop or desktop today and make your system as fast as it was on day one. And always remember that a clean and optimized Windows is the key to achieving the best performance.
Has your Windows 11 boot time gotten faster after using these tricks? Which tweak worked best for you disabling startup apps, turning on Fast Startup, or reducing visual effects? If you’re having trouble with any step or your PC is still running slow, be sure to comment below and I’ll help you out completely! 👇
Disclaimer: The Windows 11 tweaks, settings, and optimization methods mentioned in this guide are for educational and performance enhancement purposes only. Exercise caution when making changes to system settings such as Task Manager, Power Options, or sysdm.cpl. Although these are built-in and safe methods, please apply these steps carefully and at your own risk. We will not be held liable for any incorrect actions you take, system crashes, or technical issues.




