
Friends, in today’s digital age, USB drives are used everywhere and everyone uses them. Whether it’s a major college project, important office presentations, or backing up our personal photos and videos. But the biggest fear hits when you plug your USB drive into a public computer like at an internet café or a friend’s PC and after that suddenly it gets infected with a virus. In such a situation, the first thought that comes to our mind is that all the important data is gone forever and the only option is to format the flash drive. Has this ever happened to you?
If you’re panicking and then going straight online to search “how to remove virus from pendrive” without losing your important data, here’s the fastest, 100% working method: to remove the virus without formatting the pendrive, open Command Prompt (CMD) as an administrator on your Windows PC. Then type your pendrive’s drive letter, like E: or F:, and press Enter. Next, type attrib -h -r -s /s /d *.* and press Enter. This magic command will permanently delete all hidden shortcut viruses from your pendrive and recover your original files back in the same location.
In this detailed article, I’ll explain to you in the simplest way exactly what the complete step-by-step process for removing the shortcut virus from a USB is and how it’s done. There are many fake tools on the market that, in the name of data recovery, permanently delete your data, so we’ll avoid any such mistakes. Here we’ll learn the safest CMD commands and genuine tricks so you can easily recover hidden files on your USB drive. Let’s end this tech tension once and for all, so that the next time this happens to you, you’ll already know the solution.
Also Read: How to Find Hidden Viruses Using CMD
What are the main symptoms of a virus on a USB drive?
Before starting any technical treatment, it’s very important to determine whether your USB flash drive is actually infected or if it’s just experiencing a normal system error. Often, in a panic, people quickly download any random free pendrive virus cleaner software from the internet. These third-party software programs are often more dangerous than the virus itself and can permanently wipe out all your remaining data.
So how can you tell if your flash drive has been infected by a trojan or malware? If your flash drive is showing any of the symptoms listed below, then you can be sure that a virus has completely infiltrated it:
- Shortcuts Being Created for Original Files: This is the most common problem these days. All the photos, movies, and important folders on your USB drive suddenly turn into 1KB or 2KB “shortcut” icons marked with a small arrow. Note: Do not double-click these shortcut files by mistake, or the hidden virus will copy itself onto your main computer and become active.
- Pendrive Shows Empty But Space Is Used: This is truly the most frightening symptom. As soon as you open your pendrive, it says “This folder is empty,” meaning nothing is visible. But when you right-click that drive in “My Computer” (or “This PC” on your laptop or computer) and select “Properties,” you’ll see that out of 16 GB, 14 GB of space is already in use, and a red bar appears. This simply means that your data hasn’t been deleted instead, a virus has deep-hidden all your files.
- Strange-Named Files with Unusual Extensions: If you see unknown files with .autorun.inf, .exe, or .vbs extensions automatically created on your USB drive, or folders named with strange symbols (@#$%), it’s a direct sign of a malicious attack.
- System Hanging or Crashing: As soon as you plug the infected USB drive into your otherwise perfectly running laptop or PC, your system suddenly becomes extremely slow or hangs. At the same time, your built-in Windows Defender antivirus starts repeatedly popping up danger warnings.
If you’re experiencing exactly the same thing, there’s absolutely no need to panic. All your files are completely safe; they’re just covered by a layer of virus. Let’s move on to the next section to see, step by step, how to safely recover them from home without spending a single penny.
Also Read: How to Create a Windows 11 Bootable USB
Method 1: How to Remove a Virus Using CMD (Command Prompt)? (100% Free Fix)
Friends, if you want to use your system’s power directly without installing any third-party software, Command Prompt (CMD) is the best tool for that. This trick is especially for those looking for a genuine and safe solution on how to remove virus from Pendrive.
Let’s see how to recover your hidden files using cmd commands to remove the virus:
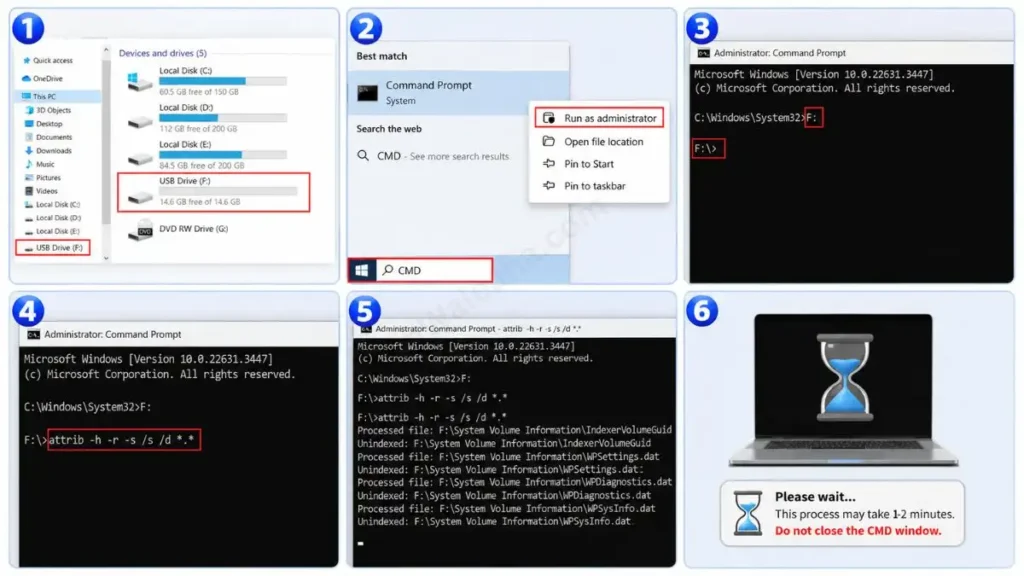
- Note the Drive Letter: First, plug your pendrive into your laptop or PC. Then, open ‘This PC’ (My Computer) and see which letter is assigned to your pendrive. For example: F:, G:, or E:.
- Open CMD: Press the Windows key on your keyboard and type “CMD” in the search bar. When “Command Prompt” appears, right-click on it and select “Run as administrator,” as this is very important.
- Select the Pendrive: Now, on the black screen, type your pendrive’s letter and press Enter. For example: F:. You are now in your pendrive instead of the system drive.
- Type the Magical Command: Now you need to type this exact command, making sure to include the spaces correctly:
attrib -h -r -s /s /d *.* - Wait: After pressing Enter, the cursor will blink for a moment, and then it may take 1-2 minutes for the process to complete, so do not close the CMD window at all.
As soon as the process is complete, a new folder will be created on your USB drive named “blank” or some numbers. Then open that folder and you’ll find all your original photos, videos, and files there safely. Now copy those files to a safe location on your PC, and permanently delete all the leftover junk shortcut files and viruses on the pendrive. Congratulations, you have successfully recovered hidden files on the pendrive.
Also Read: How to Repair a USB Flash Drive
Method 2: Scan and Clean the USB Drive with a Trusted Antivirus
If the above CMD process seems a bit technical or difficult, or if the pendrive still isn’t working properly after running CMD, you’ll need to use a trusted pendrive virus cleaner. Be careful not to download any cheap or free unknown software from the internet. Always choose only trusted and top-rated options.
Windows 10 and 11 already come with Microsoft Defender built-in, which is powerful enough to scan USB drives. Additionally, if you’re looking for the best antivirus for USB drives, Malwarebytes is a very solid option that catches even the smallest trojans instantly.
If you want to deeply understand how Windows security blocks USB viruses, you can read Microsoft Support’s Official Windows Security Guide. This authoritative source will teach you how to proactively optimize your Defender settings to prevent future virus attacks.
Let’s take a quick comparison to see which method is most suitable for you:
| Feature / Factor | Method 1: CMD (Command Prompt) | Method 2: Trusted Antivirus |
|---|---|---|
| How does it work? | It manually fixes the virus with hide/unhide commands. | It detects viruses and malware and deletes them directly from the system. |
| Data Recovery | There’s a 100% chance that the hidden data will be recovered. | If the file is completely corrupted, the antivirus can only delete the infected file. |
| Ease of Use | This is a bit technical, and you have to type its command correctly. | It’s very easy: just right-click and select the “Scan” option. |
| The Need for the Internet | Not at all, it works offline. | Yes, you need an internet connection to update the latest virus definitions. |
Also Read: How to Install Windows 11 Without Microsoft Account
Last Resort: How to Format a Pendrive? If the Data Isn’t Important
If both of the above methods fail, which is a rare occurrence, or if the data on your pendrive is not important to you at all and you just want your USB drive to work properly again, then formatting the corrupted pendrive is the easiest way to do it.
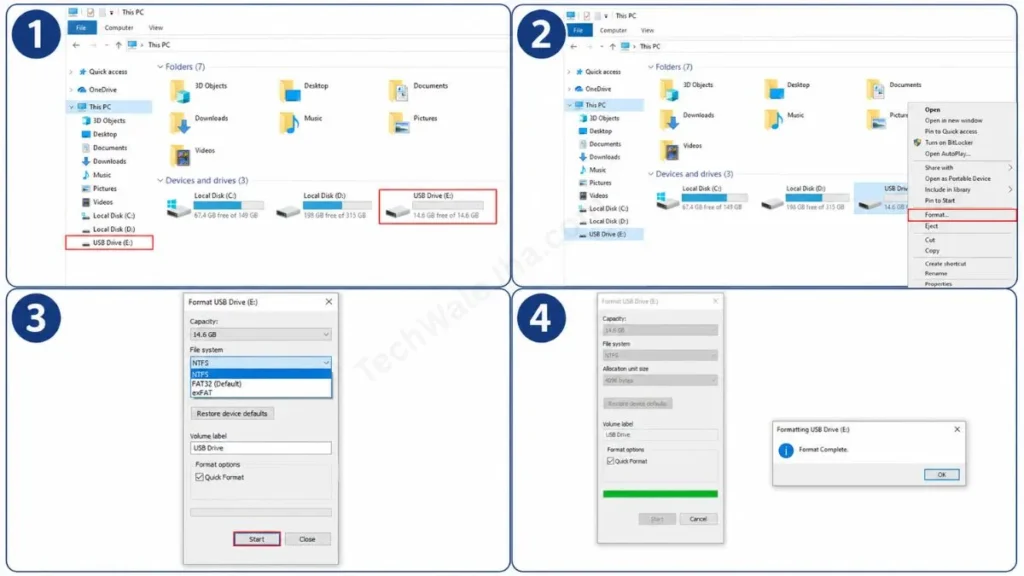
To do this, just go to ‘This PC’, right-click on your infected pendrive, and click ‘Format…’. Select ‘NTFS’ or ‘FAT32’ for the file system and click ‘Start’. In just 5 seconds, your virus will be gone forever and the drive will be just like new.
Frequently Asked Questions
Does formatting a USB drive permanently remove the virus?
Yes, absolutely! If you follow the step of formatting a corrupted USB drive, all the data on your drive and every hidden virus will be permanently deleted. But only format when you have a backup or the data isn’t important. If the data is essential, always use the CMD method first.
Whenever I plug a USB drive into my laptop, shortcuts keep getting created on it. What should I do?
This is a very common problem. If, even after removing the trojan from your flash drive, the virus keeps coming back, it means the virus isn’t on your flash drive but is embedded in your computer’s or laptop’s C: drive. In such a case, you need to run a “Full System Scan” of your entire PC with a good antivirus, in addition to scanning the pendrive.
How can I protect my USB drive from viruses in the future?
Completely avoid plugging your flash drive into public computers at cyber cafes, print shops, or college. To protect your USB drive from viruses in the future, always keep your laptop’s Windows Defender ‘Real-time protection’ ON. Additionally, you can set your USB drive to ‘Read-Only’ mode, which will prevent any external virus from copying itself onto it.
Conclusion
Friends, getting a virus on a pendrive has become a common occurrence these days, but due to a lack of proper information, many people out of fear permanently delete (format) their months of hard work and important data.
I truly hope that after reading this detailed and easy-to-follow guide, you’ll never have to search again for “how to remove virus from pendrive without losing data.” The CMD (attrib command) method is the most powerful and 100% working, which I have personally been using for many years.
We have safely recovered our hidden files without any paid pendrive virus cleaner software. If this trick has saved your important data and time today, then be sure to share this article with your friends who use a pendrive daily for college projects or office work. For more life-saving tech tips and tricks like this, stay connected with your own TechWaleJha and be sure to bookmark the page.
Disclaimer: This guide and the CMD tricks mentioned in it are for educational purposes and to help you. Be very careful when typing commands and follow all steps carefully. TechWaleJha will not be held responsible for any data loss, file corruption, or system damage resulting from any incorrect step or typo. Before starting any technical troubleshooting, be sure to back up your important data. Please apply these methods at your own risk.




