
Friends, there was a time when we used to go to the computer shop to install a new Windows and use a CD or DVD. But these days, laptops don’t even come with a DVD drive anymore. In such cases, if your PC suddenly hangs, you get the “Blue Screen of Death,” or you need to install a new OS, you’ll need a bootable USB.
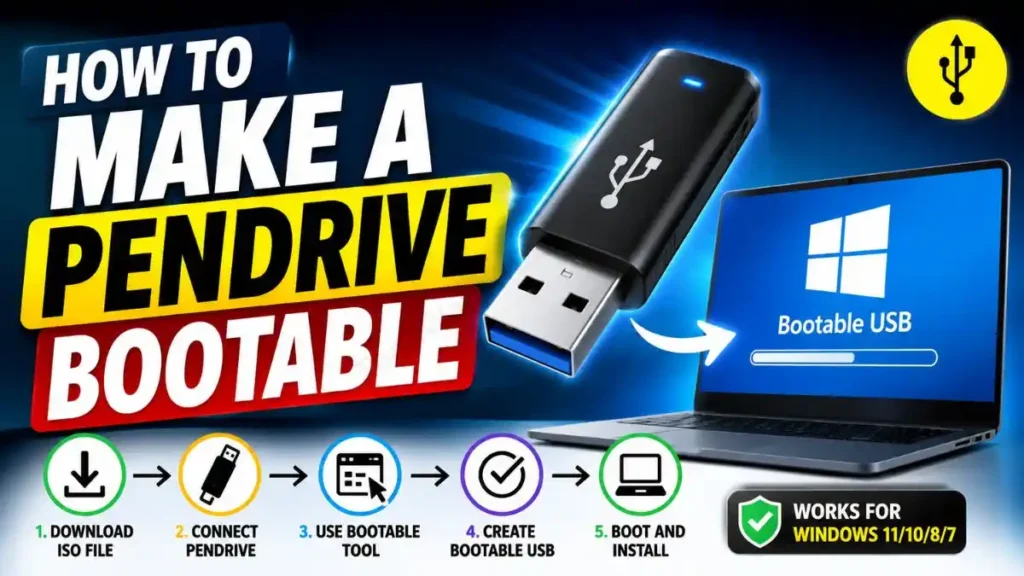
If you’re looking online for a direct, 100% working solution to “how to make a pendrive bootable” without wasting time, the fastest and easiest answer is that you first need to download the Windows ISO file from Microsoft’s website. Then insert an 8 GB or larger empty pendrive into your PC and open the small free software called Rufus. Next, select your pendrive and ISO file in Rufus, choose the partition scheme (MBR/GPT), and click the “START” button. After that, in just 5-10 minutes, your regular pendrive will become a bootable drive.
On your very own Tech Wale Jha platform, today I’m going to explain to you, in a completely practical way and without any boring theory, the correct and error-free method for creating a bootable USB for Windows 10 or setting up a bootable USB for Windows 11 on new laptops. Here, we’ll also learn a more advanced method besides using software, which is to use command-prompt (CMD) commands to make a bootable USB drive. Let’s go through this tech process very easily, so that even a child can follow it and get their work done.
Also Read: How to Create a Windows 11 Bootable USB
What Exactly is a Bootable Pendrive? And Why is it Necessary?
Before starting the process, it’s very important to clear up this technical doubt: what exactly is the difference between a “Bootable” pendrive and a “Normal” pendrive? Many people make the mistake of downloading the Windows ISO file (setup file) from the internet and directly copying it to a pendrive. When they try to format the laptop from that pendrive, nothing happens and the system ignores it.
So why does this happen? Friends, when your PC or laptop is on, its motherboard (BIOS) doesn’t know where Windows is stored. At that time, a small piece of code that we call the ‘Master Boot Record’ (MBR) or ‘Boot Sector’ tells the system, “Hey, the operating system is on this pendrive, so load it.”
- Normal Pendrive: This only stores your data, like photos, movies, or documents. To access it, you need an existing Windows installation.
- Bootable Pendrive: This is a special drive that contains the setup to install an OS (Windows/Linux) and a ‘bootable sector’. When your laptop is completely dead or doesn’t have any Windows installed, your system can still read this pendrive.
That’s why we need software that can properly unpack and format an ISO file onto a USB drive. Nowadays, most people prefer the Rufus method for creating a bootable USB drive because it’s free, safe, and the fastest. Whether you’re an IT professional or a regular user, creating a bootable USB has become such a life-saving skill that you simply must know. It lets you easily save the money you’d otherwise spend at a PC repair shop.
Also Read: How to Repair a USB Flash Drive
Method 1: How to Make a Pendrive Bootable with Rufus? (Easiest)
If you ask any IT expert how to make a pendrive bootable, 99% of them will tell you the same name: Rufus. It’s a very small, free, and portable software, about 1MB in size. “Portable” means you don’t even need to install it on your laptop only just download it and run it directly.
If you want to create a bootable USB for Windows 11 or Windows 10 for your new system, then carefully and correctly follow the easy steps given below:
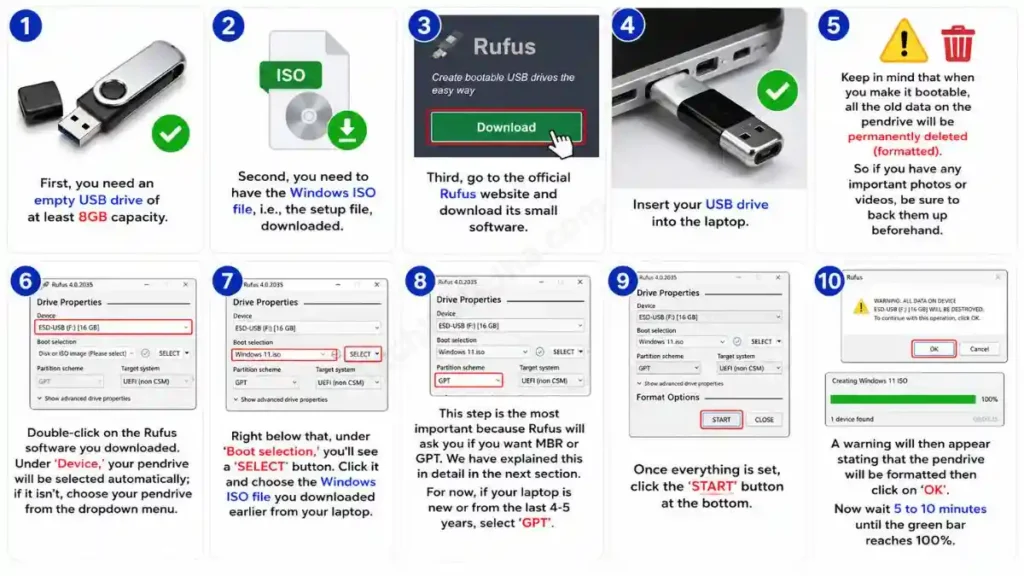
- Gather the Necessary Items: First, you need an empty USB drive of at least 8GB capacity. Second, you need to have the Windows ISO file, i.e., the setup file, downloaded. And third, go to the official Rufus website and download its small software.
- Insert the Pendrive: Insert your USB drive into the laptop. And yes, keep in mind that when you make it bootable, all the old data on the pendrive will be permanently deleted (formatted). So if you have any important photos or videos on the pendrive, be sure to back them up beforehand.
- Open Rufus: Now double-click on the Rufus software you downloaded. In the top section, under ‘Device,’ your pendrive will be selected automatically. If it isn’t, choose your pendrive from the dropdown menu.
- Select ISO File: Right below that, under ‘Boot selection,’ you’ll see a ‘SELECT’ button. Click it and choose the Windows ISO file you downloaded earlier from your laptop.
- Choose Partition Scheme (MBR or GPT): This step is the most important because Rufus will ask you if you want MBR or GPT. We have explained this in detail in the next section. For now, if your laptop is new or from the last 4-5 years, select ‘GPT’.
- Click Start: Once everything is set, click the ‘START’ button at the bottom. A warning will then appear stating that the pendrive will be formatted then click on ‘OK’.
That’s it! Now wait 5 to 10 minutes until the green bar reaches 100%. Congratulations, you have successfully completed the process of making a USB bootable for Windows.
Also Read: How to Install Windows 11 Without TPM 2.0
What is the difference between MBR and GPT? (A Crucial Step)
This is the biggest mistake people make when using Rufus. If you choose the wrong partition scheme (MBR/GPT), you will get an error message while installing Windows: “Windows cannot be installed to this disk”. Now you might be wondering why this happens? This happens because the “brain” (BIOS) of old and new laptops works in different ways.
To clear up this confusion, read the table below carefully:
| Feature / System | MBR (Master Boot Record) | GPT (GUID Partition Table) |
|---|---|---|
| Which laptops are used for this? | Old laptops that are from before 2014 and run on the old BIOS (Legacy mode). | New laptops and PCs that are from after 2015 and run in UEFI mode. |
| Drive Size Limit | It does not support hard drives larger than 2TB. | It easily supports hard drives larger than 2 TB. |
| Partition Limit | You can create a maximum of four partitions (C, D, E, and F drives). | You can create up to 128 partitions, which is far too many for normal users. |
| Windows 11 Support | Windows 11 doesn’t support MBR at all. | If you’re creating a bootable Windows 11 USB drive, selecting GPT is 100% mandatory. |
How to Find Out What Type of PC You Have?
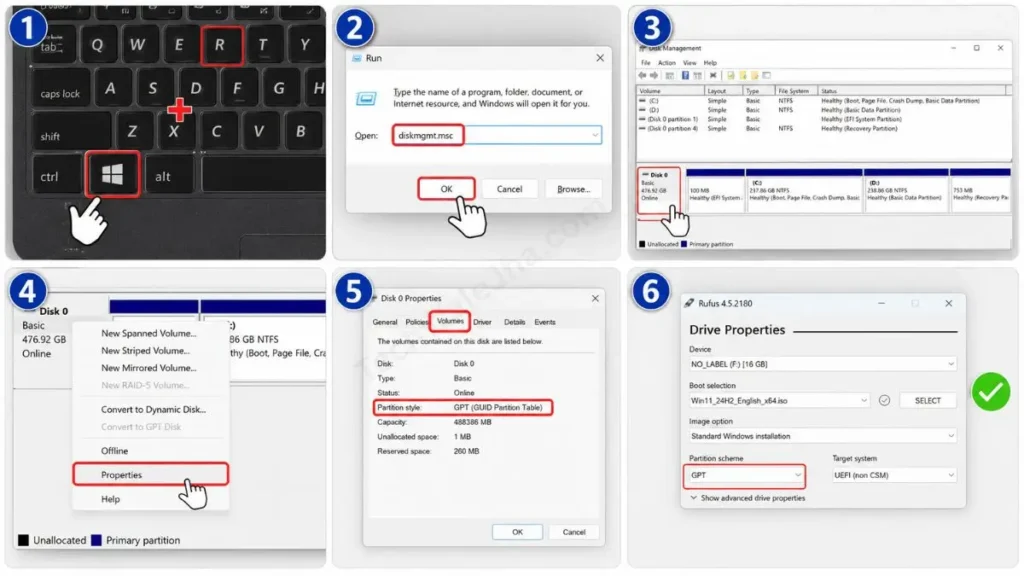
A simple trick: Press Windows + R on your PC, then a dialog box will open. Type diskmgmt.msc and hit Enter. This will open ‘Disk Management’. Then, right-click on ‘Disk 0’ and go to the ‘Volumes’ tab. There, under ‘Partition style’, you will clearly see whether your hard disk is MBR or GPT. Then select the same option in Rufus.
Also Read: How to Find Hidden Viruses Using CMD
Method 2: How to Make a Bootable Drive from the Command Prompt (CMD)? (Pro Trick)
Friends, if you’re a bit of an advanced tech user and don’t want to depend on any third-party bootable pendrive software like Rufus, then you can directly use the built-in utility within Windows. Real pro system repair users often rely on CMD.
Let’s go through the steps to see how to make a pendrive bootable using the correct CMD commands:
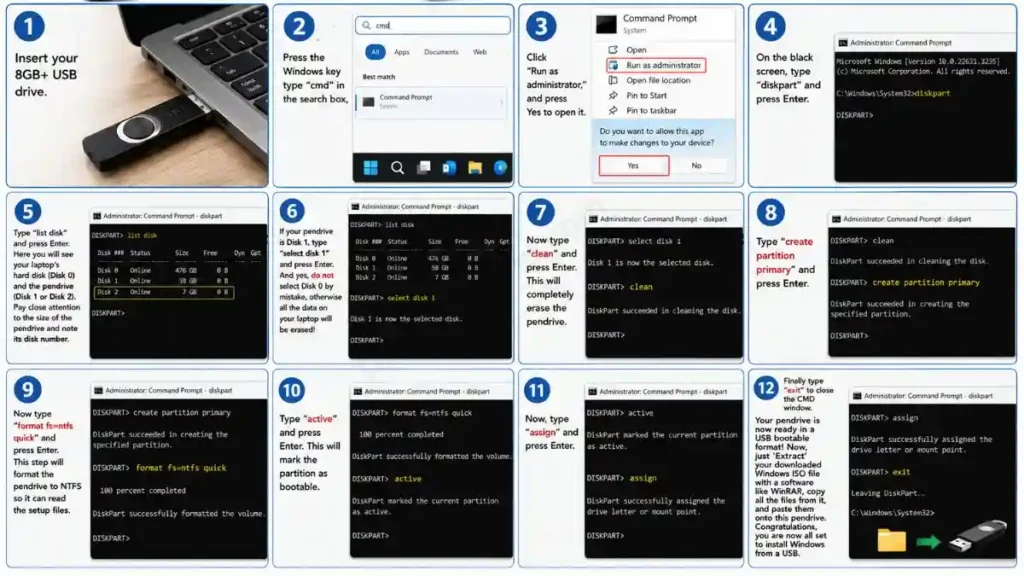
- Open CMD: Insert your 8GB+ USB drive. Then press the Windows key on your keyboard, type “CMD” in the search box, click “Run as administrator,” and press Yes to open it.
- Start the Diskpart Tool: On the black screen, type
diskpartand press Enter. - View the List of Disks: Type
list diskand press Enter. Here you will see your laptop’s hard disk (Disk 0) and the pendrive (Disk 1 or Disk 2). Pay close attention to the size of the pendrive and note its disk number. - Select the Pendrive: If your pendrive is Disk 1, type
select disk 1and press Enter. And yes, do not select Disk 0 by mistake, otherwise all the data on your laptop will be erased! - Clean the Pendrive: Now type
cleanand press Enter. This will completely erase the pendrive. - Create Partition: Type
create partition primaryand press Enter. - Format (Bootable format): Now type
format fs=ntfs quickand press Enter. This step will format the pendrive to the NTFS system so it can read the setup files. - Make Active: Type
activeand press Enter. This will mark the partition as bootable. - Now, type
assignand press Enter, and finally typeexitto close the CMD window.
Your pendrive is now ready in a USB bootable format! Now, just ‘Extract’ your downloaded Windows ISO file with a software like WinRAR, copy all the files from it, and paste them onto this pendrive. Congratulations, you are now all set to install Windows from a USB.
Windows Media Creation Tool (Official Method)
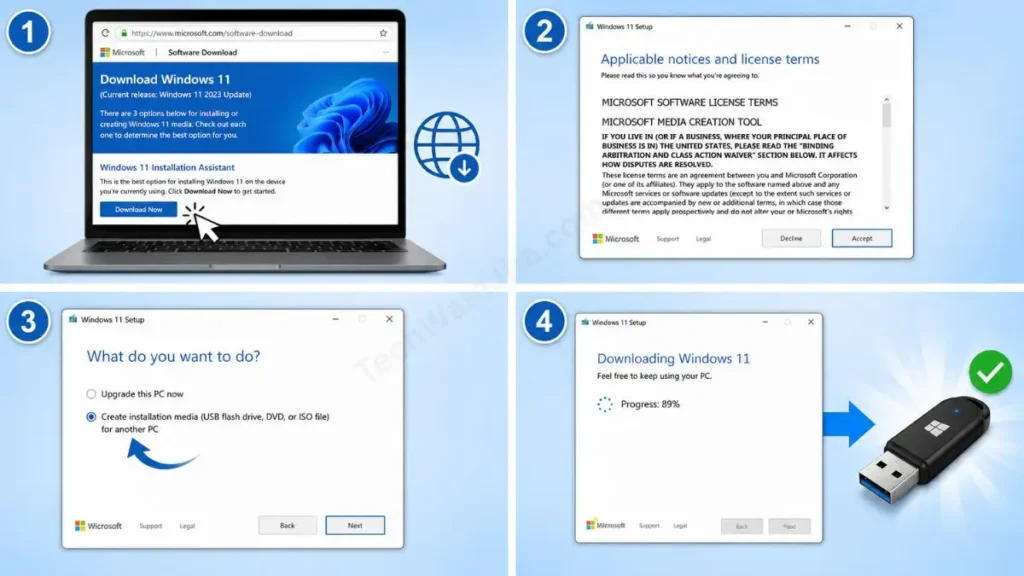
If you’re hesitant to choose MBR/GPT in Rufus and find the CMD process too long, you can use Microsoft’s official method directly. For this, Microsoft has created a small, free tool called the ‘Media Creation Tool’.
For this, you just need to go to the Microsoft Software Download page and download the Windows 10 or 11 Media Creation Tool from there. As soon as you open it, it will automatically ask to “Create installation media (USB flash drive)”. Select this and click Next. This smart tool will automatically download the official, original Windows in the background, format the USB drive, and make it bootable. You won’t need to do anything manually.
Also Read: How to Remove Virus from Pendrive Without Losing Data
Frequently Asked Questions
Is an 8GB pendrive enough to make it bootable?
Yes! Whether you need to install Windows 10 or Windows 11, their setup size is around 5.5GB to 6GB. Therefore, an 8GB flash drive is the most perfect and recommended size. And if you have a 16GB or 32GB one, that’s even better, but avoid using a 4GB drive as it won’t fit the new Windows.
Will my personal data be deleted after making the pendrive bootable?
Yes, absolutely! Whether you use Rufus, the Media Creation tool, or run CMD commands, the very first step is to ‘Format’ the pendrive. Therefore, before starting this process, be sure to copy any important photos, videos, or documents from your pendrive to a safe location on your laptop.
After Windows is installed, can I use this pendrive as a normal USB drive again?
Yes, 100%! After Windows is installed, if you feel you no longer need this bootable drive, just go to ‘This PC’ (My Computer). Then right-click on your pendrive and select ‘Format…’ and click ‘Format…’ and format it to ‘FAT32’ or ‘NTFS’. Your pendrive will go back to being a normal drive, just like before, where you can easily put songs or movies.
Conclusion
Friends, I truly hope that after learning these easy steps and tricks, you’ll never have to pay a shopkeeper to format it again, nor will you ever have to search for “how to make a pendrive bootable” again.
As a tech creator, I always try to make technical processes as easy for you as possible. If you’re in a hurry, use Method 1 (Rufus), and if you want to learn system commands, CMD is your best friend. If you’re facing any errors while installing Windows from your new bootable USB, be sure to let us know in the comments below. For solid solutions to easy tech problems like this, stay tuned and save our website to your bookmarks.
Disclaimer: This guide and the steps described in it are for educational purposes and for your help only. When you make a pendrive bootable, all the data on it is permanently deleted (formatted). Especially when using the CMD (Diskpart) commands, if you accidentally select your PC’s main hard disk instead of the pendrive, all your system data could be lost.
Therefore, before starting the process, be sure to take a safe backup of all your important data. TechWaleJha.com will not be held responsible for any data loss, hardware issues, or system errors. Please apply all steps carefully and at your own risk.




