
If you’ve recently upgraded your Windows 10 laptop or PC to Windows 11, one thing that’s probably annoyed you the most is the new right-click menu. Before, we could right-click any file and easily access options like “Copy,” “Paste,” or “Rename.” But now? Now you see a small menu and have to click an annoying “Show more options” (Shift + F10) button to see the rest of the options, only then do you get your old familiar menu.
This one extra click might seem a bit odd at first, but in your daily workflow, it can become really frustrating. When you’re trying to work quickly, every extra click slows down your productivity.
But don’t worry, in this guide, I’ll show you how to easily restore Windows 11 right-click menu and bring back your favorite Windows 11 classic context menu. And the best part is that after following this tutorial, you won’t need to download any third-party or sketchy software. You’ll also be able to get rid of that annoying “Show more options” extra click for good. Also, you’ll be able to see your old 7-Zip, WinRAR, and Antivirus shortcuts back in the direct menu. And we’ll fix this using only Windows’ own built-in tools in just 2 minutes. So, let’s get started without any further delay.
Also Read: How to Speed Up Windows 11 Startup
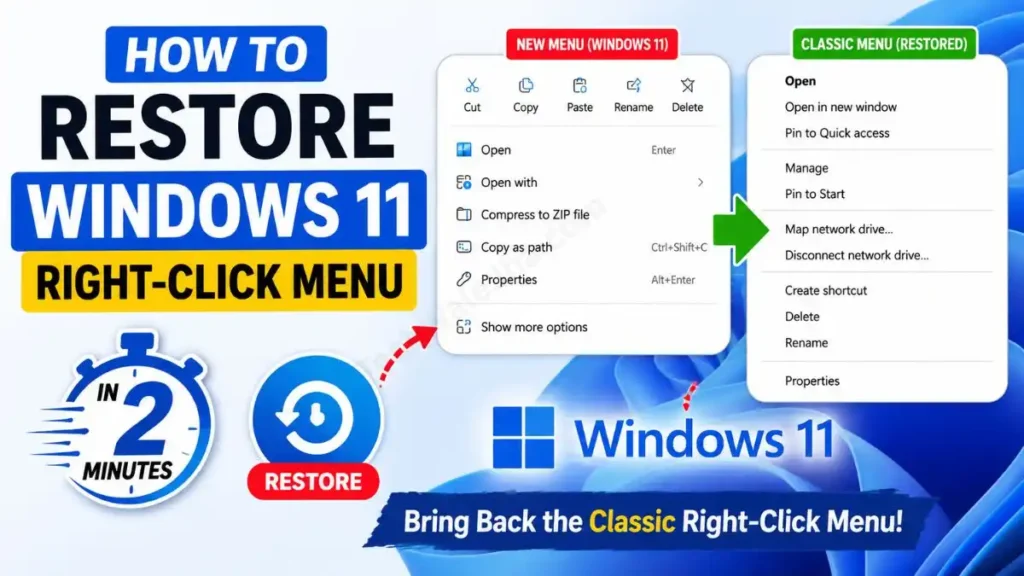
Why Did Microsoft Change the Windows 11 Context Menu?
The very first question on every user’s mind is: why did Microsoft mess with a perfectly good system? When the old menu was working flawlessly, what was the need for this new compact menu?
Actually, there’s a very big technical and design reason behind this. If you remember your old Windows 10 PC, as you installed new software like VLC, WinRAR, Photoshop, etc., your right-click menu would grow longer and more cluttered. Each software would add its own separate option menu. Because of this, the menu took time to load in the background, which significantly affected system performance.
To solve this problem, Microsoft introduced a cleaner and streamlined design, the Fluent Design language, in Windows 11. As Microsoft’s Official Windows Blog also mentioned, their main goals for the new menu were:
- Performance Optimization: The new menu loads faster because third-party apps have been restricted.
- Modern UI: A compact, rounded-corners look that better suits the new generation.
- Core Commands as Icons: The Cut, Copy, Paste, Rename, and Delete commands are now placed at the top as small icons instead of text.
But the real truth is that PC users are so used to working the old way that this new design is less helpful and more annoying. If you’re a “power user,” you’ll want to automatically disable Show more options in Windows 11 so your familiar old right-click menu returns and your workflow isn’t disrupted.
Also Read: How to Lock a Folder in Windows 11 (2026 Guide)
Method 1: The Quickest Way (Via Command Prompt)
If you don’t have much knowledge of the computer registry or you want to fix this problem safely without breaking anything, then this method is the best for you. For this, we will simply run a code via Command Prompt (CMD) that will automatically change this setting.
To do this, simply follow the easy steps below:
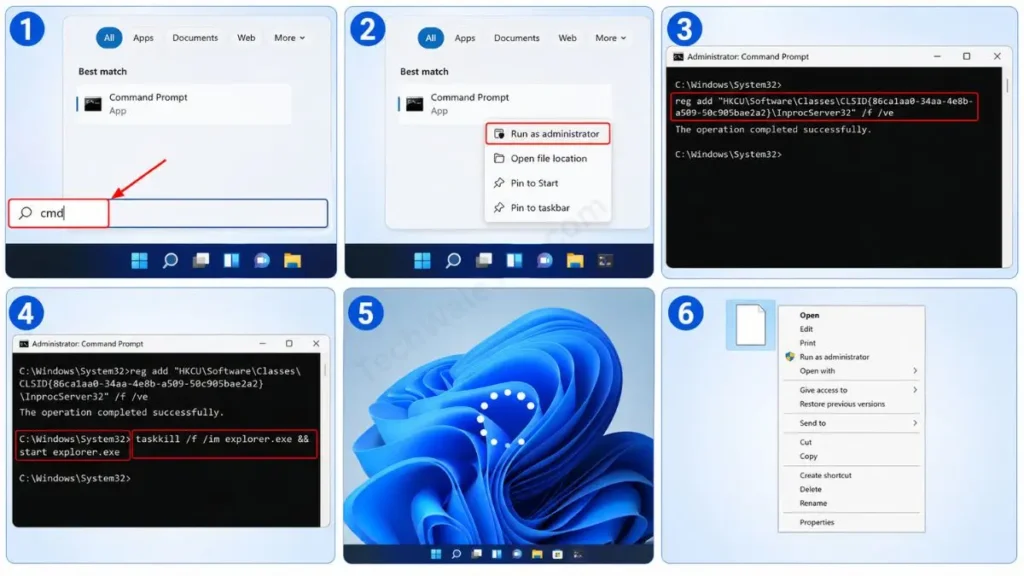
- Now, open Windows Search on your PC and type “cmd” or “Command Prompt”.
- Then, right-click on the Command Prompt app and select “Run as administrator”.
- Now, copy the exact code below, paste it into your Command Prompt window by pressing Ctrl+V, and then press Enter:
reg add "HKCU\Software\Classes\CLSID{86ca1aa0-34aa-4e8b-a509-50c905bae2a2}\InprocServer32" /f /ve- As soon as you press Enter, you will see “The operation completed successfully.”
- Now, to apply this change, we need to restart File Explorer. To do that, in the same window, paste the following code and press Enter:
taskkill /f /im explorer.exe && start explorer.exe- After that, your screen will refresh for one second. That’s it! Now right-click on any file or desktop, and your favorite Windows 11 classic context menu is back.
Also Read: How to Free Up Disk Space in Windows PC (2026 Guide)
Method 2: The Manual Registry Editor (Regedit) Tweak
If you don’t want to use CMD and prefer to set things up manually, you can also bring back the old right-click menu in Windows 11 directly through the Registry Editor. This process is also completely safe if you follow the steps correctly.
Step-by-Step Registry Guide:
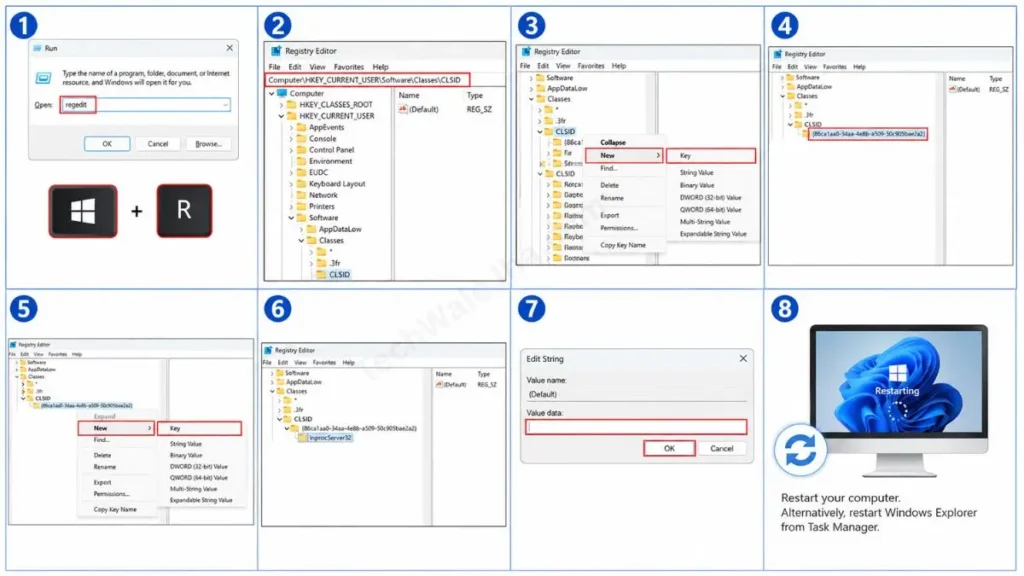
- Step 1: Press the Windows Key + R on your keyboard to open the ‘Run’ dialog box. Type
regeditthere and press Enter. - Step 2: Once the Registry Editor opens, copy and paste this path into the address bar at the top and press Enter:
Computer\HKEY_CURRENT_USER\Software\Classes\CLSID - Step 3: Now, in the left-hand pane, right-click on the CLSID folder. Then go to New and click on Key.
- Step 4: Name this new folder (Key) exactly as follows:
{86ca1aa0-34aa-4e8b-a509-50c905bae2a2} - Step 5: Now, right-click again on this newly created folder, go to New, and select Key. Then, inside it, create another sub-folder named:
InprocServer32 - Step 6: Now, click on the InprocServer32 folder. After this, you will see an entry named (Default) in the right-hand panel. Double-click on it.
- Step 7: Leave its ‘Value’ box empty (make sure not to type anything in it) and then click OK.
- Step 8: Restart your computer. Alternatively, you can restart Windows Explorer from the Task Manager.
Congratulations! The issue with your missing Windows 11 right-click menu has now been successfully fixed. You can now easily see your old menu directly without having to select “Show more options.”
Also Read: How to Make Windows 11 Faster (Top 7 Easy Tricks)
How to Undo: Get the Default Windows 11 Menu Back
You might want to switch back to the new modern look on your laptop or PC later on, or Microsoft may release an update that makes the new menu faster and more useful than before. Or, if you ever want to switch back to the default modern layout, undoing it is just as easy as activating it was.
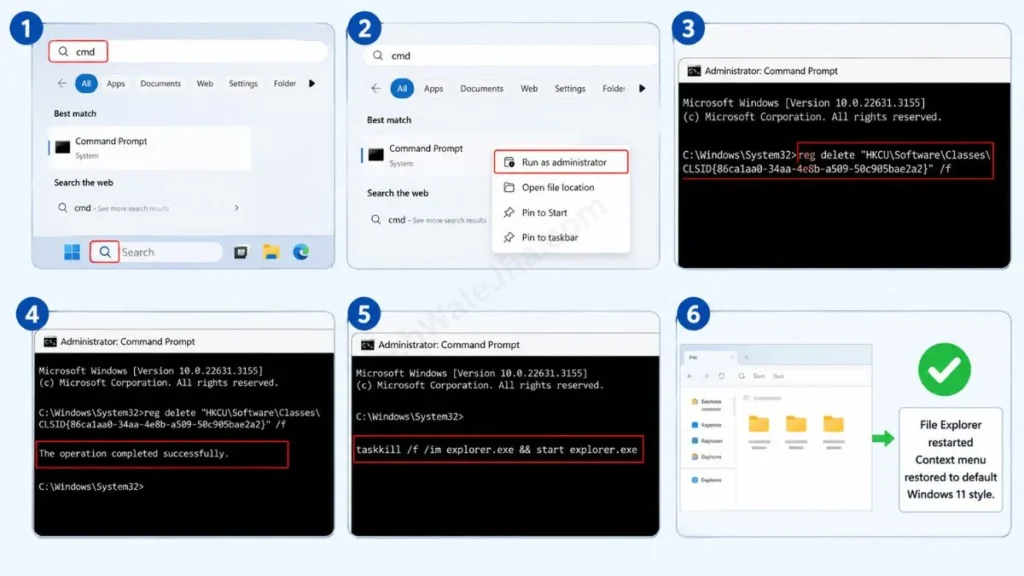
- To do this, go back to the Windows search bar, search for CMD or Command Prompt, right-click on it, and select “Run as administrator.” Then, paste the following simple command:
reg delete "HKCU\Software\Classes\CLSID{86ca1aa0-34aa-4e8b-a509-50c905bae2a2}" /f - After that, enter this code to restart File Explorer:
taskkill /f /im explorer.exe && start explorer.exe - As soon as Explorer restarts, your system will revert to the default Windows 11 compact context menu.
Also Read: How to Reset Windows 11 Without Losing Data (Easy Steps)
Frequently Asked Questions
Yes, absolutely. This method is 100% safe because we are only changing the user-level (HKEY_CURRENT_USER) configuration. This doesn’t affect system files or the stability of the OS, and you can undo it in 1 second whenever you want.
Do I need to restart my computer to see the changes?
No, a full PC restart is not necessary. If you have used the CMD method to restart explorer.exe, the changes will apply immediately. After using the Registry method, be sure to restart Explorer once from the Task Manager.
If you don’t want to apply a registry tweak and want to see the old menu for a single file, select that file and press Shift + F10 on your keyboard. This will open the old classic menu.
Sometimes major feature updates like 23H2 or 24H2 reset user-level registry keys. If the menu reverts to the modern style later on, just run this CMD command again.
Conclusion
The Windows 11 interface is quite sleek and futuristic in appearance, but when it comes to daily workflow and speed, the old Windows 11 classic context menu truly saves both time and effort. Removing an extra click makes your copy-pasting and file management process smooth again.
I hope you have successfully learned how easy and fast it is to Restore Windows 11 Right-Click Menu by following this technical guide.
I use this same registry trick on all my PCs, because when it comes to daily productivity, saving every single extra click saves a lot of time. Did you use the command line or the Registry Editor? And do you prefer the new modern menu or the old classic one? Be sure to let me know in the comments section below. And to easily learn more pro-level Windows OS customization and PC troubleshooting tricks like these, keep following my TechWaleJha platform. Until then, take care and bye-bye.
Disclaimer: This guide is for educational and UI customization purposes only. The Registry Editor is a sensitive tool, so do not tamper with any other files or paths in it. When typing or pasting commands, be sure to use the exact code. TechWaleJha platform or its author will not be held responsible for any errors in the system registry resulting from any incorrect steps.




