
Friends, if your PC or laptop is getting slower by the day, or you’ve just built a brand-new custom gaming PC from the market, the very first and most crucial step is to install a fresh OS (Operating System) on it. The era of CDs and DVDs is completely over, and nowadays every smart tech user uses a small USB flash drive to install the OS.
If you want to make your system super-fast and bloatware-free and have been searching the internet for how to create Windows 11 installation media, then you have come to the right tech blog.
In this step-by-step guide, we will create a super-fast bootable USB Windows 11 using Microsoft’s official Windows 11 Media Creation Tool. This method is 100% legal, safe, and free because the OS files will be downloaded directly from Microsoft’s official server. So, let’s start this process without wasting any time and without any complex coding, and turn your regular USB drive into a powerful OS installer!
What is Windows 11 Installation Media?
Before we get to the straightforward steps, you should have a basic understanding of the technical concept, just like a good tech enthusiast. In simple terms, ‘Installation Media’ is a USB flash drive that stores the entire Windows 11 setup in a compressed and ‘bootable’ format.
A major misconception is that people simply copy an ISO file to a USB drive. However, you can’t install Windows 11 from a USB that way. As explained in Wikipedia’s guide on Live USB and Booting, to start (boot) a PC from any pendrive, a special boot sector (EFI partition) needs to be created on the drive so that the PC’s motherboard can read it as a startup device. All this complex coding is automatically done for you in the background by Microsoft’s official Windows 11 installation media tool.
When do you need this bootable pendrive?
A bootable USB is the most important tool in your tech arsenal. It comes in handy in these situations:
- When you build a new PC and install a new processor and a blank SSD, it’s used to install Windows for the first time.
- If your PC is clogged with stubborn viruses, malware, or cached data, you’ll need this to completely format the C-Drive and install a new OS.
- If a laptop suddenly crashes with a ‘Blue Screen of Death’ and then won’t turn on, this pendrive works as a Rescue/Repair tool to fix the Dead PC (BSOD).
- It is also used to manually upgrade older Windows 10 PCs to Windows 11.
Things You Need Before We Start (Checklist)
Before running Microsoft’s official tool, you must ensure you have these 3 essential items ready beforehand to prevent any errors during the download:
- An Empty USB Flash Drive: You will need a USB flash drive with at least 8GB of space. My personal suggestion would be to use a USB 3.0 flash drive, as this will make both the installation and creation process faster.
- Fast and Stable Internet: This tool downloads the official Windows 11 ISO in the background, which has a total size of approximately 5GB. Therefore, try to connect to a good Wi-Fi or LAN connection instead of a mobile hotspot.
- A Working PC: You will need a running computer or laptop to perform this entire process. It doesn’t matter if it has Windows 10 or 11.
Step-by-Step: How to Create Windows 11 Installation Media
If you’re looking for the exact solution on how to create Windows 11 installation media without any third-party software, then Microsoft’s default tool is the best option. If you want to get results quickly, follow the steps below as is:
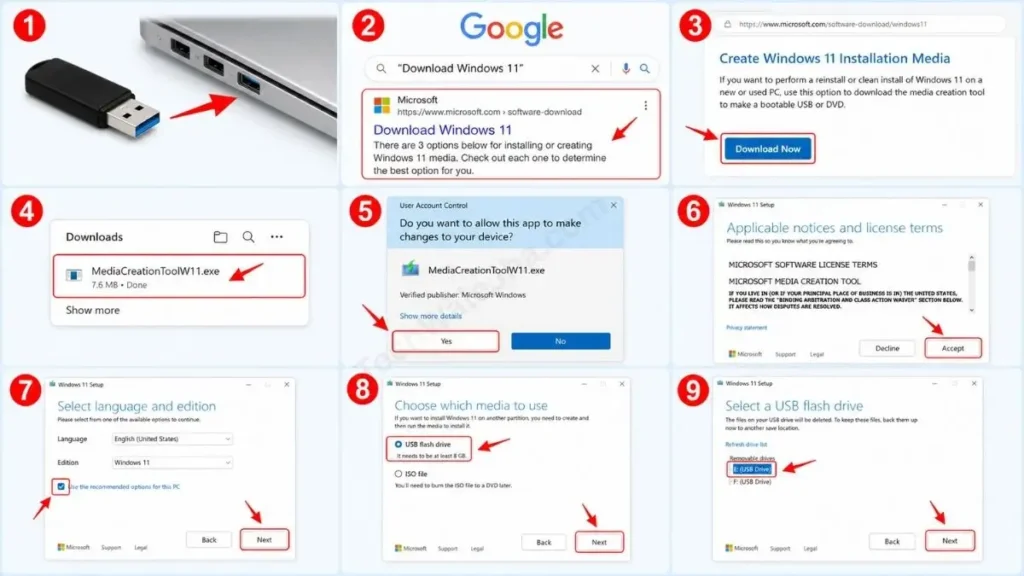
- First, securely connect your 8GB or 16GB USB drive to your working PC’s USB port.
- After that, search for “Download Windows 11” on Google and open the very first official Microsoft website.
- On the page, look for the second section titled “Create Windows 11 Installation Media.” Click the blue “Download Now” button located just below it. A small
.exefile will then download. - Then, double-click the downloaded file (
MediaCreationToolW11.exe) and click Yes in the User Account Control prompt. - After the “Getting a few things ready” screen appears, accept the license terms. On the next screen, the Language and Edition will be displayed. Leave “Use the recommended options for this PC” checked and click Next.
- Two options will appear on the screen. Our main goal is to create a Windows 11 bootable USB drive, so select the USB flash drive (not the ISO file) and then click Next.
- From the list, select your pendrive’s letter, like E: or F:, and click Next one last time.
After this, you can sit back and have a coffee, as the tool will automatically fetch the files and handle the entire complex background process of making a Windows 11 bootable USB for you. Depending on your internet speed, this can take 15 to 30 minutes or even longer. When you see “Your USB flash drive is ready,” click Finish.
Warning: Back Up Your USB Drive!
This is a very crucial reminder, friends. As soon as you select the USB drive in Step 7 and click ‘Next,’ this tool will completely format your USB drive. All the old data on it will be permanently deleted. Therefore, before starting the process, be sure to save (backup) the photos or important documents from your pendrive to another drive on your laptop.
Pro Tip: Using Rufus for Older PCs (Bypass TPM 2.0)
Microsoft has introduced strict hardware requirements with Windows 11, such as TPM 2.0 and Secure Boot. If your processor is older, like an Intel 7th Gen or lower, you will get the “This PC can’t run Windows 11” error when booting from an official USB drive.
To completely bypass this problem, tech experts use a third-party open-source software called Rufus. If you want to create a Windows 11 installation USB for an unsupported PC, you can follow the steps given below:
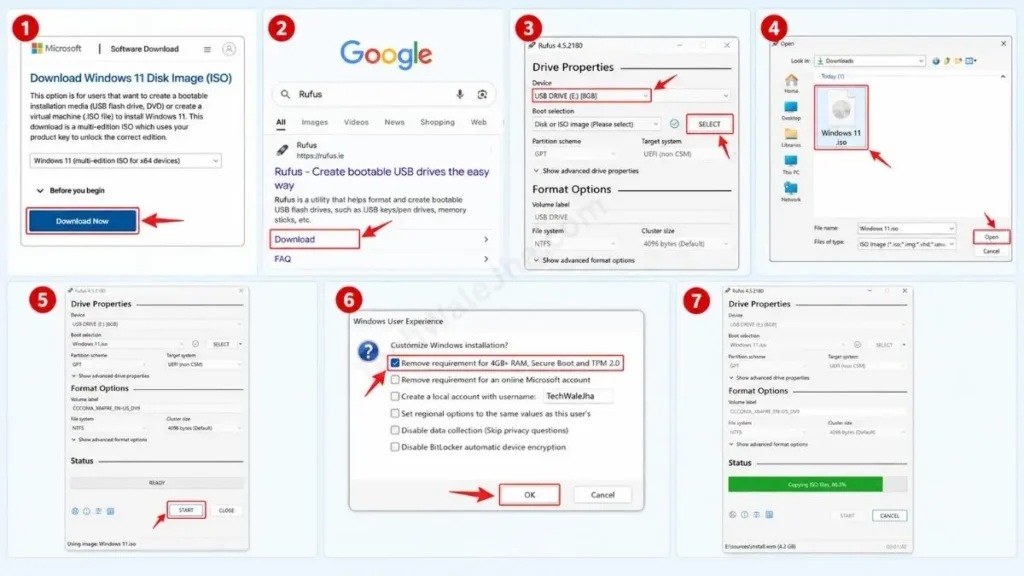
- For this, first go to Microsoft’s official website and download the Windows 11 Disk Image (ISO) directly instead of the ‘Media Creation Tool’.
- Then search for ‘Rufus’ on Google and download its latest version for free.
- After downloading, insert your 8GB flash drive and open Rufus. Then, select your USB drive under ‘Device’ and click ‘Select’ under ‘Boot selection’ to choose your downloaded Windows 11 ISO file.
- As soon as you click the START button, Rufus will open a pop-up box. The first option will be “Remove requirement for 4GB+ RAM, Secure Boot and TPM 2.0”. Check that box and press OK.
- Rufus will then modify the ISO file and write it to the USB drive. Now you can use this USB drive to easily perform a completely fresh and clean install of Windows 11 on any old “dodgy” PC, without any errors.
Frequently Asked Questions
Should I choose “USB flash drive” or “ISO file” in the Media Creation Tool?
If you want the tool to make your USB drive bootable directly, select “USB flash drive.” However, if you want to make that file bootable later using Rufus or burn it to a DVD, choose “ISO file.”
Can I do this process on a Mac to install Windows on a PC?
You can’t do it directly because both Microsoft’s Media Creation Tool and Rufus only work on Windows (in .exe format). If you want to create Windows 11 installation media on a Mac, you’ll have to manually extract the ISO file to a USB drive using Terminal commands or Boot Camp Assistant, which is a bit complex.
Will installing Windows 11 delete all my existing files and games?
When creating the pendrive, only the data on the USB drive is deleted. But when you install the OS on your actual PC from that pendrive, you have two options: ‘Upgrade,’ which preserves your data, and ‘Custom,’ which performs a clean install. A successful clean install will completely format the C-Drive, so always make sure to back up your files beforehand.
Conclusion: Ready to Format!
Friends, I hope that after reading this in-depth, step-by-step tutorial on “How to Create Windows 11 Installation Media,” you’ve become a complete master at creating a powerful Windows 11 bootable USB. Now you can confidently give a new lease on life to your slow or dead PC.
Keep building your setup and stay tuned to your TechWaleJha for more deep-dive, practical tech guides on PC optimization. If you run into any errors during the process, just ask in the comments, and I’ll be sure to reply. Until we meet again in the next detailed guide, take care and bye-bye.
Disclaimer: This guide is for educational and informational purposes only. When creating a bootable USB, all data on your flash drive will be permanently formatted, so be sure to back up your data first. Also, bypassing TPM or Secure Boot on older PCs using Rufus may prevent you from receiving future Windows updates or could make your system unstable. TechWaleJha or its author will not be held responsible for any data loss, OS corruption, or hardware issues. Please follow these steps at your own risk and discretion.




