
Is your expensive new laptop also been lagging and stuttering for the past few days? If so, and you’re tired of repeatedly hitting the refresh button and searching online for what to do when Windows 11 running slow, there’s no need to worry. You don’t have to format your PC or pay a technician to fix this problem.
If your Windows 11 is running slow, you can make it faster with these 5 tricks:
- 1. Disable startup apps from the Task Manager.
- 2. Go to Performance settings and turn off visual effects (animations).
- 3. Turn on Storage Sense and delete junk files.
- 4. Set your Power Plan to “Best Performance.”
- 5. Uninstall all bloatware (unnecessary apps) from the Control Panel.
These steps will instantly turn your PC into a rocket and let you run your laptop or PC stress-free.
On our TechWaleJha platform, we always strive to explain even the biggest tech problems to you in the simplest way so that you can solve them correctly. Today I’m going to share with you tried-and-tested Windows 11 lag-fix tricks that I personally apply on my laptop and PC to handle tasks like video scripting, content writing, and editing. So let’s find out what the real secret is to making Windows 11 faster and how to do it. Without further delay, let’s go through it step by step.
Also Read: Top 10 Hidden Features in Windows 11 You Must Try Today
Why Does Windows 11 Suddenly Slow Down?
Friends, even if you have a fast SSD or 16GB of RAM, sometimes the system suddenly starts to freeze. Why does this happen? In fact, Windows 11 looks very beautiful and sleek. But it has a lot of transparent effects, smooth animations, and background processes. These run fine on new hardware, but on older PCs or after a new update, these features put a heavy load on the system, which causes Windows 11 to run slowly.
Additionally, unnecessary apps running in the background and junk cluttering up your C-Drive completely drain your RAM and memory. If we properly optimize these small things, you can feel a massive Windows 11 performance boost right from home.
Also Read: How to Make Windows 11 Faster (Top 7 Easy Tricks)
Trick 1: Instantly Disable Unnecessary Startup Apps
When you turn on your laptop, many apps like Skype, Spotify, or a third-party antivirus quietly start on their own as soon as Windows begins. These are called ‘Startup apps’. They can double your PC’s boot time and cause your laptop to hang right at startup. Disabling them is the first and most essential step to speed up Windows 11.
How to Fix It? (Step-by-Step)
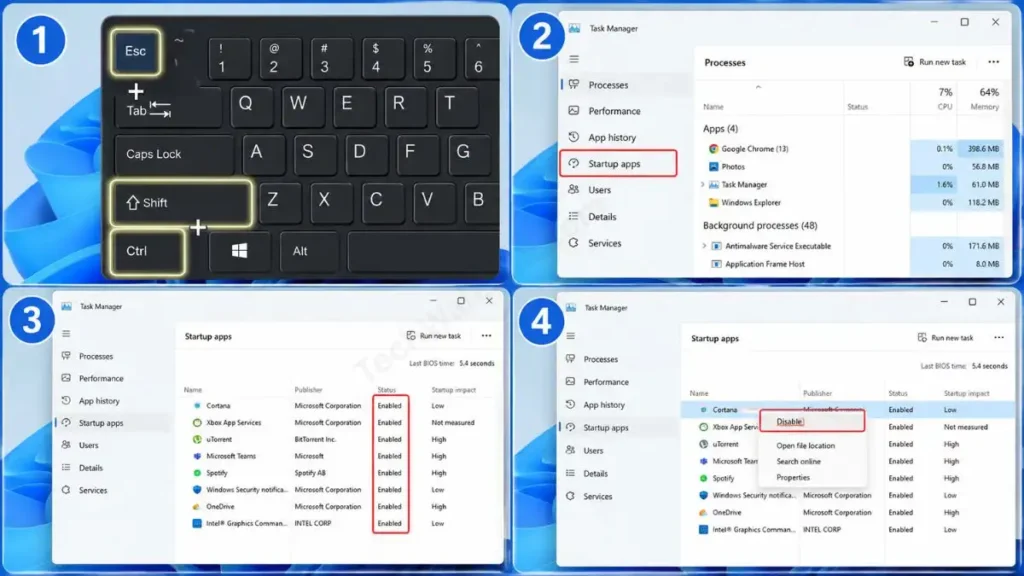
- Press Ctrl + Shift + Esc on your keyboard at the same time. This will open your Task Manager.
- Then, in the menu on the left side, you will see a speedometer-like icon labeled ‘Startup apps.’ Click on it.
- Here you will see a list of all the apps that automatically start when the PC turns on, and their ‘Status’ will be ‘Enabled’.
- Right-click on the apps you don’t use daily, such as Cortana, the Xbox App, or uTorrent, and select ‘Disable’.
Pro Tip: Keep in mind, disabling an app from here doesn’t delete the software; it just means it won’t automatically start when the PC boots up. The next time you turn on your PC, there will be less load on the system, and your laptop will boot up like a rocket.
Also Read: How to Optimize Windows 11 for Gaming
Trick 2: Turn Off Visual Effects and Animations
Friends, the new transparent and glassy look of Windows 11, also called the Mica effect, looks very premium, but did you know it puts the most load on your PC’s graphics card and RAM? Especially if your PC is a bit old or you run heavy software on it.
If you want to optimize Windows 11 for gaming or video editing at an advanced level without any lag, then turning off these unnecessary animations is one of the most effective slow PC Windows 11 solutions. Your PC will run like butter as soon as you do this!
How to Fix It? (Step-by-Step)
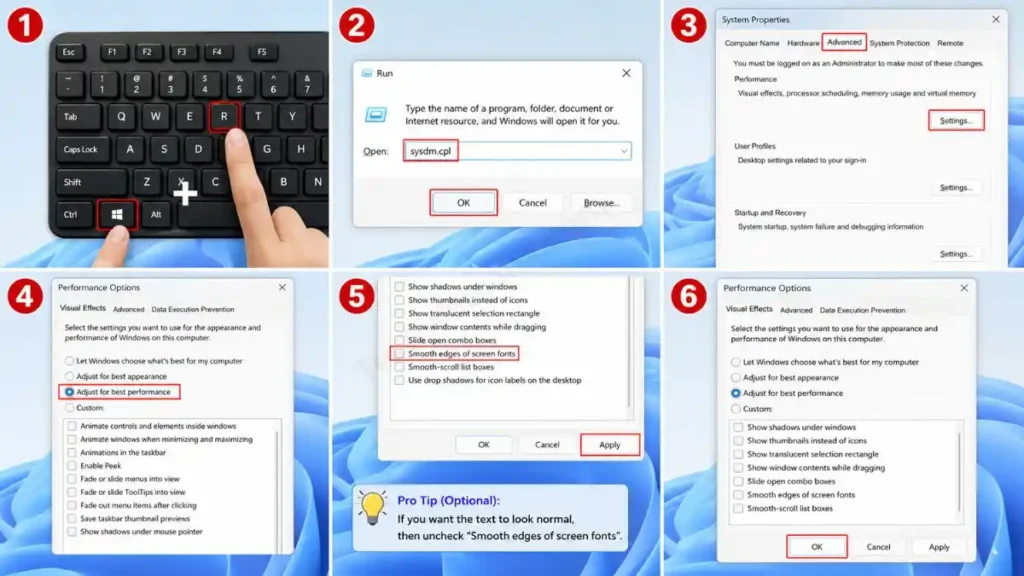
- To do this, press the Windows + R keys on your keyboard at the same time. A small ‘Run’ box will open.
- In it, type
sysdm.cpland press Enter. This will open ‘System Properties’. - Then, click on the ‘Advanced’ tab at the top. Then, in the ‘Performance’ section, click the ‘Settings’ button.
- Here you will see the “Adjust for best performance” option and check it.
- (Optional Pro Tip) If you want the text to look normal, then uncheck “Smooth edges of screen fonts” at the bottom of the list and click ‘Apply’ and ‘OK’.
If you want to understand more deeply how these background visuals affect the system, you should definitely read Microsoft Support’s Official Performance Optimization Guide. It’s Microsoft’s most trusted and detailed authority resource, explaining how to keep hardware and software in sync.
Also Read: How to Lock a Folder in Windows 11
Trick 3: Clean Junk with Storage Sense
Often, people download third-party apps like CCleaner from the internet to clean their PC, which then start consuming even more RAM in the background. In that case, if you’re searching for how to fix Windows 11 running slow after an update, the biggest reason is the update junk filling up your C-Drive, which are the temporary files. It’s this ‘junk’ that makes us need to fix the high disk usage in Windows 11.
Windows 11 has a smart, built-in feature called ‘Storage Sense.’ It automatically deletes junk files in the background.
How to Turn On Storage Sense?
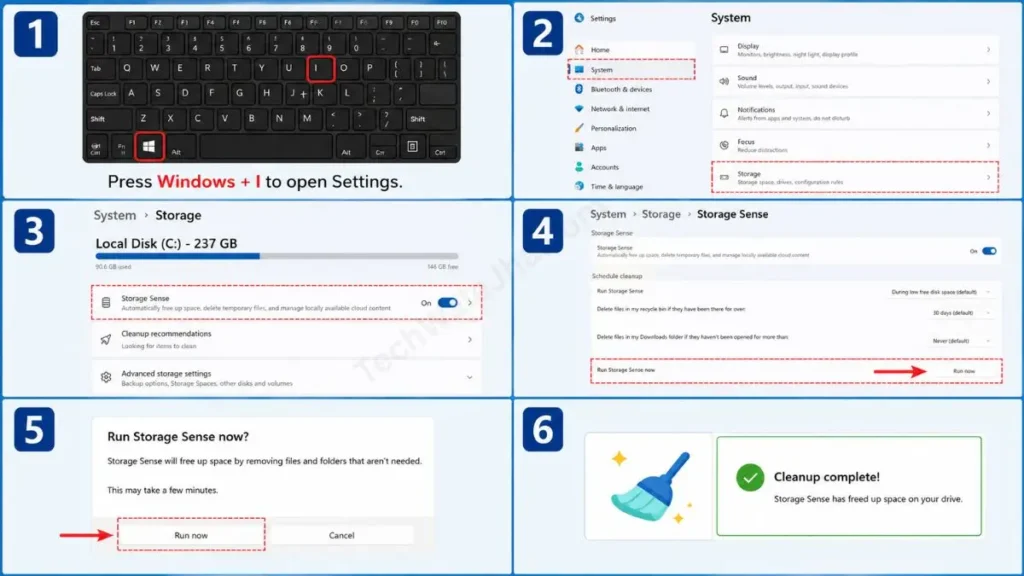
- To do this, press Windows + I to open Settings.
- Then, go to System and then to Storage.
- Here you will see the ‘Storage Sense’ button and turn it ‘ON’.
- To perform an immediate cleanup, click on Storage Sense and at the very bottom, click on “Run Storage Sense now”. This will remove all the junk from the C-Drive within a 5-10 minutes.
Which files are safe to delete?
When you clean temporary files, the system asks you which items to delete. The table below will easily guide you:
| Name of Junk File | Is it safe to delete this? | What does this file do? |
|---|---|---|
| Windows Update Cleanup | Yes, 100% Safe | These are useless leftover files from old updates that reserve and occupy several gigabytes of space. |
| Temporary Internet Files | Yes, 100% Safe | The browser saves unnecessary data when loading websites. |
| Thumbnails | Yes, 100% Safe | Small photo icons. Deleting them will save storage space. |
| Downloads Folder | Be Careful (No) | This contains movies, software, or personal files that you have downloaded yourself. |
Also Read: How to Speed Up Windows 11 Startup
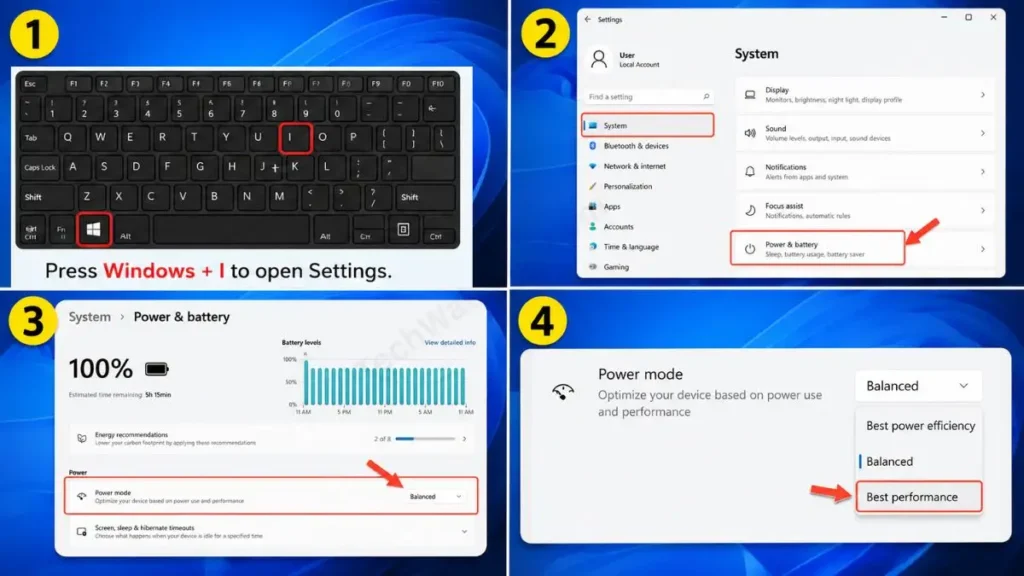
Trick 4: Set the Power Plan to ‘Best Performance’
Laptop companies set your PC to ‘Balanced’ or ‘Power Saver’ mode by default to save battery. This means your processor isn’t using its full power, i.e., its 100% capacity. If you value speed over battery life and want a massive Windows 11 performance boost, then changing the power plan is the easiest way to do it.
How to Fix This?
- To do this, press Windows + I on your keyboard to open Settings.
- Then, go to System and click on Power & Battery.
- Here you will see the ‘Power mode’ option. Change it from ‘Balanced’ to ‘Best performance’.
- This small setting gives your CPU and GPU full freedom, which immediately eliminates lag and stuttering.
Trick 5: Uninstall Bloatware (Unwanted Apps)
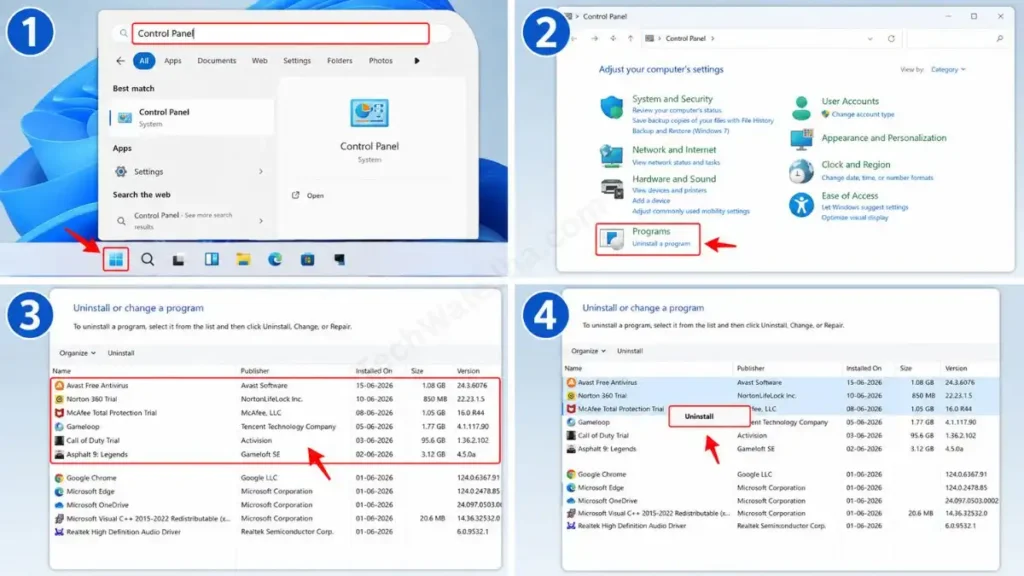
New laptops come pre-installed with a lot of weird apps like McAfee, Candy Crush, or the brand’s (HP/Dell) own apps. These are called ‘Bloatware.’ This useless software runs silently in the background and consumes all your RAM. Therefore, if you want to truly take advantage of Windows 11’s background app management, it’s essential to completely uninstall these apps.
How to Fix This?
- Type Control Panel in the Windows search bar and open it.
- Then, click on ‘Uninstall a program’.
- Carefully go through the entire list here. Right-click on any trial antivirus or unnecessary games you see and select ‘Uninstall’. After this cleanup, your system will free up more than half of its RAM and the Windows 11 lag will be fixed.
Also Read: How to Download Windows 11 25H2 Update Right Now
Frequently Asked Questions
Does updating to Windows 11 slow down a laptop?
No, on the contrary, updates make the system more secure. However, often right after an update, files are being set up in the background, which can temporarily cause a “Windows 11 running slow after update” issue. This usually resolves itself within a few hours, or you can run Storage Sense to manually clear the junk.
All my settings are fine, yet my PC is still slow. Do I need to upgrade my RAM?
If your laptop still has an old Hard Disk Drive (HDD), then no matter how much RAM you add, your dream of making Windows 11 faster will never come true. That’s why the very first upgrade should always be switching from an HDD to an SSD (Solid State Drive). After that, 8GB or 16GB of RAM runs quite smoothly.
Will using all these tricks make the laptop heat up quickly?
If you continuously use Trick 4 (Best Performance) and do heavy gaming, the laptop will definitely get a bit hot because the processor is running at full power. In that case, always keep your laptop on a flat surface (table) so air can easily flow through the vents.
Conclusion
Friends, upgrading hardware should always be a last resort. Windows is a very smart operating system here you just have to clean out the unnecessary junk that accumulates in it from time to time. I truly hope that the 5 tricks mentioned in this article have permanently solved your problem of Windows 11 running slowly.
When I’m designing scripts and vertical thumbnails for my tech tutorial videos on Windows shortcuts and network troubleshooting, I have a lot of heavy editing software open in the background. In this situation, to keep my workflow fast and maintain the speed of Windows 11, I always use these 5 tricks first. This way, my PC never freezes.
Which of these tricks did you find the most helpful? Or if you’re still experiencing any errors with your PC, let me know in the comment box below. I’ll help you as soon as possible. And for more great tech tips like these, stay connected with your own TechWaleJha.com platform.
Disclaimer: This guide and the PC optimization tricks mentioned in it are for educational and troubleshooting purposes only. While all these settings, such as disabling Startup, using Storage Sense, and changing the Power Plan, are safe for general use, exercise extreme caution when making any changes in ‘System Properties’, ‘Task Manager’, or ‘Control Panel’. TechWaleJha.com or its author will not be held responsible for any accidental deletion of an essential system file, hardware heating, or any kind of data or software loss. Please follow all steps carefully and at your own risk.




