
Hello friends, I’m your very own TechWaleJha! and welcome to this detailed guide. Have you ever experienced this: you charge your laptop to 100% at night and shut it down properly, but in the morning when you turn it on, the battery shows only 80% or even less? Honestly, this problem is pretty annoying, because little by little you start to think that the laptop’s battery itself is going bad. Right?
But here’s an interesting thing: we think that “Shut Down” means the laptop is completely off. But on modern Windows laptops, that’s not always the case. Because some settings keep the laptop slightly active in the background so the system can start up faster next time. And for this reason, the battery can continue to drain little by little even after the laptop is turned off.
If you’re also tired of repeatedly searching online for “how to fix laptop battery draining while shut down,” then there’s absolutely no need to worry anymore. First, let’s understand where the battery is going even after the laptop is off. There are generally 3 main reasons for this: Windows’ Fast Startup, a BIOS setting that keeps USB ports or other hardware powered, or the laptop actually going into Sleep mode instead of shutting down completely. And if the battery is quite old, its deteriorating health can also cause the charge to drain quickly.
So let’s go ahead and, without any delay, go through one by one to understand why this hidden battery drain is happening and how it can be fixed.
- Hybrid Power States: Windows’ Fast Startup feature keeps the system in “Deep Sleep” but doesn’t fully power it off.
- Hardware Features: Some USB ports continue to supply power even when the laptop is off.
- Chemical Aging: Lithium-ion batteries naturally age over time and begin to lose charge on their own.
Also Read: How to Fix 100% Disk Usage on Windows 10 SSD (Fast)
How to Fix Laptop Battery Draining While Shut Down
If your laptop’s battery keeps draining even after you shut it down, there’s absolutely no need to worry. This is often caused by Windows’ Fast Startup, the Always-On USB PowerShare setting in the BIOS, or the laptop not shutting down properly and instead entering sleep mode.
Alright, now let’s look at the practical solution. You won’t need any third-party software for this. You just need to check and change some of Windows’ internal settings. First, we’ll disable Fast Startup, and then turn off settings like Always-On USB PowerShare in the BIOS. We’ll also confirm that the laptop isn’t going into sleep mode instead of shutting down. By applying these two simple methods, you can easily prevent unnecessary battery drain after a shutdown.
Also Read: How to Remove Microsoft Edge from Windows 11 (Quick Fix)
Disable Windows Fast Startup
In Windows 10 and 11, a feature called ‘Fast Startup’ is enabled by default to speed up boot time. Because when you shut down your laptop, this feature removes your core OS files from RAM and saves them to the hard drive (hibernation file). To maintain this process, the motherboard needs a continuous, small amount of battery power. This is technically known as Advanced Configuration and Power Interface (ACPI) power states. Disabling it is very simple:
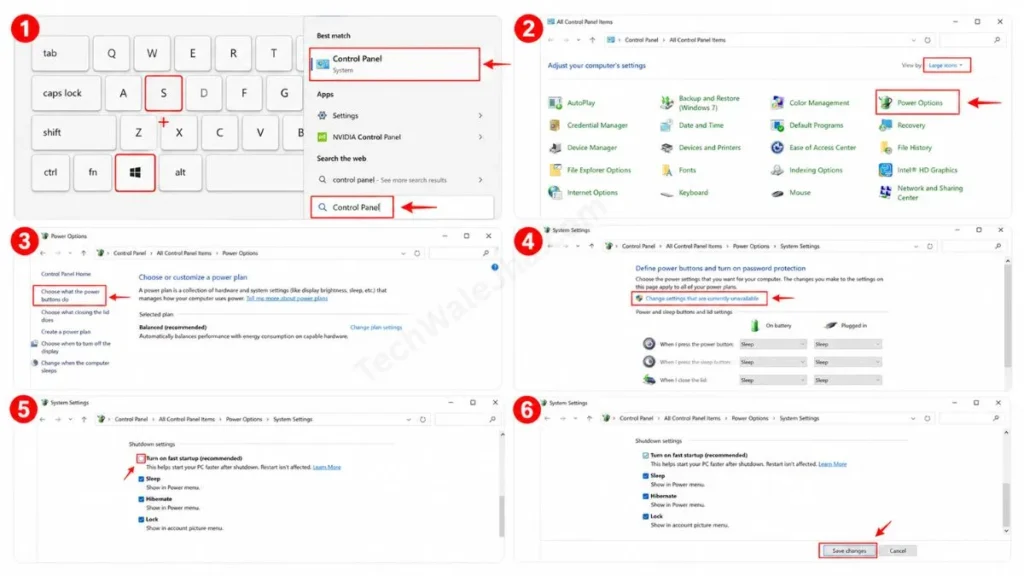
- To do this, press the Windows key + S on your keyboard or go directly to the Windows search and search for Control Panel to open it.
- Select ‘Large icons’ under View by and click on Power Options.
- Then, in the left-side menu, click on “Choose what the power buttons do”.
- Now, click on “Change settings that are currently unavailable” next to a shield icon.
- Then, under ‘Shutdown settings’, UNTICK the box for “Turn on fast startup (recommended)”.
- Finally, click Save changes. From now on, your laptop will power off completely, and your battery drain problem will also be solved.
Turn Off Always-On USB Ports in BIOS
Have you ever noticed that even after your laptop is turned off, if you plug your phone’s data cable into it, the phone starts to charge? This is called ‘USB PowerShare’ or ‘Always-On USB’. This feature is very useful when traveling, but on normal days, it quietly drains your battery. It can be fixed directly from the BIOS.
| Feature | Battery Drain Reason | How to Identify | Fix Location |
|---|---|---|---|
| Fast Startup | It holds power to quickly boot my OS. | The boot time is unusually fast. | Windows Control Panel |
| USB PowerShare | The laptop charges external devices (phone) when it’s closed. | There is a small ‘Battery’ or ‘Lightning’ icon next to the USB port. | System BIOS or UEFI |
Also Read: How to Get Help in Windows 11 Quickly (2026)
How to disable it in the BIOS:
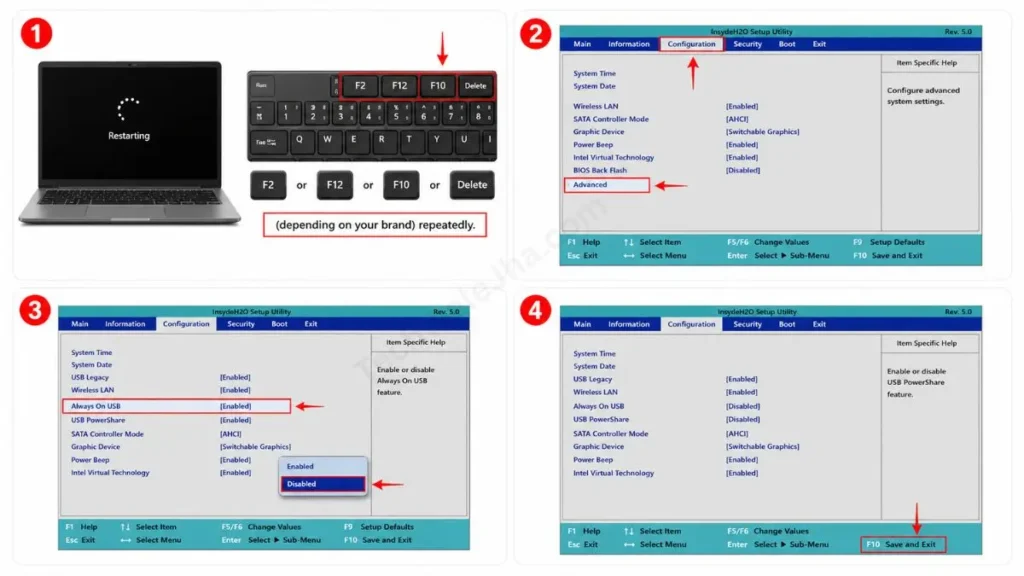
- To do this, restart your laptop and immediately press the F2, F12, F10, or Delete key (depending on your brand) repeatedly.
- When the BIOS menu opens, go to the Configuration or Advanced tab.
- Then, find the “Always On USB” or “USB PowerShare” option.
- Change it from ‘Enabled’ to ‘Disabled’.
- Then press F10 to save the settings and exit.
If you really wanted to know how to fix laptop battery draining while off, these two steps will completely solve your problem up to 90%.
Also Read: Why Does My Laptop Keep Hanging? 5 Fast Ways to Fix It
Advanced Fixes for Laptop Battery Drain
If the battery continues to drain after the laptop shuts down even after changing the Fast Startup and BIOS settings, the problem may be a bit deeper. In such a case, you can try performing a complete shutdown from the Command Prompt to confirm that the laptop is properly powering off.
Also, check the battery health using your laptop’s built-in manufacturer tools. Because sometimes the cells in an older lithium-ion battery naturally lose their ability to hold a charge, the battery continues to drain even after the laptop is shut down. In other words, if the problem isn’t solved with the normal settings, we’ll need to check Windows’ deeper settings or the battery’s hardware. So let’s see what we can do in such cases.
Force a Complete Shutdown via CMD
New laptops with Windows 10 and 11 are very smart. Many times when you click ‘Shut Down’ from the Start menu, Windows, due to background processes like Windows Update or system maintenance, puts the PC into ‘Modern Standby’ or ‘Deep Sleep’ instead of shutting it down completely. And this continuously drains the battery.
There’s a great hack to permanently shut down Windows and avoid this problem for good: the Command Prompt (CMD).
- To do this, press the Windows key + R on your keyboard to open the Run dialog.
- Then, type cmd and press Enter.
- Next, type the following on the black screen:
shutdown -s -t 0(the zero here means a 0-second delay). - As soon as you press Enter, your laptop will instantly and completely power off.
Pro Tip from TechWaleJha: If you don’t want to type this command every day, you can create a small shortcut on your desktop. To do this, right-click on your desktop, hover over New, click Shortcut, then in the Location field type shutdown.exe -s -t 0 and save it. Then whenever you need to completely shut down your laptop, just double-click this icon and the PC will shut down properly. This is a guaranteed method for anyone asking “how to fix laptop battery draining while shut down.”
Also Read: How to Check Your Laptop Battery Health (Easy Guide 2026)
Check Your Laptop Battery Health
If you’ve tried all the software-level tricks and they fail, the truth is the problem might be with your battery’s hardware, not the software. This is because the life of lithium-ion batteries is always measured in ‘Charge Cycles’. As the battery gets older (2-3 years), its internal chemical cells begin to degrade. Because of this, the battery can’t hold a charge and starts to ‘Self-Discharge’ (lose power on its own) even when the PC is turned off.
To confirm that your battery is okay, you can run a diagnostic report in Windows. To do this, follow the steps below:
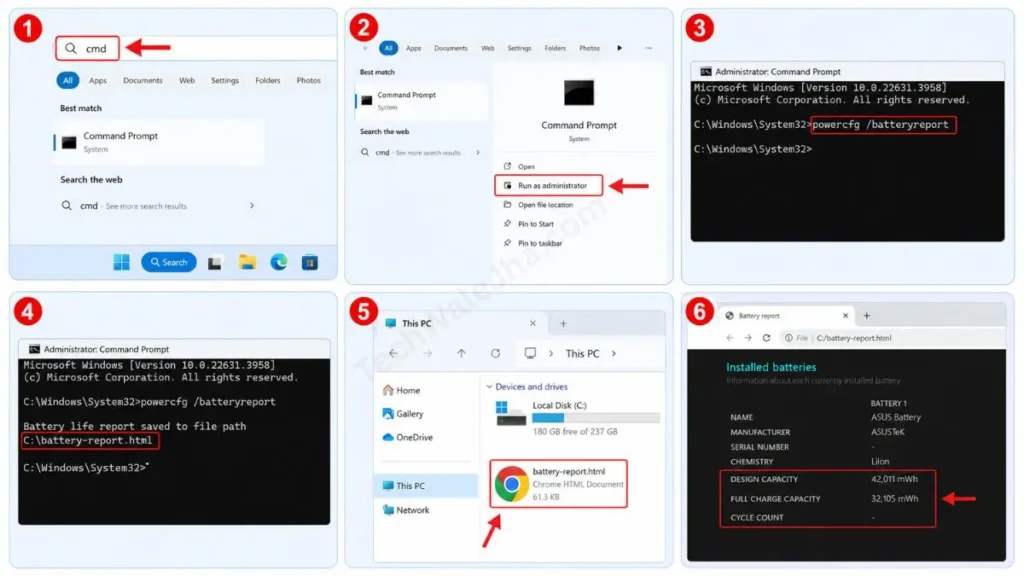
- First, go to Windows Search, type CMD, and open it in Administrator mode.
- Then, a black screen will open. In it, type:
powercfg /batteryreportand then press Enter. - This command will save an HTML file to your C: Drive.
- Open that file in Chrome or Edge browser.
- In the report, compare the “Design Capacity” (the battery’s original capacity) and the “Full Charge Capacity” (the battery’s current capacity).
If your ‘Full Charge Capacity’ has dropped by 40% to 50% from the original capacity, it means your battery’s life cycle is nearing its end. In this case, no matter how many software settings you try, you will have to buy a new, original battery.
Also Read: How to Remove Virus from Pendrive Without Losing Data
Frequently Asked Questions
Is it normal for the battery to drain a little when the laptop is shut down?
Yes, a 1% to 3% battery drain over 24 hours is completely normal because the motherboard’s internal clock (CMOS) is always using a small amount of power. But if your battery is dropping 10% to 20% overnight, you need to immediately disable Fast Startup to fix this issue.
Does leaving a USB drive or wireless mouse plugged into a laptop cause battery drain?
Yes, it does. If your laptop has the ‘Always-On USB’ (PowerShare) feature enabled, a wireless mouse dongle, keyboard, or USB drive left plugged in will continue to consume power in the background even when the PC is off. To prevent this battery drain, it’s best practice to unplug these external devices after shutting down.
How much should you charge a laptop to extend its battery life?
To maintain your laptop’s battery health and extend its lifespan, you should always keep its charge level between 20% and 80%. Frequently draining the battery to 0% or leaving it plugged in after it reaches 100% can quickly degrade its lithium-ion cells.
Final Words From TechWaleJha
So friends, I hope you’ve understood how to fix a laptop battery draining while shut down. In most cases, just turning off Fast Startup and adjusting the USB port settings is enough.
To keep your laptop’s battery healthy, always try not to leave the charger plugged in 24/7 and don’t let the battery drop to zero percent. Always keep the laptop’s charge between 20% and 80%.
If your battery drain problem was solved by these tricks, be sure to share this article with your tech-savvy friends! And if your PC is still draining battery, comment below with your laptop’s model and the problem, and I will personally provide its technical solution! 👇
Disclaimer: The information provided in this article is for educational and troubleshooting purposes only. Modifying BIOS/UEFI settings, running CMD commands, or making changes to the system registry are technical steps. Although these methods are tested and generally safe, the TechWaleJha platform or its author assumes no responsibility for any data loss, system instability, or hardware damage that may result from using these methods. If you are unsure about any setting, especially within the BIOS, please consult a professional technician or refer to your laptop manufacturer’s official support guidelines.




