
There comes a moment in every Windows user’s life when our laptop restarts and a blue screen displays: “Getting Windows ready, Don’t turn off your computer.” Then everything seems to be going fine, until suddenly the loading gets stuck at 0% or 99%. Then in such a situation you wait for hours, but the screen doesn’t move forward. Or sometimes when you check for updates in Windows Settings, you keep facing the Windows Update stuck-downloading problem and get strange error codes like 0x80070057 popping up.
If you’re also fed up with this frustrating problem and are looking for a safe way to fix it, you’ve come to the right place. Friends, in this in-depth tech guide from your very own TechWaleJha, we’ll provide a solid, permanent solution to the “How to Clear Windows Update Cache” issue.
Actually, the main reason updates fail isn’t a major OS (Operating System) issue, but rather corruption of the temporary update files we call the cache. In this article, I’ll walk you through, step by step, how to manually and safely clear Windows update cache. This simple tweak will not only get your stalled updates to install smoothly and automatically, but it will also free up a lot of unnecessary memory on your system, making your PC react even faster.
Why Do You Need to Clear Windows Update Cache?
If you’re wondering why this update cache keeps getting corrupted and why it’s necessary to clear it, let’s easily understand the small technicality behind it.
Whenever Microsoft pushes a new system update or security patch, your computer doesn’t install it directly. Instead, all the heavy files are first downloaded from the internet and temporarily saved in a hidden folder on your C-Drive. We call this the ‘Update Cache’ storage. If you want to understand the workings of cache memory in more detail, you can read the reference data on Cache Computing on Wikipedia.
The real problem starts when files are downloading in the background and your internet suddenly disconnects, the PC goes into sleep mode, or a minor glitch occurs in the system. In such situations, you should follow the steps given below:
- Corrupted Update Files: The temporary files being downloaded become corrupted.
- The Installation Loop: When you try to resume or install the update again, Windows gets confused. New files arrive, but the old, corrupted files in the folder clash with them, causing the update to get stuck in an infinite loop.
- Massive Storage Drain: These incomplete “stuck” updates can often take up 5GB to 10GB of storage, which makes the system run very slowly.
The only way out of this entire loop is to forcibly remove these old, incomplete, and corrupt files from the system. As soon as you properly clear Windows update cache, Windows starts with a fresh slate and new files download safely without any conflicts. This process is the IT experts’ favorite and most recommended hack for freeing up C drive space.
Also Read: How to Recover Deleted Files for Free (2026 Guide)
Method 1: The Easiest Way (Using Windows Settings)
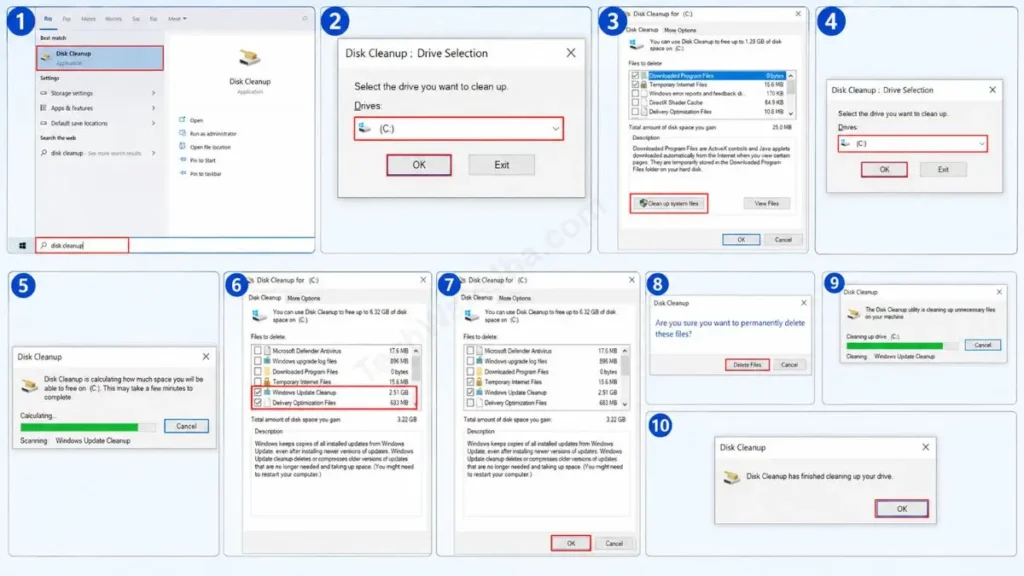
If you don’t want to navigate into a hidden system folder and want to safely remove the cache, then Windows’ built-in ‘Disk Cleanup’ tool is the best option. This process is completely automatic and helps you properly delete Windows update files.
Just follow these easy steps below:
- Now, click the Windows Search icon in your taskbar and type “Disk Cleanup.” Open it.
- If you have multiple drives, select the C: drive or the one where Windows is installed, and press OK.
- Now a small window will open. Here you will see a button at the bottom labeled: “Clean up system files”. Click on it, and note that this step requires admin rights.
- Again, select the C: Drive and press OK. Now the tool will take a little time to calculate the old system files.
- When the new list appears, scroll through it and tick “Windows Update Cleanup” and “Delivery Optimization Files.”
- Then, in the final step, just click OK and confirm to “Delete Files.”
This is an excellent Windows 11 update cleanup process that silently clears corrupt files in the background and frees up several GBs of storage.
Also Read: How to Fix 100% Disk Usage on Windows 10 SSD (Fast)
Method 2: Manually Delete via the SoftwareDistribution Folder
Sometimes an update gets so badly stuck that even the Disk Cleanup tool can’t clear it. In such situations, we have to use a manual method.
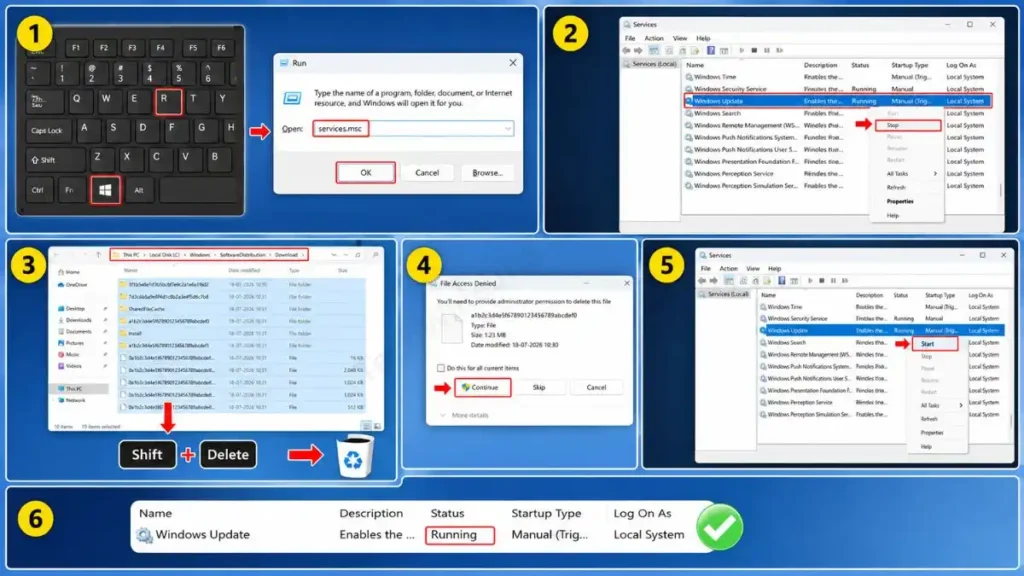
Here’s a twist: Windows won’t let you delete these files directly because the Windows Update service is using them in the background, which results in a “File in use” error. Therefore, before clearing the cache, we need to stop the Windows Update service. Then, we can go directly into the Windows Update cache location and clean out the junk.
Step-by-Step Manual Process:
Follow this process carefully and exactly as is:
- Now, press the Windows Key + R on your keyboard to open the ‘Run’ dialog box. Type
services.mscthere and press Enter. - A long list will open. In it, scroll down and find the service named “Windows Update”. Then, right-click on it and click Stop. Or, just leave it open.
- After that, open your ‘File Explorer’ (My PC) and copy-paste this exact path into the address bar at the top, then press Enter:
C:\Windows\SoftwareDistribution\Download - You are now in the official SoftwareDistribution folder in Windows 11. Select all the folders and files with strange names here (Ctrl + A) and permanently delete them using Shift + Delete. If the system asks for permission for a specific file, click ‘Continue’.
- After clearing the cache, return to the ‘Services’ window we left open in step 2. Then, right-click on the “Windows Update” service again and click Start this time.
You have now successfully cleared the stuck update cache manually. Now, when you go to Windows Settings and click ‘Check for Updates’ again, fresh, new files will download and the update will install 100% smoothly.
Also Read: How to Reset File Explorer Windows 11 in PowerShell
Method 3: The Pro Way (Using Command Prompt – CMD)
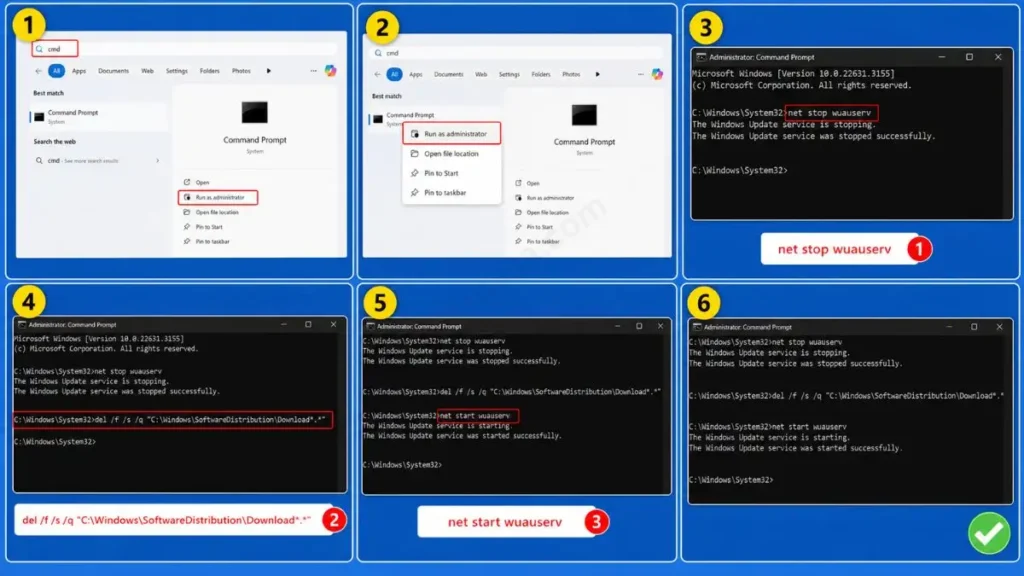
Power users and IT professionals don’t like to repeatedly navigate through menus and folders. If you’re one of those who prefer working on the command line, you can save time by using the direct clear update cache CMD method. This code does exactly the same thing we did manually in Method 2: stopping the update service, deleting the files, and then restarting the service, but it does it all in just 10 seconds.
Just follow these simple steps carefully:
- Go to your Windows search and type CMD or Command Prompt.
- Right-click on it and select “Run as administrator.” This is very important, otherwise the commands will fail.
- Now, in this black window, copy and paste the codes given below one by one, pressing Enter after each line:
net stop wuauservdel /f /s /q "C:\Windows\SoftwareDistribution\Download*.*"net start wuauserv
- Line 1 (net stop wuauserv): This will stop the Windows Update service.
- Line 2 (del…): This code will forcefully delete all the corrupted cache files inside that folder automatically, without asking for your permission.
- Line 3 (net start wuauserv): This will restart the update service.
After that, just close the CMD window. Your Windows update cache location is now completely clean, and you can download new updates without any errors.
Also Read: How to Fix Application Error 0xc00007b Windows 11 (Working Fix)
Frequently Asked Questions
Is it safe to clear Windows Update Cache or delete the SoftwareDistribution folder?
Yes, it’s 100% safe. Deleting the Windows Update files won’t negatively affect your PC’s stability. You’re only removing the temporary installation files that were downloaded. As soon as you run “Check for Updates” again, Windows will automatically download the new, fresh files and recreate that folder on its own.
Will clearing the cache delete my personal files, photos, or apps?
Not at all. The SoftwareDistribution\Download folder only contains the OS’s system update files. This process will not harm your desktop, documents, or any of your personal files or apps.
What happens to the updates I have already installed?
The updates you have already installed correctly are not affected by this process. We are only removing the pending or corrupt files that were downloaded but failed to install for some reason. Your system will remain updated.
I’m still getting Windows Update errors after clearing the cache. What’s next?
If you’re still getting errors after clearing the cache, use the built-in Windows Update Troubleshooter. To do this, go to your PC’s Settings, then System, then Troubleshoot, and under Other troubleshooters, click ‘Run’ next to ‘Windows Update’.
Conclusion
Friends, Windows updates failing repeatedly can be frustrating for anyone. But by understanding the system’s mechanics a little and using this SoftwareDistribution folder trick, you can fix your PC yourself without having to go to a professional IT technician. Performing this process will complete your stalled update, and by clearing the unnecessary cache cluttering up your C-Drive, your system will automatically feel a bit faster.
I hope this detailed tech guide has 100% solved your error problem. For more real and working tech guides, PC optimization tips, and in-depth tutorials, stay connected with the TechWaleJha platform. And if you have any related issues, you can ask in the comments below.
Disclaimer: This guide and all the steps described in it, such as CMD commands and system folder tweaks, are for educational purposes only. Although these methods are fully tested and safe, always create a System Restore Point before changing any system settings. TechWaleJha or its author will not be held responsible for any data loss, errors, or system crashes. Please follow these steps at your own risk and with extreme caution.




