
If you’re in a hurry and want to fix your error right away, you can quickly set it up like this. To disable Windows 11 telemetry, go to your system’s Settings, then Privacy & security, then Diagnostics & feedback, and turn off Optional diagnostic data. You can also delete diagnostic data and configure the relevant Windows services, Registry policies, or Group Policy settings.
If you’ve bought a new laptop or updated Windows, you’ve probably heard about telemetry at some point. Hello friends, your buddy TechWaleJha is here to solve another tech mystery. In simple terms, Windows 11 telemetry is a background process that sends system diagnostic information to Microsoft’s servers. Its primary purpose is to understand system crashes, fix bugs, and improve overall OS reliability.
But many users have a lot of questions about privacy. So let’s understand this Windows 11 data collection system in detail.
What Data Does Windows 11 Collect?
Microsoft mainly divides data into two parts in Windows:
- First, Required Diagnostic Data: This data is very important for keeping Windows secure, up-to-date, and functioning properly. It also includes basic error codes and device specifications.
- Second, Optional Diagnostic Data: This is additional data, such as which apps you use the most or how a specific feature is performing.
Also Read: How to Disable VBS in Windows 11 | Advanced Fix Latest 2026
Is Windows 11 Telemetry a Privacy Risk?
To be honest, it’s not right to view this as fear-mongering, because Microsoft isn’t freely reading your personal photos, chats, documents, or any other files. The main purpose of telemetry is to maintain technical health and perform troubleshooting. Still, if you’re privacy-conscious and want to minimize background activity, reviewing your Windows 11 privacy settings can be a sensible step for you. Microsoft’s official Diagnostics and Privacy guide also explains how this data is handled. You can read the guide here.
Can You Completely Stop Windows 11 Data Collection?
There are many videos on the internet that claim they will make your data transfer “100% zero.” But this is a very big myth! It’s not possible to completely isolate the system, because ‘Required’ data for updates and basic security will always be shared. However, you can definitely block unnecessary and ‘Optional’ data. Let’s see how you can do this!
How to Disable Windows 11 Telemetry from Settings
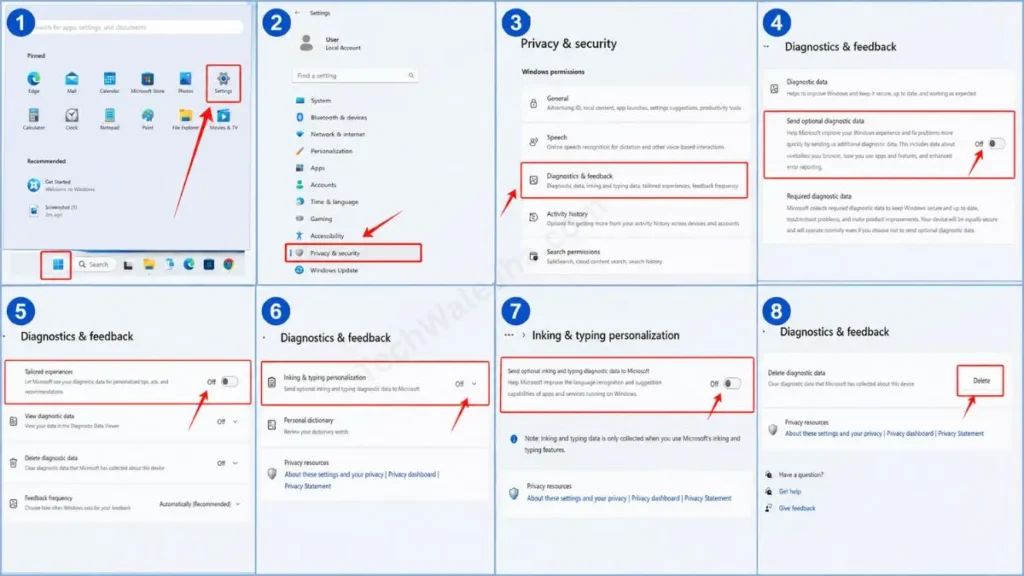
To do this, go to your system’s Settings, click on Privacy & security, and open Diagnostics & feedback. From here, turn off Optional diagnostic data, then disable Tailored experiences or Personalized options. After that, click the Delete button under Delete diagnostic data to remove it.
If you want to safely disable Windows 11 telemetry, there’s absolutely no need to go into the complex setup of the Registry or Services, because Windows’ own built-in Settings app is the most beginner-friendly and safe method. And it doesn’t pose any risk of system crashes.
Open Diagnostics & Feedback Settings
To open the settings for this, first, you need to access the privacy dashboard:
- Now, open Settings by pressing the Windows key + I on your keyboard.
- Then, from the left menu panel, click on Privacy & security.
- After that, find and open Diagnostics & feedback within the Windows permissions section.
Turn Off Optional Diagnostic Data
On this page, you will find the main switch to control data. Here you will find the ‘Send optional diagnostic data’ toggle, or in some versions, just ‘Optional diagnostic data’. Simply turn this toggle to Off. This one step instantly blocks the largest part of Windows 11 data collection.
Turn Off Tailored Experiences or Personalized Options
Now, scroll down a bit. Here you will see an option called “Tailored experiences.” Microsoft uses your diagnostic data to provide you with personalized ads, tips, and suggestions. Turning this off will stop unwanted recommendations and intrusive ads from appearing within Windows.
Turn Off Inking & Typing Personalization
If you’re concerned that Windows is recording your typing history or handwriting style, look for the Inking & typing personalization option in the same menu. Then click it to turn it off. This prevents your keystrokes and local dictionary history from being sent to Microsoft’s servers.
Delete Existing Diagnostic Data
We’ve stopped the data from going forward, but what about the data that has already been sent?
For this, on the Diagnostics & feedback page, you’ll find a “Delete diagnostic data” section a little further down. Click the Delete button there. This will delete all your previous diagnostic history from Microsoft’s cloud.
Quick Privacy Settings Checklist:
| Setting Name | Recommend Action | What is its benefit? |
|---|---|---|
| Optional diagnostic data | Off | This will stop the extra background tracking. |
| Tailored experiences | Off | This will stop unwanted system ads and suggestions. |
| Inking & typing | Off | Typing and keyboard patterns will remain secure. |
| Existing diagnostic data | Delete | The old data server will be permanently wiped clean. |
Also Read: How to Fix Blue Screen Error in Windows 11 Using Command Prompt
How to Disable Windows 11 Telemetry Services
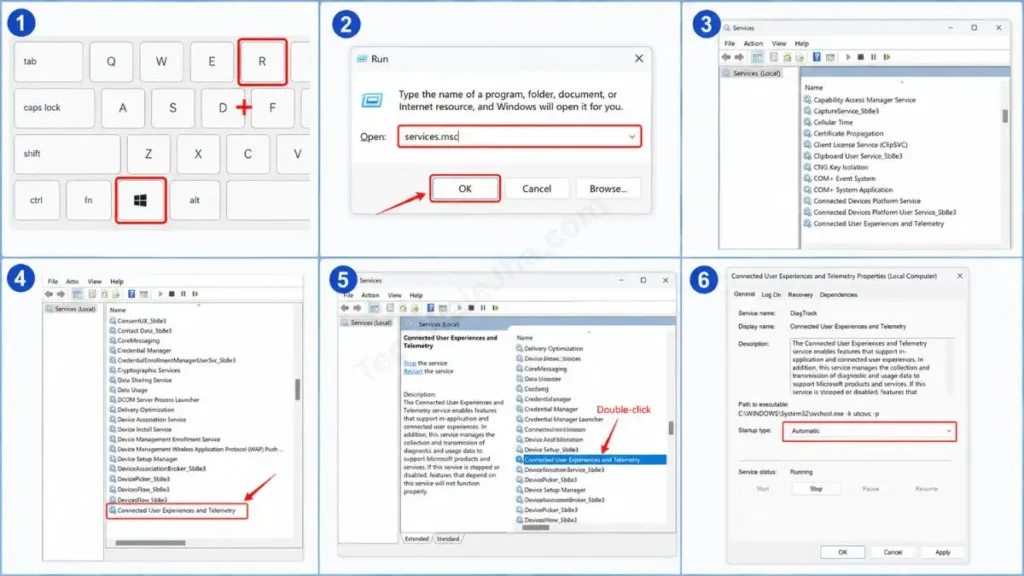
To manage Windows telemetry services, press the Windows key + R, then type services.msc in the box and press Enter. After that, find Connected User Experiences and Telemetry in the list, but before disabling the service, understand how it might affect Windows’ diagnostic features.
While turning off privacy options from the Settings app is the safest method, if you’re a tech enthusiast like me who wants to get under the hood and take control, we can manually review the Windows 11 telemetry services. For this, many tutorials on the internet say to disable everything as soon as you see the word “telemetry.” But be careful, Windows services are interconnected, and blindly disabling them can cause some apps to crash.
Open Windows Services
To do this, first, we need to access the Windows background services manager:
- To do that, press the Windows key + R together on your keyboard.
- Now, type
services.mscin the Run dialog box and press Enter. - A long list of services will now open.
Find Connected User Experiences and Telemetry
Scroll through this long list and find the service named Connected User Experiences and Telemetry. Friends, this service is commonly called DiagTrack Windows 11, which continuously gathers diagnostic data in the background and sends it to Microsoft.
- Double-click this service to open its Properties window.
- Then, you will see a ‘Startup type’ dropdown menu.
Should You Disable DiagTrack?
If you change its ‘Startup type’ to Disabled, this service will not start automatically. However, it’s very important to take a balanced approach here. Disabling it can cause issues with system diagnostics and some future insider updates. If your primary goal is just privacy, then use the Settings method first, as disabling the service is an extreme step.
What About dmwappushservice?
Some older Windows 10 privacy guides also advise disabling dmwappushservice, i.e., the WAP Push Message Routing Service. However, in current versions of Windows 11, it’s more important to focus on your OS’s stability rather than blindly disabling this service. Turning off every service just because it’s tagged with “telemetry” is a common mistake you should avoid.
Also Read: How to Find Error Codes on Windows 11 Quickly 2026
How to Restrict Windows 11 Telemetry Using the Registry
Advanced users can check the HKEY_LOCAL_MACHINE\SOFTWARE\Policies\Microsoft\Windows\DataCollection policy path in the Windows Registry. It is recommended to back up the Registry before editing, as incorrect values can affect Windows behavior.
If you want to properly disable Windows 11 data collection at the policy level, the Registry Editor is a very powerful tool. However, the Registry is the “brain” of Windows. If you make even a single mistake, your system could get stuck in a boot loop. Therefore, only use this Windows 11 Registry telemetry method if you are an advanced user and know what you’re doing.
Create a DataCollection Policy Key
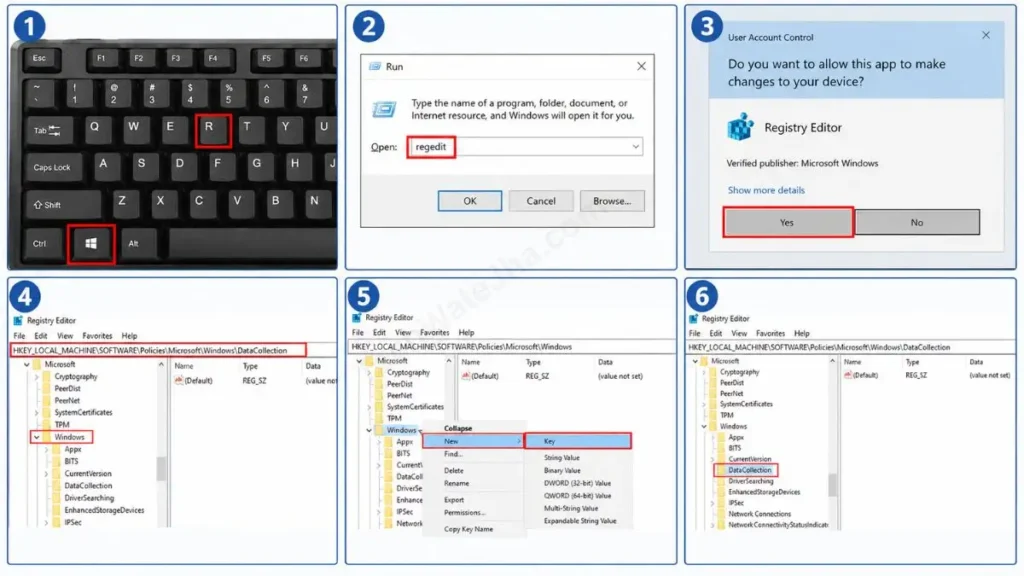
- To create the DataCollection Policy Key, press the Windows key + R, then type regedit in the Run box and press Enter. It will then prompt for administrator permission; click Yes.
- Then, carefully copy and paste this path into the address bar at the top and press Enter:
HKEY_LOCAL_MACHINE\SOFTWARE\Policies\Microsoft\Windows\DataCollection - If the ‘DataCollection’ key isn’t already there, right-click on the Windows folder, select New, then select Key and name it DataCollection.
Configure the AllowTelemetry Value
Old tutorials used to say to create a new DWORD (32-bit) value here named AllowTelemetry and set its value to 0.
- If you set this policy, Windows limits diagnostic data behavior to a strict level.
- Note: In newer versions of Windows 11, such as 23H2/24H2, Microsoft has slightly changed the data collection policies, so this doesn’t guarantee 100% telemetry disabling, but it still minimizes data sharing.
Registry Changes You Should Avoid
Always avoid downloading random “.reg” files from third-party websites and double-clicking them. These files often contain dozens of registry tweaks that promise “Ultimate Privacy,” but in reality, they break Windows Update and the Microsoft Store.
Restart Windows After Registry Changes
Any policy change in the registry does not take effect immediately. You must properly restart your PC for it to take effect.
Registry Safety Checklist:
| Action Check | What’s the use of it? |
|---|---|
| Create Restore Point | If the PC crashes, you’ll return to a safe state. |
| Verify Registry Path | This can prevent changes from being made to the wrong folder. |
| Change Minimal Values | Changing it reduces the risk of unwanted system errors and broken features. |
Also Read: How to Get Help in Windows 11 Quickly
How to Disable or Restrict Telemetry with Group Policy
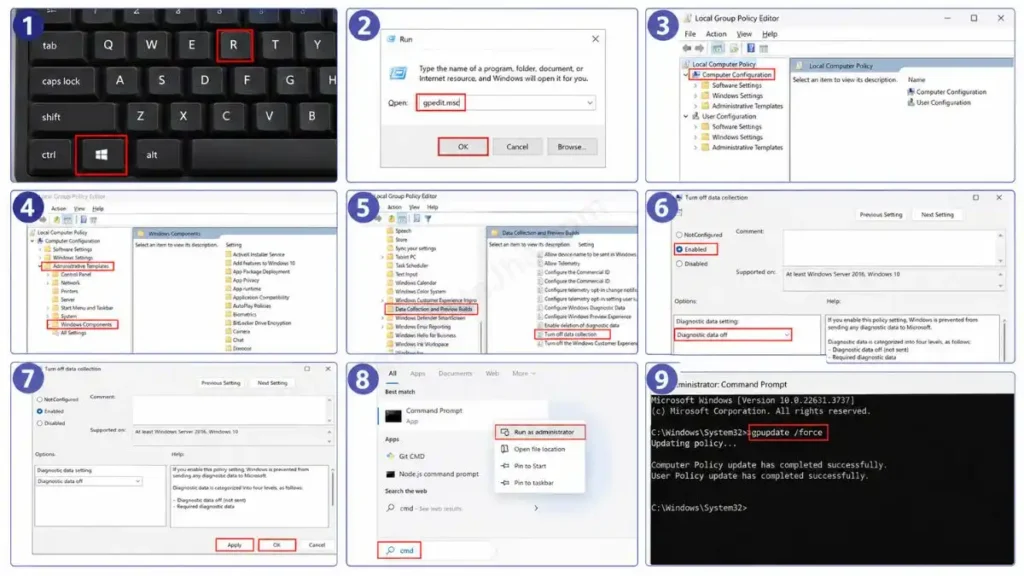
In Windows 11 Pro or Enterprise, open gpedit.msc, go to Computer Configuration, then click on Administrative Templates, then go to Windows Components, and then click on Data Collection and Preview Builds. Here you can configure the Allow Diagnostic Data policy.
You should know that if you have the Windows 11 Pro, Enterprise, or Education edition, then you’re very lucky! You don’t need to get tangled up in messy registry codes at all, because Microsoft provides you with a clean and powerful interface to manage Windows 11 Group Policy telemetry. For this reason, you can safely disable Windows 11 data collection at the policy level through the Group Policy Editor.
(Note: gpedit.msc is disabled by default in the Windows 11 Home edition. Therefore, for Home users, the Settings method mentioned above is the best option.)
Open Group Policy Editor
Let’s now open this hidden tool:
- To open it, press Windows + R on your keyboard.
- Then, a Run dialog box will open. Type
gpedit.mscand press Enter. - The ‘Local Group Policy Editor’ window will then open.
Find the Data Collection and Preview Builds Policy
Now we need to navigate to the correct policy folder. To do this, follow this exact path in the left-side panel:
- Go to Computer Configuration, then click on Administrative Templates, then on Windows Components, and then on Data Collection and Preview Builds.
- When you click on this folder, you will see all the policies related to privacy and diagnostic data on the right side.
Configure Allow Diagnostic Data
In the right-hand panel, find the policy named “Allow Diagnostic Data” and double-click on it.
- A new window will open. Here, you need to select “Enabled” in the top left.
- Right below it, there will be an “Options” box. From the dropdown menu here, you need to set the data sharing limit.
- Note: Older online guides used terms like ‘Basic’, ‘Enhanced’, or ‘Full’, but in newer updates, Microsoft only provides the option to set it to ‘Diagnostic data off’ for Enterprise or at the minimum required level. Select the lowest option according to your privacy requirements.
Apply the Policy and Restart Windows
After making the settings changes, click Apply and then OK. To enforce this policy on the system immediately, you can open Command Prompt and type gpupdate /force. After that, be sure to restart the PC so that your new privacy rules are properly applied to the system.
Also Read: How to Check Your Laptop Battery Health
Which Windows 11 Telemetry Method Should You Use?
For most users, the best starting point for reducing Windows 11 telemetry is the Settings app. Pro or Enterprise users can use Group Policy for additional control, while the Registry and Services methods are for advanced users.
So far, we’ve looked at four different ways to disable Windows 11 telemetry. But for the average user, which is the best method? Well, to be honest, not everyone needs to do hardcore hacking. You should choose your method based on your technical knowledge and your OS version.
Settings Method: Best for Most Users
If you want to easily optimize your Windows 11 privacy settings without any risk, then just use the Settings app. It’s 100% safe and won’t break any system features.
Group Policy: Best for Pro and Enterprise
If you have the Pro version and want to limit system data sharing in a clean, organized way, there’s nothing better than Group Policy. It provides centralized control without putting the Registry at risk.
Services Method: For Advanced Users
Only proceed if you know exactly how background processes work. Otherwise, don’t touch DiagTrack or any other services through services.msc, as this method carries a higher risk and can cause interconnected apps to crash.
Registry Method: Advanced Users Only
This is strictly for experienced Windows users. A small typo can send your PC to the blue screen. Use it only when all other methods have failed.
Quick Decision Table:
| Method | Difficulty Level | Who is it best for? | System Risk |
|---|---|---|---|
| Settings | Easy | For every regular user and beginner. | Low (Zero Risk) |
| Group Policy | Medium | For Pro / Enterprise / Office users. | Low-Medium |
| Services | Medium | Advanced users who properly understand background apps. | Medium |
| Registry | Advanced | Experienced PC Enthusiasts. | High |
If you want to keep your data secure with ease, know your limits and adopt a safe approach. Otherwise, even the smallest mistake could cost you dearly.
Also Read: How to Lock PC Folder Without Any Software
What Happens After Disabling Windows 11 Telemetry?
Disabling optional diagnostic data keeps Windows 11 secure and operational. According to Microsoft, required diagnostic data provides the minimum data needed to keep Windows secure, updated, and functioning properly.
When you finally succeed in disable Windows 11 telemetry, it’s natural to have a fear of, “Have I broken my PC?” Friends, there are many misconceptions on the internet that as soon as you turn off telemetry, your computer will become completely offline or stop working, and so on. Let’s see in practice what its real-life effect is.
Will Windows 11 Stop Receiving Updates?
Absolutely not! This is one of the biggest and most common misconceptions people have. Telemetry and Windows Update are two completely separate things. Limiting Windows 11 data collection has no effect on Windows Update. You will continue to receive your regular security patches, bug fixes, and feature updates just as you normally would.
Will Windows Security Still Work?
Yes, your Windows Defender and Firewall will remain fully operational. Diagnostic data is mainly for reporting technical issues and bugs, while Windows Security handles real-time virus and malware protection. Therefore, tightening your Windows 11 privacy settings never compromises your system security.
Can Disabling Telemetry Improve Performance?
Some YouTubers claim that disabling telemetry will make your PC a rocket. But the reality isn’t that simple. If the DiagTrack service in the background was using a lot of CPU or disk space, then it might make a slight difference. But on a normal PC, simply turning off telemetry won’t provide any magic or huge FPS boost. If your PC is genuinely slow, you should optimize your startup apps and drivers, not this.
What Features Might Be Affected?
When you disable Windows 11 data collection, you effectively stop telling Microsoft about your usage habits. The trade-off is that you will now see fewer or no personalized tips, Start menu recommendations, and custom app suggestions within the OS. If you are privacy-focused, this might be a plus for you.
Required vs Optional Diagnostic Data:
| Data Type | What is its purpose? | Can you turn this off? |
|---|---|---|
| Required Diagnostic Data | Performing security, update compatibility, and core system health checks. | No, this is the minimum requirement to run the OS. |
| Optional Diagnostic Data | In-depth troubleshooting and personalization. | Yes, it can be completely turned off. |
Also Read: How to Repair Windows 11 Using Command Prompt
How to Check If Windows 11 Telemetry Settings Worked
To verify, reopen the Diagnostics & feedback page, then check the selected diagnostic data setting. For advanced changes, verify the Services, Registry, or Group Policy configuration and restart your PC.
So, you’ve changed your settings, tweaked the Registry, or configured Group Policy, but how can you be sure the changes have actually taken effect? That’s why TechWaleJha always says: “Trust, but verify!” Follow this simple verification checklist to confirm your settings correctly:
Check Diagnostics & Feedback
The easiest way to check this is to go back to where you started. So first go back into Settings, click on Privacy & security, and open Diagnostics & feedback. There, check whether the “Optional diagnostic data” toggle is actually locked in the Off position or not. If it shows Off, then half your work is already done.
Check Services
If you have modified the Windows 11 telemetry services like DiagTrack, press Win + R to reopen services.msc. Then, find that service and check its ‘Startup type’ carefully. If it says ‘Disabled’, then your tweak is working successfully.
Verify Registry or Group Policy
Advanced users, if you used the Registry, reopen that folder path (HKEY_LOCAL_MACHINE\SOFTWARE\Policies\Microsoft\Windows\DataCollection) and check the policy value you set. Group Policy users, open gpedit.msc and verify the current status of your ‘Allow Diagnostic Data’ policy to see if it is locked as you intended. Be careful to only check and not make any further edits during verification.
Restart and Recheck
Always restart your PC after applying any major setting. After restarting, go back and check the steps mentioned above. If the settings are still the same after rebooting, congratulations! Your data is now completely safe.
Windows 11 Telemetry Verification Checklist:
- Optional diagnostic data: Did you turn it off?
- Personalization settings: Did you review and disable them?
- Existing diagnostic data: Did you press the delete button?
- Services/Registry (Optional): Did you verify the configuration?
- System Restart: Did you reboot the PC?
Also Read: 10 Cool CMD Tricks to Look Like a Hacker
Common Mistakes When Disabling Windows 11 Telemetry
When disable Windows 11 telemetry, do not randomly disable all services, do not copy outdated Windows 10 instructions, and be sure to take a backup before editing the Registry. In Windows 11, the minimum level of Required diagnostic data can be retained.
Friends, optimizing your OS is a great idea, but half-baked information on the internet can harm your PC instead of helping it. That’s why when disabling Windows 11 telemetry, most people, in their rush to get privacy, make some common mistakes that break Windows’ basic functionality. Let’s see what you should avoid.
Disabling Every Windows Service
The biggest mistake is going into services.msc and disabling any service named “telemetry.” As I always say, Windows services are interconnected. Killing random background processes can cause your apps to crash or the Windows Store to stop working.
Editing the Wrong Registry Key
Tweaking Windows 11 registry telemetry is an expert-level task. If you create a DWORD in the wrong folder, the policy won’t apply. And if you accidentally delete another OS file, the PC will stop booting. That’s why you should always back up first and verify the exact path.
Using Outdated Windows 10 Guides
Old articles used to divide diagnostic data into “Basic, Enhanced, or Full.” The Windows 11 system has changed a lot today. Microsoft now uses the ‘Required’ and ‘Optional’ terminologies. So stop copying and pasting 4-year-old Windows 10 guides.
Expecting Zero Data Collection
Thinking, “My PC won’t send a single byte of data to Microsoft anymore,” is very unrealistic. Windows 11 has a ‘Required’ component for data collection that always runs in the background to maintain security patches and system health. Therefore, it can never be completely turned off.
Mistakes You Must Avoid:
| Mistake | Better Approach |
|---|---|
| Disable random services. | Only modify what you already know will have an impact. |
| Editing the registry without thinking. | First, create a System Restore Point. |
| Use the old Windows 10 guides. | Please follow the latest Windows 11 terminology correctly. |
| Expect zero telemetry. | Focus only on reducing “Optional” data. |
Also Read: How to Make a Pendrive Bootable
Frequently Asked Questions
What is Telemetry in Windows 11?
It is a diagnostic information sharing system that sends data about Windows crashes, errors, and system reliability to Microsoft so they can fix bugs and develop new features.
Can I Completely Disable Windows 11 Telemetry?
No, it’s not possible to make it completely “zero.” You can block unnecessary ‘Optional’ data, but ‘Required’ data will always be shared for the OS’s basic security and updates.
How Do I Stop Windows 11 From Collecting Data?
The safest way to do this is to go to Settings > Privacy & security > Diagnostics & feedback and turn off Optional diagnostic data. After that, you can disable the personalization options.
Is It Safe to Disable DiagTrack?
Disabling the Connected User Experiences and Telemetry (DiagTrack Windows 11) service is fine for experienced users, but it’s not safe for beginners because it can cause some diagnostic features to stop working.
Does Disabling Telemetry Make Windows 11 Faster?
No, it doesn’t make a significant difference to your FPS or gaming performance. It’s a background diagnostic system. If your PC is slow, focus on RAM, disk usage, and startup apps.
Does Windows 11 Still Collect Required Diagnostic Data?
Yes. Microsoft clearly differentiates that ‘Required diagnostic data’ is necessary to keep the OS active and error-free. You can only manage the ‘Optional’ data.
Final Verdict: Should You Disable Windows 11 Telemetry?
If you want to improve your privacy, first review the Optional diagnostic data, personalization options, and unnecessary feedback settings. Make advanced changes only when you fully understand their effects.
So, friends, the final question is: should you really disable Windows 11 telemetry on your system or not? As a responsible tech guide, I believe you should avoid unnecessary tweaking, but you should also be fully mindful of your privacy.
Recommended Privacy Setup for Most Users
If you’re concerned about your data, you don’t need some random “one-click privacy tool.” Just take these 3 safe steps:
- Turn off Optional diagnostic data: From the Settings app.
- Review Personalization Settings: To turn off unwanted ads and tips.
- Delete Existing Data: To clear old diagnostic history.
Advanced Privacy Setup
Only if you’re running your system like a pro IT admin should you use Windows 11 Group Policy telemetry or Registry edits. Regular users absolutely do not need to touch these complex settings. Microsoft officially agrees. For more information and to read about the policies in-depth, you can always refer to Microsoft’s official Diagnostics, feedback, and privacy guide.
This is your friend, TechWaleJha. I hope that after this ultimate guide, all your doubts about disabling Windows 11 data collection have been cleared.
What method did you use to enhance your PC’s privacy? Did you turn off Optional data in Settings or use the advanced Group Policy method? If you’re facing any registry errors or are confused about privacy settings, be sure to comment below and I’ll personally help you! 👇
Disclaimer: The Registry, Services, and Group Policy tweaks described in this guide are all advanced methods. Modifying them incorrectly can cause your Windows installation to crash or become corrupted. Please be sure to back up your data and create a System Restore Point before making any changes. Techwalejha or its author will not be held liable for any data loss, system failure, or OS errors. You apply these steps entirely at your own risk.




