
Friends, if your PC suddenly starts to slow down while playing games or editing videos, you’re experiencing frame drops, or the system becomes very laggy, then in that case, you should definitely check your CPU’s temperature. Because often the simple reason can be overheating. If you’re also wondering how to check CPU temperature in Windows 11, the simple answer is that Windows 11 doesn’t have a direct built-in app for checking CPU temperature. Yes, if you want to see the temperature without installing any software, you can restart your PC, enter the BIOS/UEFI menu, and check the CPU temperature there. Usually, to open the BIOS, you have to press the F2 or DEL key as soon as the PC starts.
But if you want to see the live CPU temperature right on your desktop while Windows is running, you can use trusted free third-party tools like Core Temp or HWMonitor. This is also very useful for me, especially when I’m doing heavy video editing in Premiere Pro for TechWaleJha or testing new scripts and tools in the background. During such times, the system naturally generates more heat, so keeping an eye on the temperature with a reliable Windows 11 CPU temperature monitor is quite helpful. This way, if the temperature is getting unnecessarily high, you’ll know in time and can easily manage the cooling or workload to save your PC from unnecessary stress.
Also Read: How to Turn Off Smart App Control Windows 11 (Quick Fix)
Why is it important to check a PC’s temperature?
A typical user might think, “If my laptop is getting hot, so what? It’s just a laptop.” But the truth is, heat is the number one enemy of your processor (CPU). When you perform heavy tasks like 4K video rendering or intense gaming, the CPU uses its full power and generates a lot of heat.
If you don’t check CPU temperature in Windows 11 from time to time, your processor can fall victim to “Thermal Throttling.” This means that when the temperature crosses a danger limit, like 90°C, the CPU automatically halves its speed and FPS to prevent itself from getting any hotter and sustaining physical damage. This is the reason your PC might lag or suddenly restart with a blue screen. Therefore, to extend the life of your expensive laptop, making it a habit to regularly check your PC’s temperature in Windows 11 can be a very smart move.
Also Read: How Long Does it Take to Upgrade to Windows 11? (Time Guide)
Method 1: Check from BIOS/UEFI (Without Software)
Many power users don’t want to install unnecessary third-party apps on their system and ask if they can safely check the CPU temperature without software. The answer is yes, you absolutely can. To do this, you can go into your motherboard’s BIOS (Basic Input/Output System) and view the exact hardware status directly from the sensor.
How to Check It? (Step-by-Step):
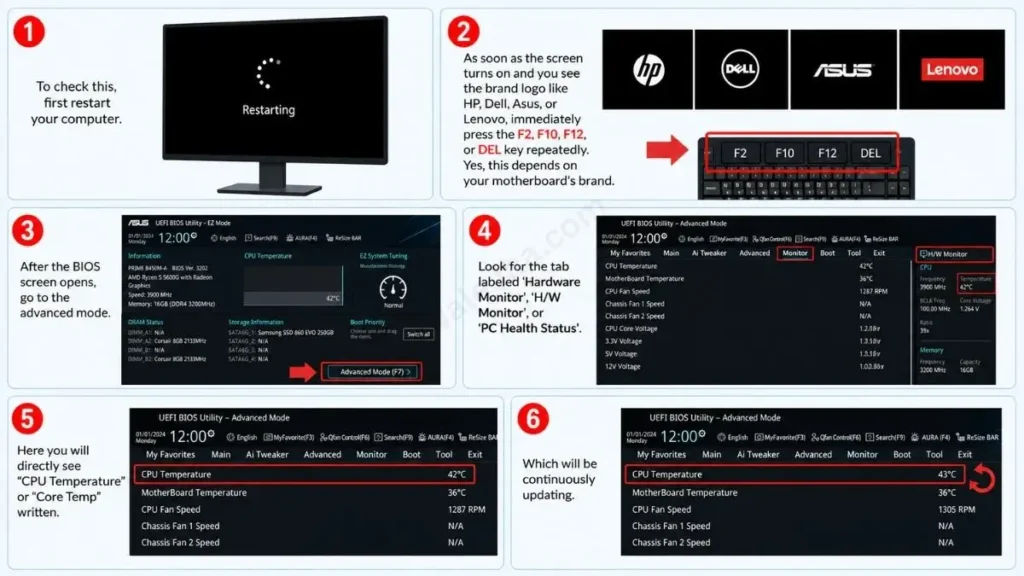
- To check this, first restart your computer.
- As soon as the screen turns on and you see the brand logo like HP, Dell, Asus, or Lenovo, immediately press the
F2,F10,F12, orDELkey repeatedly. Yes, this depends on your motherboard’s brand. - After the BIOS screen opens, go to the advanced mode and look for the tab labeled ‘Hardware Monitor’, ‘H/W Monitor’, or ‘PC Health Status’.
- Here you will directly see “CPU Temperature” or “Core Temp” written, which will be continuously updating.
This method is 100% accurate because it takes a reading directly from the hardware sensor. But the problem is that you can’t open the BIOS while playing a game or working in Windows, so it’s pretty useless for live tracking.
Normal vs Dangerous CPU Temperature (Is It Safe?)
New users often don’t know whether 75°C is normal or dangerous. Use the table below to clear up your doubts:
| PC Task (What are you doing?) | Safe Temperature (°C) | Warning Limit (Danger) |
|---|---|---|
| Idle (Screen is on, no heavy apps are running) | 35°C se 50°C ✅ | Above 60°C (Cooling issue) ❌ |
| Heavy Gaming and Video Editing | 65°C se 80°C ✅ | Above 85°C ❌ |
| Thermal Throttling Zone | N/A | 90°C – 100°C (PC will shut down suddenly) 🚨 |
Also Read: How to Enter Safe Mode in Windows 11 (3 Fast Methods)
Method 2: Core Temp & HWMonitor (Best Third-Party Apps)
If you want to see live how hot your CPU is getting while gaming, you’ll need to install a safe software from the internet. There are plenty of tools on the market, but power users always choose these two lightweight, ad-free apps first. These are considered the best CPU temperature monitors for Windows 11:
1. Core Temp (Easiest and Lightweight):
If you only care about the temperature and don’t need any extra data on the screen, then you should definitely download Core Temp for Windows 11 from the official website.
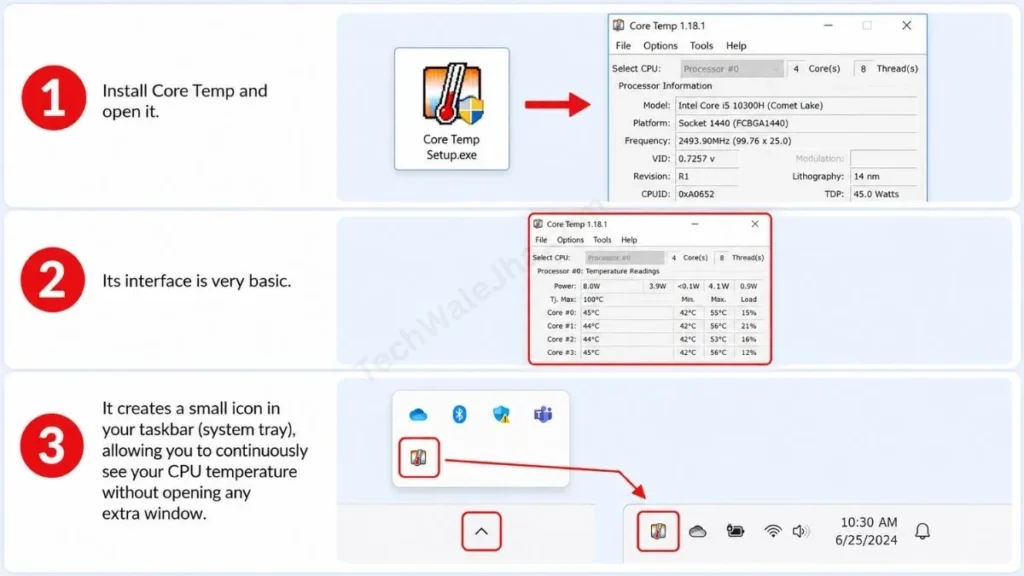
- Install and open it.
- Its interface is very basic. It creates a small icon in your taskbar (system tray), allowing you to continuously see your CPU temperature without opening any extra window.
2. HWMonitor (Detailed Hardware Tracking):
If you’re a more advanced user and want to check not just the CPU but also the motherboard, RAM, fan speeds, and hard disk temperature, then HWMonitor is the best tool for Windows 11.
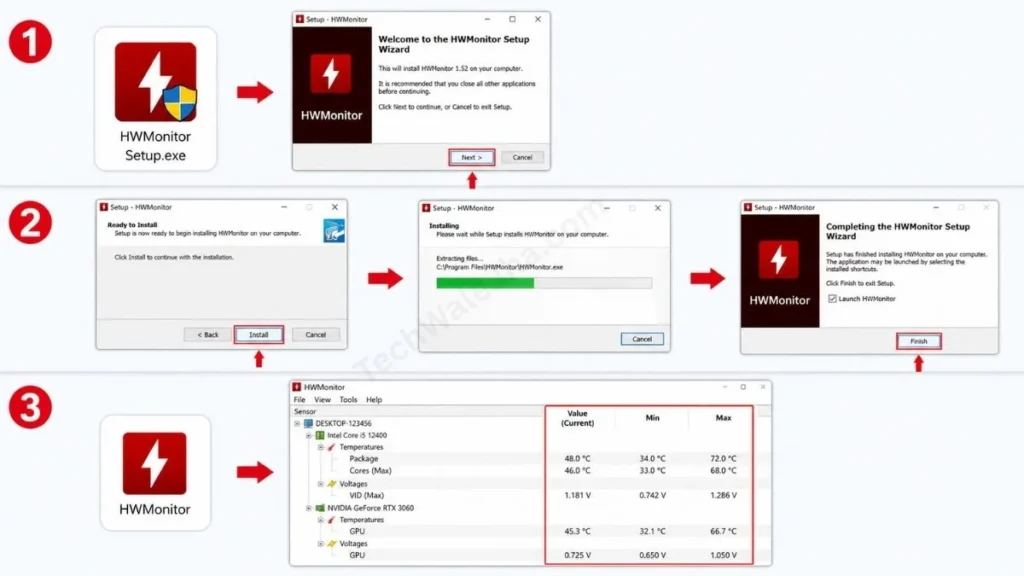
- Download and run the setup.
- As soon as you open the app, you’ll get readings for the minimum, maximum, and current live voltage and temperature for each of your system’s hardware components.
How much heat your processor can handle depends on its architecture. To understand this point in-depth, you should definitely read Intel’s Official Thermal Management Guide. This authoritative documentation teaches you what TJ Max (Thermal Junction Maximum) is and why modern processors automatically shut down to prevent damage when they overheat.
Also Read: How to Create Windows 11 Installation Media (USB Guide)
How to See GPU Temp in Task Manager? (Bonus Trick)
It’s often seen that new users make a mistake. They go to the Windows 11 Task Manager and assume the temperature they see there is the CPU’s temp. In fact, by default, Windows 11 only shows your GPU (Graphics Card) temperature on the Performance tab in Task Manager. Microsoft has not yet added CPU temperature directly to Task Manager. Therefore, the degree Celsius reading you see there is for your graphics card, not your processor.
Frequently Asked Questions
Users have many basic questions about hardware monitoring. Below are the exact answers to the most frequently asked technical questions. Read through them once you might find your question answered here.
Is there really no direct, built-in CPU temperature monitor in Windows 11?
Yes, unfortunately, the Windows 11 Task Manager only shows the GPU (graphics card) temperature. To see the CPU’s current status, you’ll either have to restart your PC and check the CPU temperature in the BIOS, or use tools like the one mentioned above, such as HWMonitor.
My laptop is hitting 80°C as soon as I start a game. Is this a normal CPU temperature while gaming?
Yes, a temperature of 70°C to 85°C under a heavy load is considered completely normal, especially for gaming laptops since they have limited ventilation space. But if the temperature crosses 90°C and stays there consistently, that’s the danger zone.
My PC is overheating, what is the fastest solution for cooling it down?
If your laptop is overheating, first clean the dust from its fans (vents). Always keep the laptop on a flat, hard surface like a wooden table; avoid places like beds or pillows. If the PC is 2-3 years old, then re-applying the processor’s thermal paste is the most effective solution.
Conclusion
Friends, monitoring your hardware is not a hacker’s job at all, but rather a smart and necessary step to extend the life of your system. I hope you have successfully learned how to check CPU temperature in Windows 11 and at what temperatures you should be alerted after reading this detailed guide.
If you’re a power user, my personal recommendation would be to pin Core Temp to the taskbar, so that while rendering in the background or gaming, you can always keep a close eye on your system’s health.
What is your PC’s idle temperature, and which tool are you using to check it (Core Temp or HWMonitor)? Be sure to let us know in the comments section below. Also, stay connected with our platform to easily learn more hardware tracking and pro PC optimization guides like these.
Disclaimer: This guide and the third-party software mentioned in it are for educational and hardware monitoring purposes only. Do not attempt to change your PC’s settings or voltages using HWMonitor or any other tool. Continuously using your PC in an overheated state can cause hardware damage, for which this platform will not be held responsible. You are downloading all manual settings and software at your own risk.




