
Friends, does your PC also lag so much while playing your favorite game that the screen freezes before you can even kill your enemies? Is this happening to you or has it happened to you? If you’re frustrated with your old laptop or budget desktop and searching online for “how to optimize Windows 10 for low end PC for gaming,” here’s a quick, 100% solution but it’s given in short form. If you don’t have much time and want a quick rundown, you can apply these settings immediately.
To boost gaming performance on your low-end PC, first go to your computer’s Settings, then go to Gaming and turn on ‘Game Mode’ and turn off the ‘Xbox Game Bar’. After that, in the Windows search bar, type ‘View advanced system settings’, then click on the ‘Settings’ option under Performance. From there, tick ‘Adjust for best performance’, click Apply, and then OK. Finally, close all background apps so the game can get all the RAM.
When we create short-form tech guides and vertical videos on hardware specs and OS tips on our TechWaleJha platform, our viewers often ask how to seed up their system without buying a new expensive graphics card. Honestly, your PC isn’t as old as you think, it’s just full of Windows junk. In today’s guide, we’ll fix those hidden settings so your low-end PC is perfectly optimized for gaming, games run like butter, and you can aim like a pro. So, let’s get started without wasting any more of our precious time.
Also Check: Best Windows 11 Debloater Script for Max Speed (2026)
Basic Tweaks to Quickly Boost FPS
If you want to instantly boost your Windows 10 FPS without any third-party software, the first thing we need to do is fix the default OS settings that are unnecessarily consuming your resources. These are considered the most basic and best Windows 10 settings for gaming to reduce lag in games:
1. Turn On Windows Game Mode
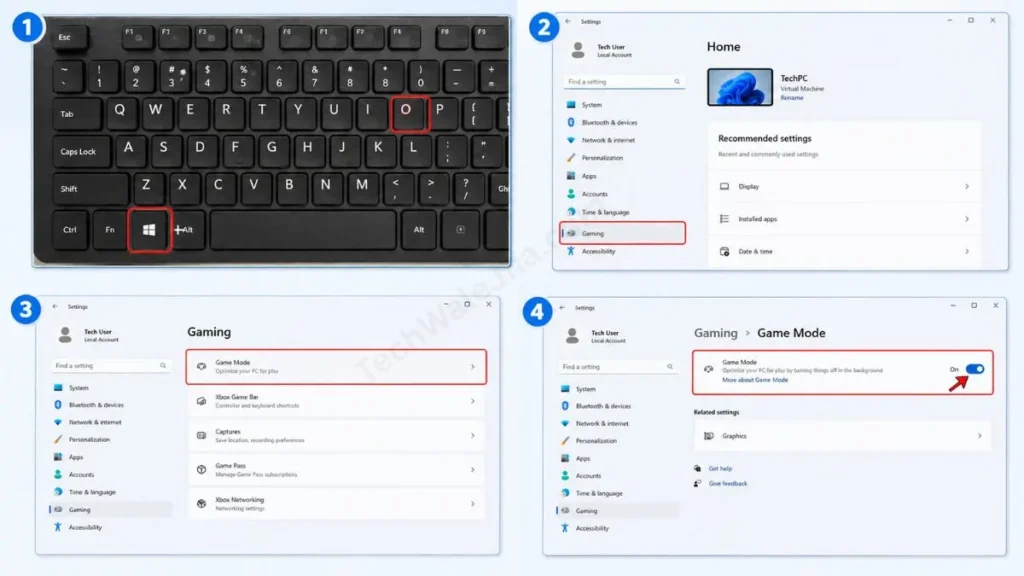
- Microsoft has included a built-in ‘Game Mode’ in Windows 10. When this is ON, Windows automatically detects that you are playing a game and automatically pauses background Windows updates or unnecessary notifications, so that all the CPU power goes to the game.
- How to turn it on: To turn it on, first press the Windows key + I on your keyboard to open Settings. Then go to the ‘Gaming’ section. The ‘Game Mode’ option will appear on the left side then select it and toggle its slider to ON.
2. Disable Xbox Game Bar & Captures
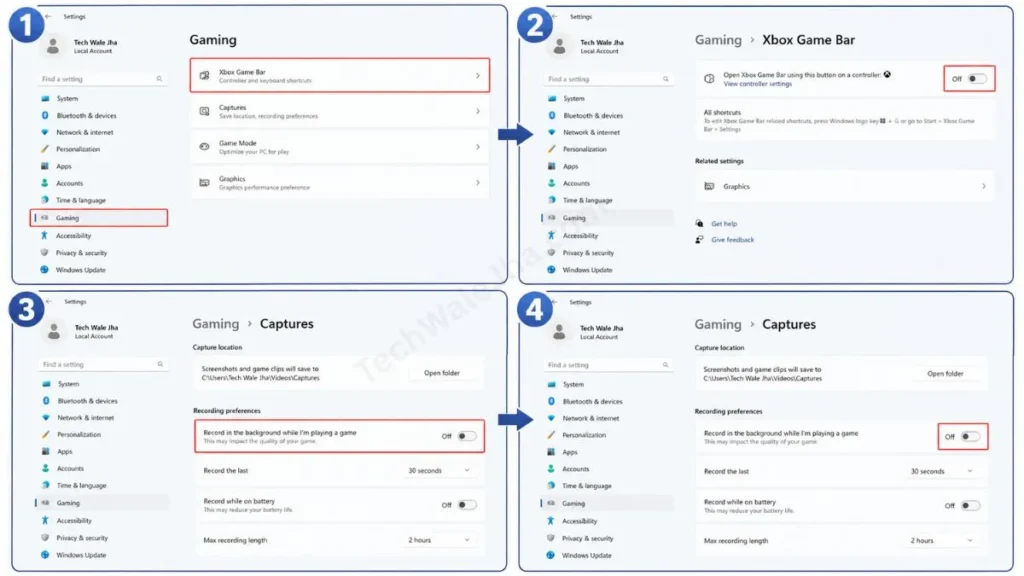
The Xbox Game Bar is a very heavy feature that is always ready to record your screen in the background. Having it enabled on a low-end PC is the biggest cause of FPS drops.
- How to fix this: Go back to the ‘Gaming’ settings. Then, from the left menu, select ‘Xbox Game Bar’ and turn it OFF. After that, go to the ‘Captures’ section and disable “Record in the background while I’m playing a game” as well.
3. Adjust Windows Visual Effects for Best Performance
Windows 10 looks very beautiful because it has animations and shadows. But when playing games, there is no need for these beautiful effects. Turning them off gives your graphics card and RAM a lot of relief.
Effect of Visual Effects Settings
| Setting Options | What will it look like? | Gaming Performance (FPS) |
|---|---|---|
| Let Windows choose | Normal (Animations ON) | Slow (Low FPS) |
| Adjust for best appearance | Bohot Premium (Heavy UI) | Excessive lag and stuttering |
| Adjust for best performance | Basic and Simple (No shadow, No animation) | Maximum FPS and Super Smooth |
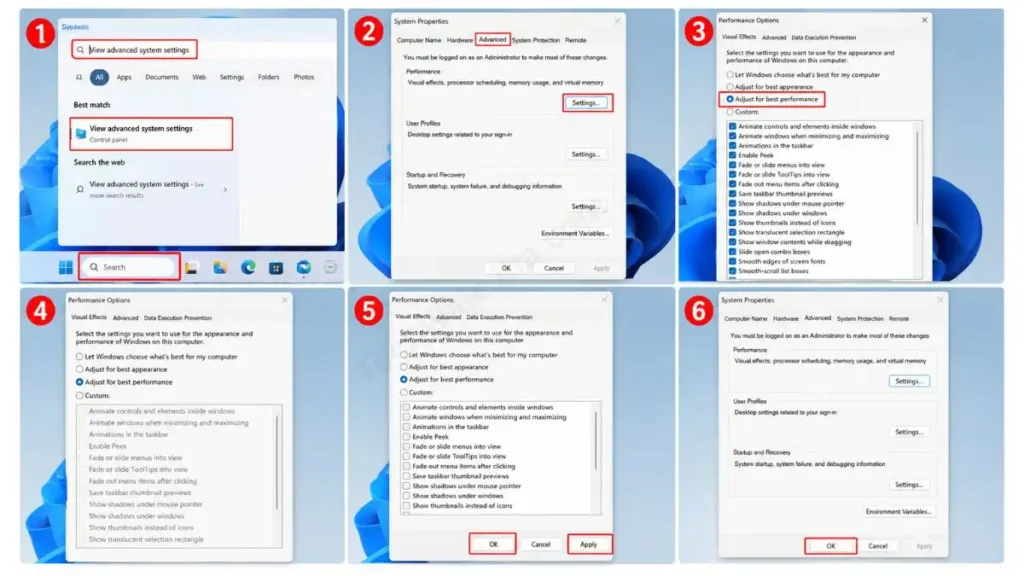
- How to fix this: Go to the Windows search bar, type “View advanced system settings,” and open it. Then, under the “Advanced” tab, right below “Performance,” click the Settings button. There, check the box next to “Adjust for best performance.” Then click ‘Apply’ and “OK.” This will make your screen a bit simpler, but it will double your system’s speed.
Also Check: How to Optimize Windows 11 for Gaming (Easy Guide)
Deep System Cleaning and Management
No matter how old your PC is, if it’s not running junk (unnecessary apps) in the background, it can give 100% of its power to your game. If you really want to achieve the dream of increasing FPS on a low-end PC, then deep cleaning these two places is the most important:
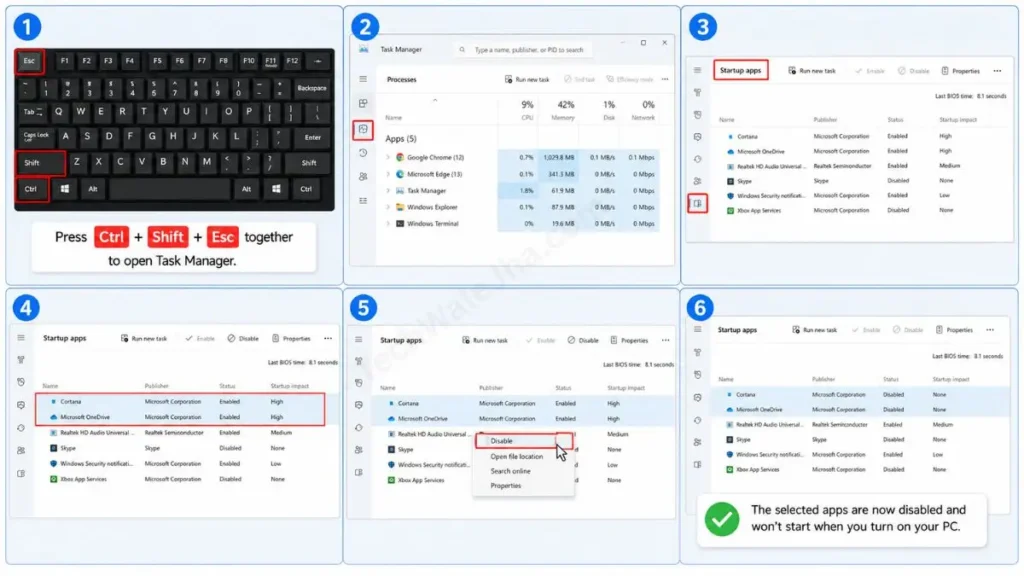
1. Stop Unnecessary Startup Programs
When you turn on your computer, some apps like Skype, Spotify, uTorrent, or others start automatically in the background. And when you’re playing a game, these apps continue to use your RAM and CPU. That’s why it’s very important to disable them, and it’s also very easy to do:
- To close it, open the Task Manager by pressing Ctrl + Shift + Esc on your keyboard at the same time.
- Then, in the tabs above, click ‘Startup’ or the Startup apps icon in Windows 11.
- Then, you will see a list of all the apps that start as soon as the PC turns on. For the apps you don’t need while gaming, such as Cortana, OneDrive, or others, right-click on them and select ‘Disable’ to turn them off.
2. Disable Background Apps
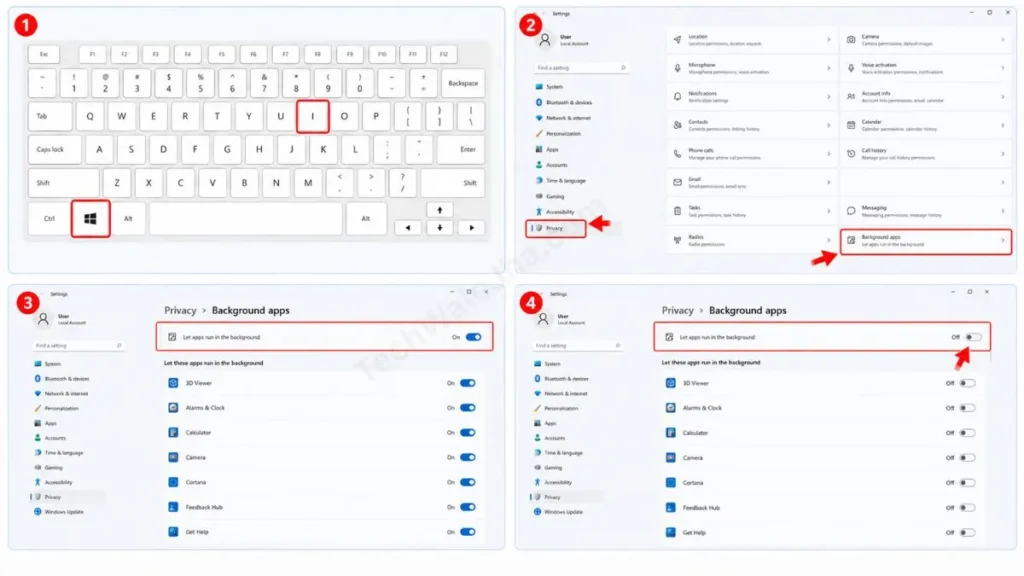
When it comes to disabling background apps in Windows 10, this step acts as a lifesaver for older laptops. Windows 10 constantly runs many unnecessary things in the background, such as weather, news, and alarms.
- To turn this off, press the Windows key + I to open Settings.
- Then, go to the ‘Privacy’ section.
- Here, scroll down the left-side menu a bit and click on ‘Background apps’.
- Here at the very top, there will be a master switch labeled “Let apps run in the background.” Just turn this switch OFF. With this one click, you will instantly free up about 1GB of RAM on your system, and after that, you will feel the real magic of tweaking Windows 10 performance.
Also Check: Why Does My Laptop Keep Hanging? 5 Fast Ways to Fix It
Advanced Settings for Maximum Performance
After fixing the basic OS settings, it’s time for some advanced technical settings. With these tweaks, we will push the PC’s hardware, like the Processor and GPU, to their full limits so you can get the full benefit of smoothly optimized graphics card settings.
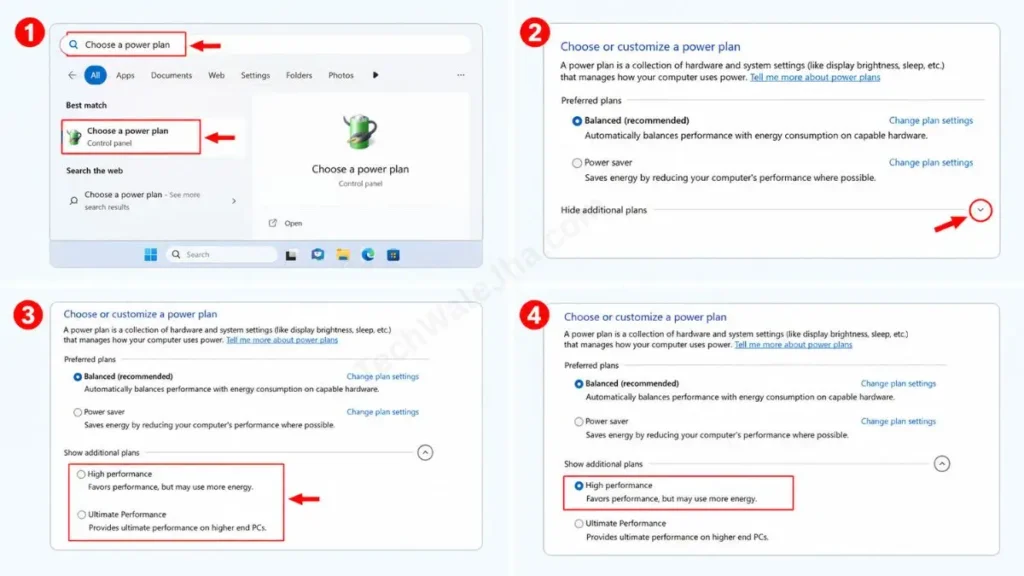
1. Enable High Performance Power Plan
By default, Windows 10 is always set to ‘Balanced’ or ‘Power Saver’ mode to save electricity or a laptop’s battery. But when we’re gaming, we need speed, not battery life. That’s why it’s very important to change this setting so the processor doesn’t throttle its power:
- To turn it on, go to the Windows search bar, type ‘Choose a power plan,’ and open it.
- If you see the ‘High performance’ or ‘Ultimate Performance’ option there, select it.
- If it’s hidden, click the “Show additional plans” drop-down arrow, and you will find the High Performance mode there.
2. Update Graphics Drivers
The most important rule for optimizing Windows 10 for a low-end PC for gaming is to always keep your display drivers up-to-date. This is because outdated drivers can’t properly handle the software architecture of new games like Valorant or CS:GO, which can cause the screen to lag.
For this, you should always get drivers from the official website. If you want to understand practically how drivers affect OS performance, you should definitely check Intel’s Official Guide on Updating Graphics Drivers. This is a trusted hardware documentation that teaches you how to safely flash your Intel HD/UHD graphics to the latest version without a system crash, which directly results in a 10-15% FPS boost.
Also Check: How to Check Your Laptop Battery Health (Easy Guide 2026)
Frequently Asked Questions
Will increasing RAM alone boost FPS on my low-end PC?
Yes, but it won’t increase much; it will only go up to a certain limit. If your system has 4 GB of RAM and you upgrade it to 8 GB or 16 GB, the stuttering in your games that momentary freezing will be completely stop. But increasing RAM doesn’t improve the core graphics quality; for that, the processor and GPU speed are necessary.
Is it really beneficial to keep Game Mode ON on a low-end PC?
Absolutely! Microsoft’s Game Mode is most beneficial for older and budget PCs. It blocks Windows update downloads and notifications in the background, so the system’s full attention (resources) stays on your game.
How does Windows 10 compare to Windows 11 for gaming?
If your PC is low-end, meaning it has an older processor and less RAM, then Windows 10 is much better for you. Windows 11 has more background bloatware and heavy UI animations that put a lot of strain on low-end hardware.
Conclusion
Friends, hardware upgrades are always expensive, but software optimization is completely free. I hope that after applying this technical guide, you have successfully learned how to optimize Windows 10 for low end PC for gaming without spending a single rupee.
When we record gameplays for our platform or do heavy video editing, these same basic but powerful settings, like turning off the Game Bar and disabling background apps, give us a smooth experience. Which trick gave you the biggest FPS boost? By reducing visual effects or changing the power plan? Be sure to let us know in the comments.
And to learn such advanced Windows optimization tips and exclusive PC tricks with the greatest ease, stay connected with your very own TechWaleJha platform. Until then, take care and bye-bye.
Disclaimer: This guide and the system registry and power settings described herein are for educational and system optimization purposes only. Changing power plan settings can cause your laptop’s battery to drain quickly. Therefore, always make sure your PC is protected from overheating. TechWaleJha platform and its author assume no responsibility for any hardware overheating or driver crashes. Apply at your own risk.




