
Have you gone into Settings and turned off Memory Integrity, set the value to zero in the Registry Editor, and properly restarted your PC? But even after that, when you open System Information, it still shows “Virtualization-based security: Running.” Is this happening to you too? If so, friends, this problem can be really annoying, especially when you’ve tuned your system expecting a massive VBS gaming performance FPS boost.
Hello everyone, I’m your very own TechWaleJha, and today we’re going to get to the root of this stubborn error. Most online guides and YouTube videos only teach you how to toggle basic Windows settings. But when those standard settings fail, it simply means that some deep hardware feature on your PC, a hidden motherboard configuration, or a secondary Windows service is forcibly keeping VBS active.
In this deep-dive guide, we’ll specifically discuss the advanced technical troubleshooting methods that will allow you to successfully and confidently disable VBS in Windows 11 with ease. We’ll look at how the motherboard’s virtualization settings, Microsoft’s built-in Hypervisor, and Pro or Enterprise Group Policies continuously push this security feature in the background. If you want to permanently get rid of this annoying Virtualization-Based Security running error so your PC can deliver its maximum performance, read this article carefully without skipping any steps. So let’s get started without any delay.
Also Read: How to Fix Blue Screen Error in Windows 11 Using Command Prompt
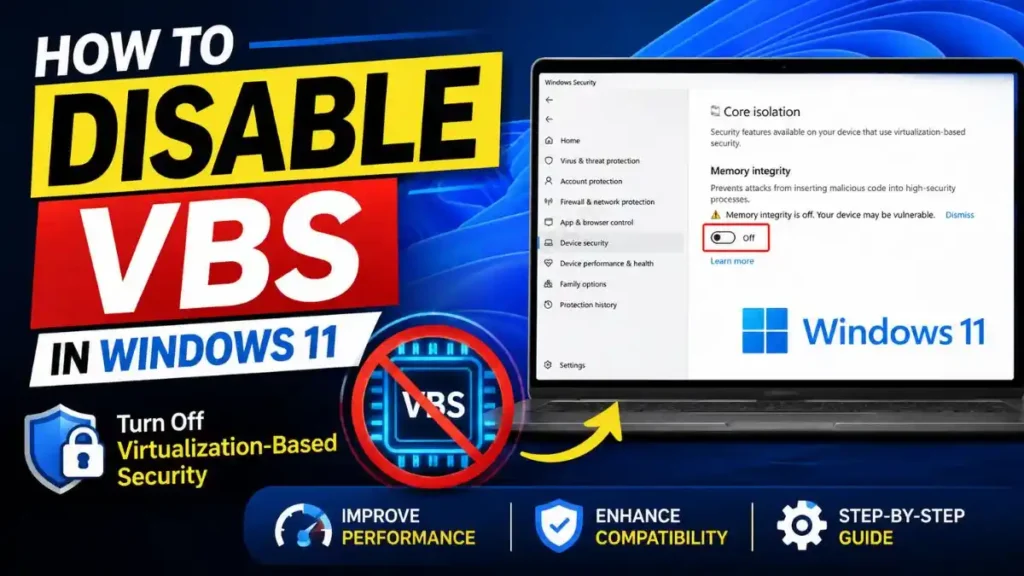
What If VBS Is Still Running?
If VBS is still not disabled after changing basic settings like Memory Integrity and Registry, you will need to take these 3 advanced steps:
- Turn off VBS BIOS settings: First, restart your PC and go into the BIOS/UEFI to completely disable ‘Intel VT-x’ or ‘AMD-V’ hardware virtualization.
- Disable Hyper-V in Windows 11: Open the ‘Windows Features’ menu and uncheck Hyper-V, Sandbox, and Virtual Machine Platform.
- Group Policy Check: In the Local Group Policy Editor, forcibly set the Device Guard settings to ‘Disabled’.
The list above directly targets the advanced culprits that repeatedly override your changes. Let’s take a deep dive into this simple table to understand why these features keep VBS ‘Running’ on your system and what their actual functions are:
| Feature & Setting Name | Why does he keep VBS forcibly on? | The Real Impact of Disabling It |
|---|---|---|
| Hardware Virtualization (BIOS) | Windows uses the hardware-level foundation to create its secure memory space (VBS). | Disabling it will completely stop Android emulators and third-party VMs from running. |
| Microsoft Hyper-V | This is Windows’ built-in virtualization engine that directly depends on the VBS architecture. | Disabling Hyper-V in Windows 11 will prevent Windows Sandbox and WSL2 from working. |
| Device & Credential Guard | On enterprise laptops, IT admins forcibly keep these policies enabled so that malware can’t hack the PC. | The PC’s advanced enterprise-grade kernel protection will be removed. |
If you want to understand the computer science behind complex security layers in more detail, be sure to refer to Wikipedia’s guide on Hardware-assisted Virtualization. A smart PC enthusiast always knows exactly what’s running in the background of their system. Now let’s learn how to disable these settings effectively and safely.
Also Read: How to Find Error Codes on Windows 11
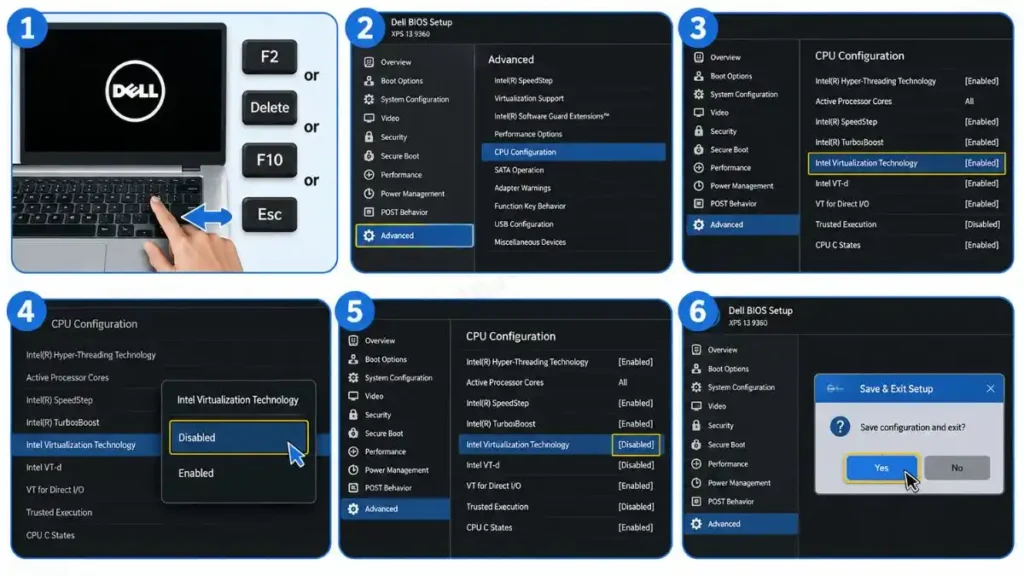
Advanced Method 1: Disable Virtualization from BIOS/UEFI
Like a parent, your motherboard’s BIOS or UEFI is the boss of the entire system. Many motherboard manufacturers like ASUS, MSI, Gigabyte, Dell, or HP ship their devices with hardware virtualization enabled by default. As long as this hardware layer is active, Windows silently runs VBS in the background. Therefore, to get to the root of this problem, we need to use the VBS BIOS settings method.
Important Warning: Before proceeding with the steps, please note that if you use Virtual Machines (VMware, Workstation, VirtualBox), Windows Sandbox, or Android Emulators (Bluestacks, LDPlayer) on your PC, disabling CPU virtualization will cause these applications to stop working.
Follow the steps below to disable virtualization on your motherboard:
- Restart & Enter BIOS: Restart your PC and as soon as the manufacturer’s logo appears on the screen, repeatedly press F2, Delete, F10, or Esc according to your brand.
- Navigate to CPU Config: After the BIOS opens, go to the Advanced or CPU Configuration section.
- Locate the Virtualization Option: Now, find the option that corresponds to your processor:
- For Intel Processors: Intel Virtualization Technology (VT-x) or Intel VT-d.
- For AMD Processors: AMD SVM Mode or AMD-V.
- Change to Disabled: Click on the option to set it to Disabled.
- Save & Exit: Now press F10 on your keyboard, confirm “Save Changes & Exit,” and allow Windows to restart.
After Windows opens, press Win + R on your keyboard, then type msinfo32 in the Run box to check the System Information. Note that after performing this step, you will definitely see the result of easily disable VBS in Windows 11.
Also Read: How to Get Help in Windows 11
Advanced Method 2: Check Hyper-V & Windows Features
The second biggest culprit after the BIOS is the built-in Windows hypervisor software suite. If Hyper-V services are enabled on your PC, VBS will remain active even after you turn Windows 11 memory integrity OFF.
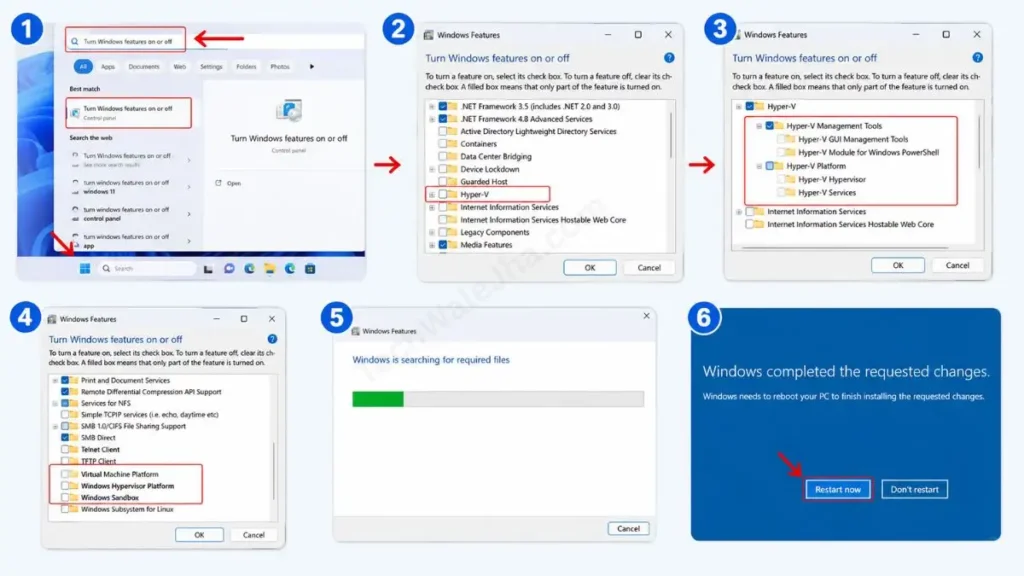
Let’s see how you can disable Hyper-V in Windows 11 by unchecking these hidden Microsoft features:
- Open Windows Features: First, open the Start Menu and type: “Turn Windows features on or off.” Click this applet to open it.
- Uncheck Hypervisor Modules: A small list box will pop up. Then scroll down and uncheck all these boxes (leave them blank/clear):
- Hyper-V and all its sub-folders
- Windows Hypervisor Platform
- Virtual Machine Platform
- Windows Sandbox (if it is already checked)
- Apply Changes: then click the ‘OK’ button. After this, Windows will search for some necessary files and ask for permission to restart the system.
- Reboot Your PC: then click ‘Restart Now’ to restart.
Let’s see through this quick table what impact disabling these features will have on your daily applications:
| Feature Name | What will be the impact of disabling it? | Safety Status for Normal Gamers |
|---|---|---|
| Hyper-V | The Windows native Virtual Machine system will be disabled. | 100% Safe (Gamers don’t use it) |
| Windows Sandbox | An isolated testing environment won’t work. | Safe (Turn it off without any worry) |
| Virtual Machine Platform | The Android subsystem and emulators will be affected. | Safe (as long as you don’t emulate games) |
Also Read: How to Check Your Laptop Battery Health
Advanced Method 3: Group Policy Editor (Pro/Enterprise Only)
If you’re using the Windows 11 Pro, Enterprise, or Education edition, corporate-level security policies may be applied to your system. These policies—such as “Device Guard” or “Credential Guard” directly force VBS. In such cases, you need to use the VBS Group Policy Editor fix.
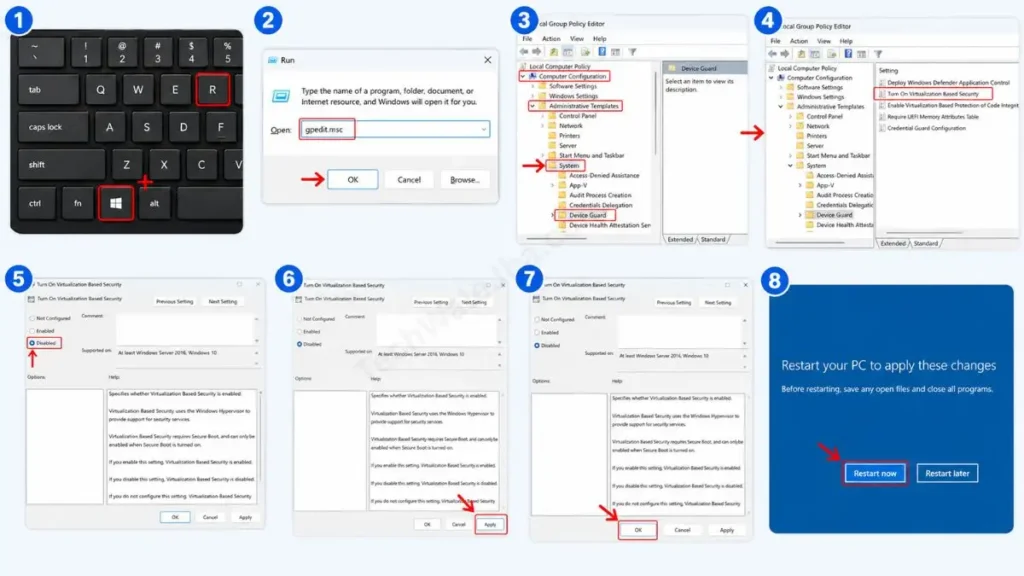
To disable this advanced policy, follow the steps below:
- Press the Windows + R keys on your keyboard to open the Run dialog box.
- In the Run box, type
gpedit.mscand press Enter. - In the left pane, navigate to this exact path:
- Go to Computer Configuration, then Administrative Templates, then System, and then Device Guard.
- In the right pane, find the setting named “Turn On Virtualization Based Security” and double-click it.
- When the new window opens, select the “Disabled” radio button in the top-left.
- Now, click “Apply” and then press “OK”.
- After this, restart your PC once.
Note: If you are using Windows 11 Home Edition, the Local Group Policy Editor is not available by default on your system. You should skip this step and focus only on the BIOS and Hyper-V methods.
Quick Troubleshooting Checklist
If you have followed all the steps correctly, then before opening msinfo32, use this checklist to verify that you have covered everything:
- Memory Integrity: OFF
- Registry Value (EnableVirtualizationBasedSecurity): 0
- Hyper-V & Virtual Machine Platform: Unchecked
- BIOS Virtualization (VT-x / AMD-V): Disabled
- Group Policy (Device Guard): Disabled (For Pro Users)
- System Restarted: Done
After completing all these steps, when you check the System Information VBS status, you will finally see “Virtualization-based security: Not enabled”.
Also Read: How to Lock PC Folder Without Any Software
Does Disabling VBS Improve Gaming Performance? (FPS Boost)
Yes, disable VBS in Windows 11 can directly improve gaming performance on some systems. You can see an FPS boost of up to 2–10% in CPU-intensive games and productivity workloads. However, the exact improvement depends on your PC hardware and graphics card.
The most frequently asked question on the internet is: “Will my games run smoothly if I disable VBS?” and everyone thinks, “Should I disable VBS for gaming?” The short answer is: Sometimes, yes!
Actually, VBS continuously runs a mini virtual machine in the background to perform security-related tasks. Because of this, a small portion of your CPU resources is always reserved for security operations. When you play heavy games, this can create a CPU bottleneck.
Let’s look at this table to see where and how much VBS gaming performance FPS boost you can get:
| PC Usage or Game Type | Expected Performance Gain (FPS) | Who will benefit? |
|---|---|---|
| Esports Games (CS2, Valorant) | 2% – 8% FPS Boost | Competitive gamers who want maximum FPS. |
| AAA Titles (Cyberpunk, RDR2) | 1% – 5% FPS Boost | Single-player story gamers. |
| CPU-Intensive Tasks (Editing) | Up to 10% Faster Rendering | Video editors and 3D modelers. |
| Daily Web Browsing & Office | Almost No Difference | Normal home and office users. |
Reality Check: Keep in mind, you won’t get a magic-like 10% FPS boost on every PC. If your system already has a very powerful 14th Gen Intel or Ryzen 7 CPU, the difference will be virtually negligible. But if you’re on older or mid-range hardware, this tweak will definitely stabilize your FPS.
Also Read: Why Does My Laptop Keep Hanging? 5 Fast Ways to Fix It
Pros, Cons & Final Verdict: Should You Disable VBS?
The pros of disable VBS in Windows 11 include higher gaming FPS and better CPU benchmarks, while the cons include reduced kernel protection and lower security. If you’re just a gamer, disable it; but for office and banking work, it’s best to keep it ON.
If you’re still confused, the best way to make a decision is to carefully understand the pros and cons of disabling VBS. There are advantages and disadvantages to permanently turning off any security feature. You can get an idea from the table below.
Pros and Cons of Disabling VBS
| Advantages (Pros) | Disadvantages (Cons) |
|---|---|
| Better Gaming Performance: Reducing CPU overhead brings stability to frames. | Reduced Kernel Protection: Advanced malware and sophisticated viruses can easily attack a system. |
| Faster System Response: Heavy rendering tasks complete quickly. | Business Device Risks: Office or corporate laptops may violate security policies. |
| Better Benchmark Scores: PC enthusiasts get slightly higher scores in tools like Cinebench. | Credential Leaks: A security layer is missing for saved passwords and credentials. |
Final Verdict & Expert Recommendation
So, what’s the final verdict? Should you practically disable VBS on your system?
You should Disable VBS in Windows 11 if:
- You are a hardcore PC gamer, streamer, or content creator.
- You need maximum performance and to squeeze out every single FPS.
- You perform benchmark testing and fully understand the security risks.
You should leave VBS enabled (ON) if:
- Your PC is used for office work, online banking, or crypto trading.
- It’s a managed business laptop or a school device.
- Your PC stores highly sensitive/confidential data.
If you’re a security-first user, don’t risk Windows’ core security for a small boost in gaming performance. But yes, for performance chasers, this is a very solid tweak.
As a tech creator, I’d like to give one final pro tip: before changing any major settings, always create a System Restore Point so that if something goes wrong, you can easily return to a safe state.
I’m your friend TechWaleJha. If you’re still having trouble understanding your PC’s settings, be sure to mention your motherboard or laptop brand in the comments below, and I’ll personally reply to help you fix the problem.
Also Read: Top 10 Hidden Features in Windows 11 You Must Try Today
Frequently Asked Questions
Is it completely safe to disable VBS in Windows 11?
If you use a personal gaming PC or a performance-focused desktop, it’s generally safe to disable VBS. However, if your system is a business laptop, an office device, or a PC that stores sensitive passwords and banking data, keeping this advanced security layer enabled is the safest and most recommended option.
Will disabling VBS turn off my Windows Defender or antivirus?
No, not at all. Windows Defender and Microsoft Defender Antivirus will normally continue to do their job. Disable VBS in Windows 11 only disables Virtualization-Based Security and its associated hardware-isolated kernel protection, and your basic antivirus will keep running in the background.
Can Windows Update automatically turn VBS back on my PC?
Normally, regular Windows Updates don’t automatically enable VBS. However, sometimes major feature updates like 24H2, OEM firmware updates, or a new BIOS update can reset it to the default settings. If you suddenly notice your gaming performance dropping, be sure to check your VBS status in msinfo32 (System Information).
Disclaimer: All troubleshooting methods described in this guide (registry edits, Hyper-V features, and BIOS/UEFI changes) are advanced system tweaks. While these instructions are completely accurate based on hardware and software limitations, making unfamiliar changes to the BIOS/UEFI or Group Policy can lead to system instability or boot failures. Please perform these steps with great care and at your own risk. We will not be liable for any incorrect actions you take, data loss, or security compromises. Always create a System Restore Point before changing any advanced settings.




