
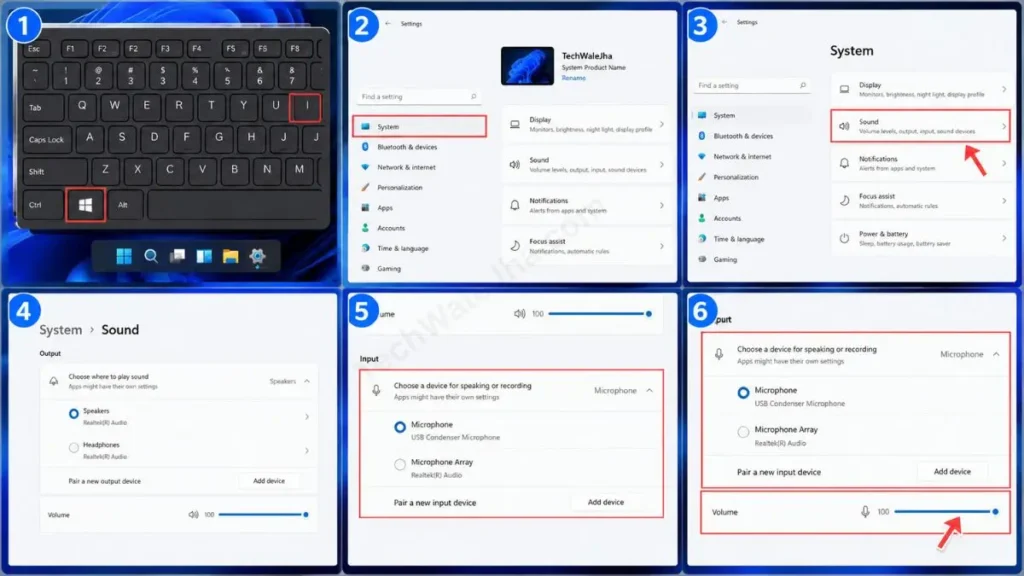
Friends, does it ever happen to you that you’re watching tech tutorial videos on YouTube, or a movie on your laptop, or doing some other task that requires audio, and then when you play it back, the sound is so low that you can’t hear anything properly? and then, frustrated by this, you’re searching for “how to boost mic audio on windows 11,” then to fix this or to increase your mic’s volume, first you need to go to your system’s ‘Settings,’ then to ‘System,’ and then to ‘Sound’ and set the Input volume to 100%.
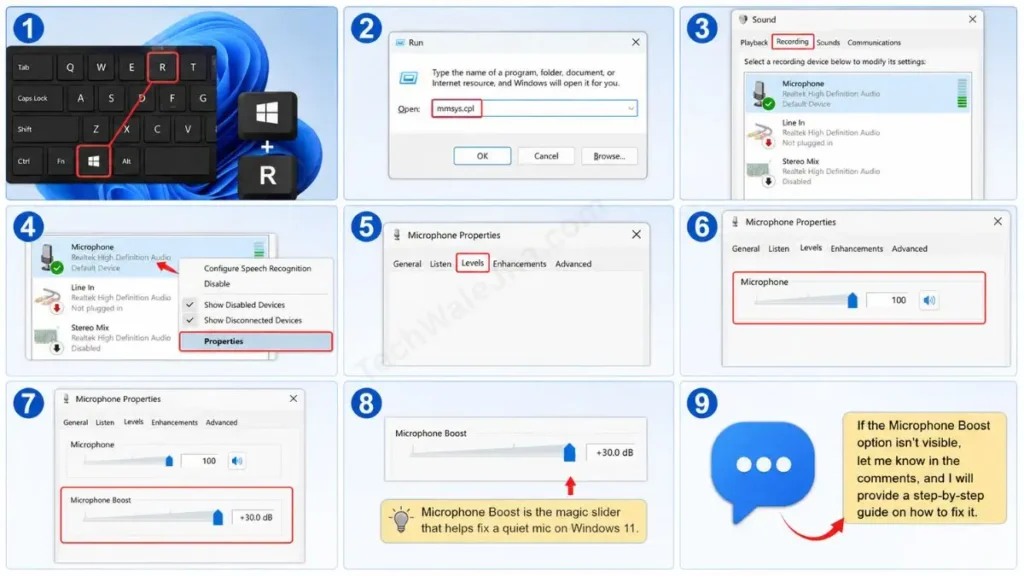
If the sound is still low, press ‘Windows + R’ on your keyboard to open the Run box and type mmsys.cpl. Then, in the ‘Recording’ tab, right-click on your mic and select ‘Properties’. Click the ‘Levels’ tab, set the ‘Microphone Boost’ slider to +10dB or +20dB, and click Apply.
When I create vertical short videos and technical guides for my TechWaleJha platform, audio clarity matters more than video quality. Because a clear voice is what keeps the viewer engaged with the video. In this guide, I’ll show you the exact settings that will permanently fix your low mic volume problem on Windows 11. So, let’s get started without any further delay.
Why is the mic volume low?
Many people think their newly purchased expensive mic is defective. But the truth is the problem isn’t with the hardware, but with hidden settings in the operating system. Whenever you install a new Windows update on your PC, the system often automatically resets the Windows 11 sound settings for the mic so that unnecessary background noise isn’t recorded.
Additionally, when people face the issue of microphone volume being too low in Windows 11, a major reason can be outdated or corrupt audio drivers, such as out-of-date Realtek drivers. In such cases, the system hardware cannot correctly determine how much power to supply to the mic. But don’t worry, we can easily fix this problem at the software level.
Also Read: How to Check Your Laptop Battery Health (Easy Guide 2026)
Method 1: Increase Mic Volume to 100% From System Settings
If you want the process of increasing the mic volume in Windows 11 to be very easy, then first, we should check the basic modern Settings app. This is because the volume slider here is often accidentally turned down.
How to Fix This? (Step-by-Step):
- Press the Windows key + I shortcut on your keyboard at the same time. This will open the Windows Settings screen.
- In the left menu, click on ‘System’, and then click on the ‘Sound’ option on the right side.
- Now, scroll down the page a bit and find the ‘Input’ section. Here, under ‘Choose a device for speaking or recording’, your current mic, such as USB Condenser or Realtek Audio, should be selected.
- Right below it, you will see a ‘Volume’ slider. If it is at 50% or 70%, drag it to 100%.
You can also speak right below the slider to check how high the blue line is going. If the volume doesn’t increase even after setting it to 100%, then you’ll need to use the Microphone Boost advanced setting in the Control Panel.
Also Read: How to Disable VBS in Windows 11 | Advanced Fix Latest 2026
Method 2: Turn on ‘Microphone Boost’ from the Control Panel
If the normal settings don’t work for you, then now we need to go to Windows’ classic Control Panel. This step is a bit hidden, but honestly, it’s the most powerful and precise way to boost microphone sensitivity on your PC. With this method, you can directly amplify the sound at the software level.
How to Do It? (Step-by-Step):
- To apply this, first press the Windows key + R on your keyboard at the same time. This will open a small ‘Run’ box.
- In that box, type
mmsys.cpland press Enter. This will open the classic “Sound” control panel. - Now, click on the ‘Recording’ tab at the top. Here you will see your mic’s icon with a green checkmark on it.
- Right-click on your microphone and select ‘Properties’.
- A new window will open. In it, go to the ‘Levels’ tab.
Here you will see two sliders: the first is ‘Microphone,’ which you need to set to 100, and the second is ‘Microphone Boost.’ This is our magic slider that is essential for fixing a quiet mic on Windows 11. And if the Microphone Boost option isn’t visible, let me know in the comments, and I will provide a step-by-step guide on how to fix it.
Also Read: How to Fix 100% Disk Usage on Windows 10 SSD (Fast)
How much boost (dB) is appropriate to use?
When you adjust the microphone properties boost level, if you get greedy and crank up the volume too much, it can really mess things up. Use the simple table below to see how many dB (decibels) is best for your mic:
| Boost Level (dB) | What will the voice sound like? (Result) | When should we use it? |
|---|---|---|
| 0.0 dB | Normal and Quiet | When the mic is right up to your mouth. |
| +10.0 dB | Clear and a little loud (safe limit) | While recording the voiceover script for videos or Reels. |
| +20.0 dB | Very loud (slight static sound) | When the mic is placed a bit farther away, like on Zoom calls or Google Meet. |
| +30.0 dB | Extremely Loud (A lot of trash/Noise) | Avoid it. It will also record the fan and background noise. |
Method 3: Update Drivers (If the Boost Option is Missing)
Often, users find that even when they go to the ‘Levels’ tab, the boost slider is nowhere to be seen. This is known as the Windows 11 microphone boost missing problem. This happens when your system has generic (low-quality) audio drivers installed, or when your hardware, such as your motherboard, has pending driver updates.
How to Fix It?
- To do this, go to the Windows search bar, type Device Manager, and open it.
- Here, double-click on ‘Audio inputs and outputs’ to expand the list.
- Right-click on your microphone or Realtek High Definition Audio and click ‘Update driver’. Then, select ‘Search automatically for drivers’.
- Additionally, if you are a Realtek Audio Console Mic Boost user, you can also download the ‘Realtek Audio Control’ app directly from the Microsoft Store to enable your mic boost from there.
If you are facing any technical errors with hardware and driver sync, you should definitely read Microsoft Support’s Official Sound Fixing Guide. This is Microsoft’s most trusted and detailed article that teaches you how to fix every audio glitch step-by-step.
Also Read: How to Reset File Explorer Windows 11 in PowerShell
Frequently Asked Questions
I boosted it by +20dB, but now there’s a lot of background noise (wind sound). What should I do?
When we digitally boost the audio, the mic ends up picking up ambient noise as well. To fix this, open your mic’s Properties by typing mmsys.cpl in the Control Panel or Run. Then, if the ‘Enhancements’ tab is available, go into it and check the boxes for “Noise Suppression” and “Acoustic Echo Cancellation.” This will make your voice louder and also clear up the background noise.
I have a USB microphone, why isn’t the boost option showing up?
This is a very common issue. For most premium USB condenser mics, like the Blue Yeti or HyperX, the ‘How to boost mic audio on Windows 11’ option is blocked in Windows. Now you might be wondering why this is. It’s because these mics have a physical ‘Gain’ knob on them. You have to adjust the volume by turning their hardware button.
Is it safe to download third-party equalizer apps (like Equalizer APO)?
If you’re not getting results from the built-in settings and the low mic volume issue persists, you can use open-source apps like Equalizer APO. However, as a beginner, the setup for these apps can be a bit complicated, and they can sometimes crash the Windows audio registry. Therefore, always try the basic Windows tricks first.
Conclusion
Friends, I hope you’ve successfully understood how to get a clear and loud voice on your PC by following this easy tutorial. Now you can make pro-level voiceovers and calls with your existing mic, without any expensive hardware upgrades.
When I’m writing technical scripts and recording vertical video tutorials, my mic is placed a bit farther away. In that case, I always use the +10dB trick, which adds a richness (bass) to the voice and doubles the video’s quality.
What dB setting did you find gives the best results? Be sure to let me know in the comment box below. And for more advanced Windows troubleshooting tips and fast tech hacks, stay connected with your own TechWaleJha platform.
Disclaimer: This guide and the audio settings described herein are for educational purposes only. Please exercise caution when modifying the Control Panel or device drivers. TechWaleJha platform and its author shall not be held responsible for any audio errors, driver crashes, or hardware issues. Please follow all steps at your own risk.




