
Friends, has your laptop keyboard also suddenly started behaving strangely? Sometimes when you press “A,” it accidentally types something else, or letters start typing themselves without any touch, which in tech jargon is called “ghost typing.” Writing any important document or doing crucial office work with such a problem becomes a nightmare.
Many times, to make our setup a bit more professional, we get a nice mechanical keyboard and think we’ll smoothly use an external keyboard with the laptop, but the laptop’s faulty built-in keyboard keeps popping up and causing a disturbance. If you’re also struggling with this problem and constantly searching online for “how to disable laptop keyboard,” then you’ve come to the right tech guide.
In today’s in-depth guide, I’ll share some solid and 100% working Windows tricks that will let you temporarily or permanently disable your faulty keyboard. To disable it, we won’t use any unnecessary software; instead, we’ll use Windows’ built-in tools to fix this problem for good. So, let’s get back control of our laptop’s keyboard without wasting any more time.
Also Read: [100% Solved] Fix Snipping Tool Not Working Windows 11 (4 Easy Ways)
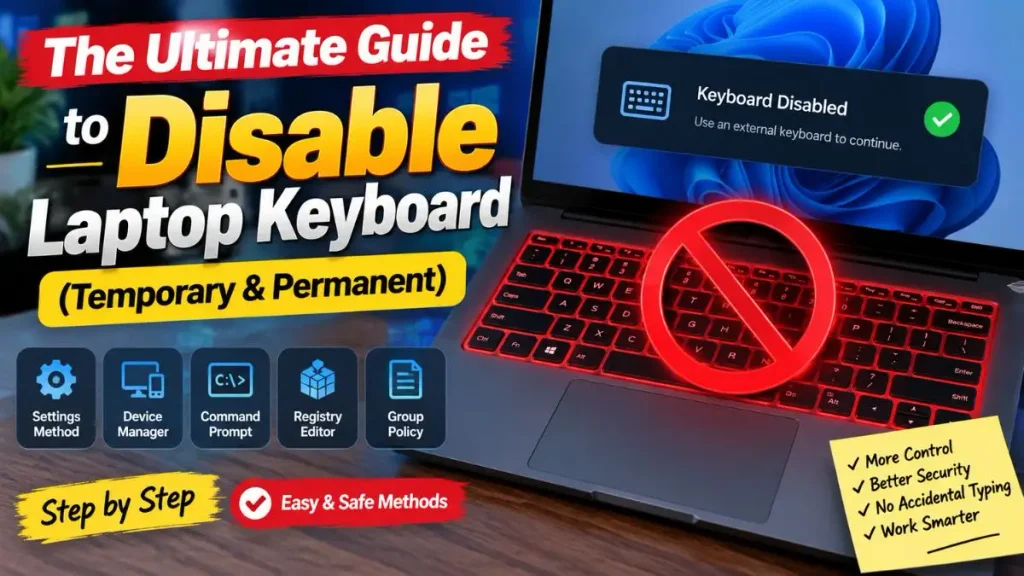
Why Disable Your Built-in Laptop Keyboard?
Before jumping straight to the technical steps, let’s understand why we need to disable our laptop’s built-in hardware. There are some very practical and everyday reasons behind this process of disabling the built-in keyboard, such as:
- Liquid Damage & Broken Keys: This is the biggest and most common reason to disable laptop keyboard. If you’ve ever accidentally spilled tea, coffee, or water on your laptop, the circuits inside the keyboard short-circuit. In such cases, the laptop starts pressing keys on its own. Until you replace the keyboard with a new one from a service center, applying this “ghost typing” fix is the only and easiest option left for you.
- The External Keyboard Setup: Many heavy typists, coders, and gamers prefer to place their laptop on a stand and use a separate USB or Bluetooth keyboard. In such a setup, the built-in keyboard is useless, and accidentally touching it can be disruptive. That’s why turning it off completely is a smart choice.
- Safe Cleaning Mode: When you clean your laptop’s screen and keys with a microfiber cloth, random apps keep opening over and over, or you type something and it gets deleted. In such cases, the trick of locking the laptop keyboard for cleaning saves you a lot of time. If you want to understand the internal circuitry and matrix of these keys in detail, Wikipedia’s article on Computer Keyboards can further enhance your tech knowledge, so be sure to check it out.
- The “Cat or Kid” Problem: If you have small children or a pet like a cat that loves to sit on your laptop, locking the keyboard for a while can help keep all your files safe.
So friends, now that our base and reason are both crystal clear, let’s get straight into action mode and find out what the first method is.
Also Read: Ghost Touches? How to Disable Touch Screen on Windows 11 Fast!
How to Disable Laptop Keyboard in Windows with 3 Easy Method
Alright, friends, let’s go straight into Windows’ internal settings and see how you can easily disable laptop keyboard using these three methods.
Method 1: Use Device Manager (The Quickest Fix)
If you search online, many people will tell you to “go to Device Manager and click Uninstall.” But friends, this is an incomplete trick. Because as soon as you uninstall and restart your laptop, Windows will automatically reinstall that driver and the keyboard will turn back on.
So, we’ll use a smart ‘Incompatible Driver’ trick that will make the keyboard disabling in Device Manager work permanently until you fix it yourself. To do this, follow the steps given below exactly as they are:
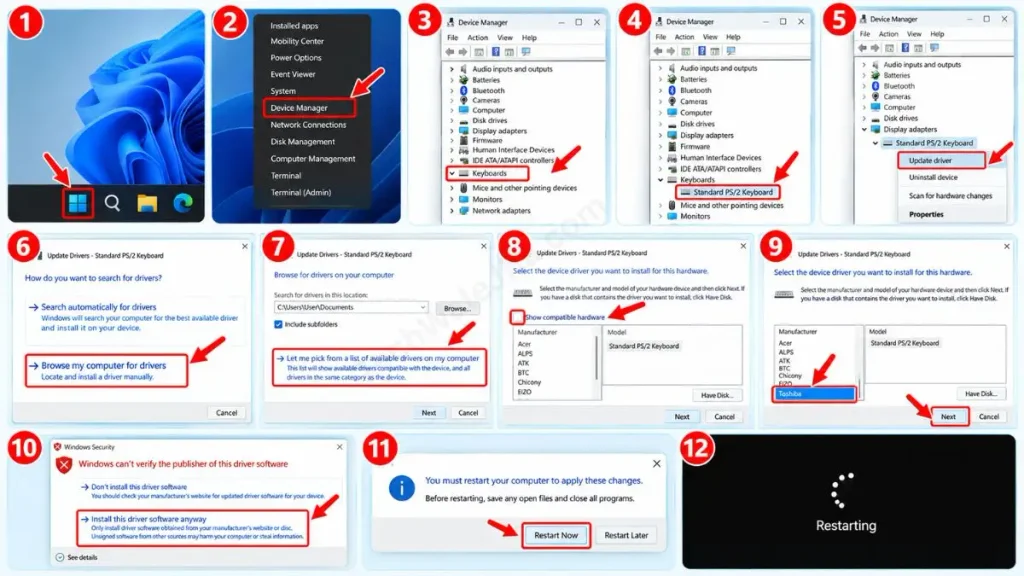
- Now, right-click the Start icon on your taskbar or press the Windows key + X on your keyboard and open Device Manager from the menu.
- A list will appear. Click on Keyboards to expand it. Here, you will see your built-in keyboard. On most laptops, its name is “Standard PS/2 Keyboard”.
- Now, right-click on that keyboard driver and select the “Update driver” option.
- After this, in the new pop-up that appears, click on “Browse my computer for drivers,” and then click on “Let me pick from a list of available drivers on my computer.”
- As soon as you click, a box will open on the screen with “Show compatible hardware” checked. Uncheck that box. Now, select a driver from any random company in the list, like Toshiba, Alps, or another, and click Next.
- After this, Windows will give a red warning that this driver doesn’t match. But don’t worry about this error; just click on “Confirm anyway.” Now restart your PC. After this, your broken keyboard will be 100% dead.
Also Read: Enable New Search Bar in Windows 11: The Ultimate 1-Click Fix
Method 2: Use Group Policy Editor (Permanent Block)
If you’re a pro Windows user and you want to make sure Windows can never reinstall that keyboard again, then in that case the gpedit trick to disable the keyboard is the best. It’s a bit technical, but it’s a rock-solid solution for how to disable laptop keyboard.
In this method, we will directly command Windows to block that specific hardware (keyboard):
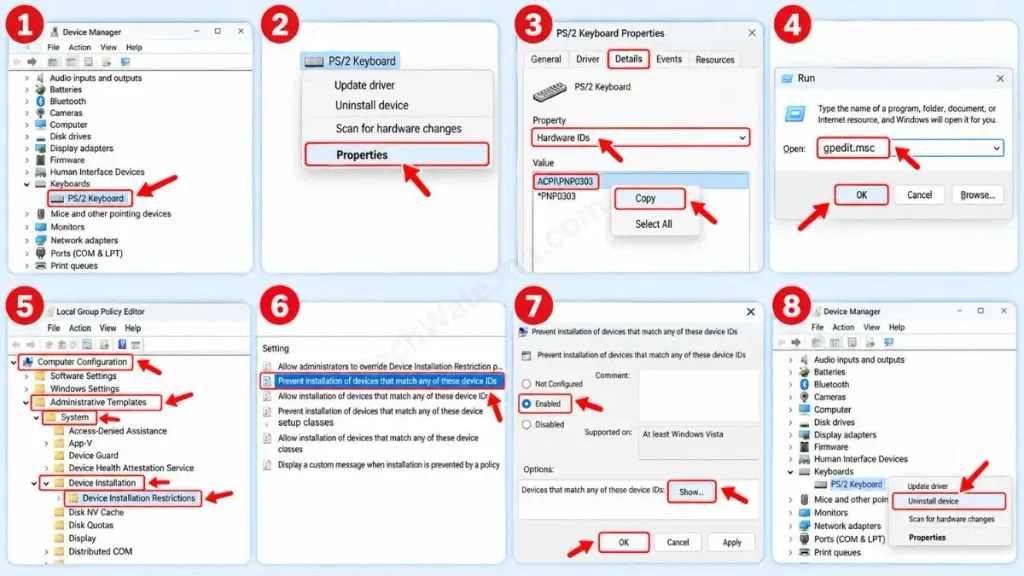
- First, go to Device Manager and then to Keyboards. Right-click your PS/2 keyboard, open Properties, go to the Details tab, select Hardware IDs from the dropdown, and right-click the first value (ID) listed in the box below to copy it.
- After copying, open the Run box on your PC by pressing the Windows key + R, type
gpedit.msc, and press Enter. - Now navigate to this long path: Computer Configuration > Administrative Templates > System > Device Installation > Device Installation Restrictions.
- Then on the right side, you will see a setting “Prevent installation of devices that match any of these device IDs”. Double-click it, set it to Enabled, and click the Show… button right below it.
- In the table that opens, paste your copied Hardware ID into the first box and click OK.
- For the final step, go back to Device Manager, right-click on your PS/2 Keyboard and Uninstall the device, then restart your PC. Now, Windows will not be able to reinstall it, even if it tries.
Method 3: Use Third-Party Tools (For Temporary Lock)
If your main goal is just to clean your laptop’s keys, or you want to prevent your child from accidentally hitting the keyboard and turning off the video while watching a movie, then you should use the temporary laptop keyboard disabling trick. You don’t need to change any permanent settings for this.
There is a very popular and lightweight free tool called KeyFreeze. It was specifically created for this purpose.
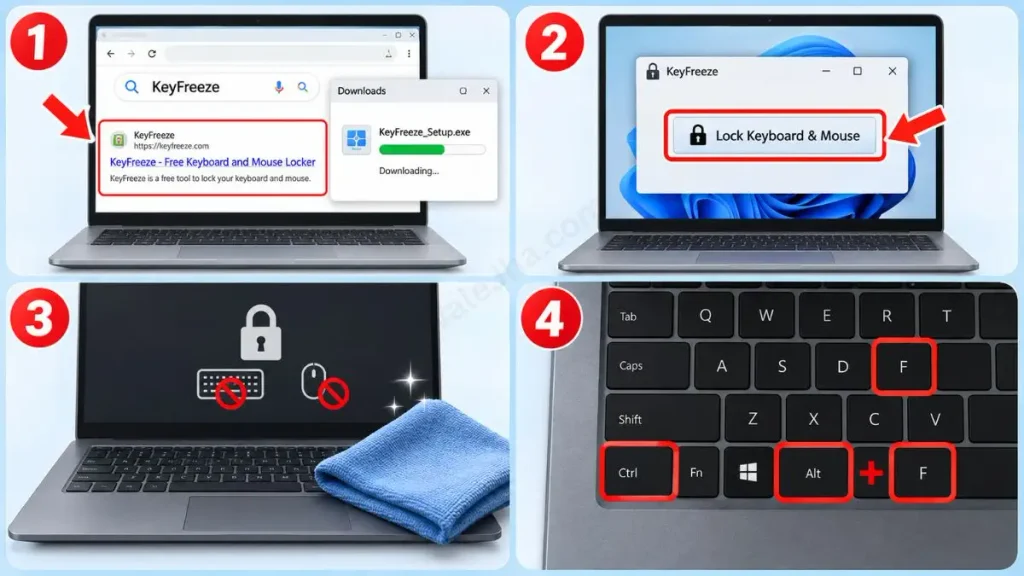
- Download and install the official free version of ‘KeyFreeze’ on your laptop from the internet.
- As soon as you open the app and click on “Lock Keyboard & Mouse,” your entire keyboard and touchpad will be locked. After that, you can comfortably clean your screen and keys with a microfiber cloth.
- After that, if you want to turn it back on and your work is done, just press the Ctrl + Alt + F keys together on your keyboard. It will then turn back on.
Pro Tip: If you don’t want to download any third-party app, you can also try Windows’ “Filter Keys” trick for this press and hold your keyboard’s Right Shift key for 8 seconds. You’ll hear a beep and your keyboard will temporarily lock. To turn it back on, press and hold it again for 8 seconds, and your keyboard will be unlocked.
Also Read: 4 Secret Ways to Change Brightness in Windows 11 (100% Working)
How to Re-enable Your Laptop Keyboard
The biggest rule in technical troubleshooting is that you should also know how to unblock what you’ve blocked. If you’ve gotten your keyboard fixed and want to turn it back on, follow these steps carefully:
- If You Used Method 1 (Driver Trick): Go back to Device Manager. Then, right-click on your incompatible keyboard, click Update Driver, and select ‘Browse my computer…’ and then ‘Let me pick from a list…’. This time, tick “Show compatible hardware,” select Standard PS/2 Keyboard again, and click Next. The keyboard will work as soon as you restart.
- If You Used Method 2 (Group Policy): For this, press the Windows key + R to open the Run box, type
gpedit.msc, and open it. Go back to the same ‘Device Installation Restrictions’ path. Then, change that policy from “Enabled” back to “Not Configured.” Then, go to Device Manager, click on Action, and select Scan for hardware changes. After this, Windows will automatically install the correct driver.
Also Read: How to Change File Type in Windows 11 (Fast Fix)
Frequently Asked Questions
Will disabling my laptop’s built-in keyboard affect my external USB or Bluetooth keyboard?
Not at all! In Device Manager, each keyboard has a separate driver. When you disable your in-built (PS/2) keyboard, it doesn’t affect the functioning of your new USB or wireless keyboard. You can perfectly use an external keyboard on the laptop.
Can I disable specific keys instead of the whole keyboard?
Yes, if only 1 or 2 keys on your keyboard are faulty, like the Spacebar keeps getting pressed, you don’t need to disable the entire keyboard. You can use an official Microsoft app like “PowerToys” or an app like “SharpKeys” to permanently remap or disable just that specific key.
Why does my keyboard type automatically?
What we call “Ghost Typing” is often caused by a little moisture getting inside the keyboard or a loose ribbon cable. If the problem persists even after applying a fix (cleaning) for the laptop ghost typing, then replacing the keyboard hardware is the best permanent solution.
Conclusion: Take Control of Your Typing Experience!
Friends, we hope this in-depth guide on “How to Disable Laptop Keyboard” has completely solved your problem. Whether you safely disabled your keyboard using Method 1, or locked your laptop for a while to clean it with Method 3, your PC is now back under your full control.
For more such solid, practical, and 100% working Windows troubleshooting tips, stay tuned to the TechWaleJha blog. If your keyboard still isn’t working or you’re seeing an error in the Device Manager, be sure to leave a comment below. I’ll reply to every comment to help you out.
Disclaimer: This guide is for educational and troubleshooting purposes only. Device Manager and Group Policy Editor are advanced core tools in Windows. Please note that you should only modify the drivers for your built-in keyboard (Standard PS/2). Blocking the wrong hardware can cause the system to hang. Therefore, TechWaleJha or its author will not be responsible for any technical problems or data loss. Use these tools at your own risk and discretion.




