
Friends, have you ever noticed that even though you have a high-end processor, powerful RAM, and an expensive graphics card, your PC doesn’t feel as fast and snappy as it should? The biggest reason for this isn’t any hardware, but rather the default power settings of Windows 11.
Microsoft by default ships your PC set to “Balanced” mode. Their main aim is to save power and keep heat low. But if you’re a hardcore gamer, a video editor, or use heavy 3D software, then you need raw performance, not power saving. You’ve spent thousands of dollars on your PC setup, so why only use half of its performance? Right?
If you’re exactly looking for how to enable ultimate performance power plan in Windows 11, then today I’m going to fulfill your search. In this in-depth OS config guide from your very own TechWaleJha, we’re going to uncover one of Windows’ hidden and most powerful secrets. It’s a setting that is deliberately kept hidden from regular PC users, but with a simple technical CMD trick, you can easily break all the chains (restrictions) on your system.
When you activate this ultimate performance mode in Windows 11, your system will push your expensive hardware to its maximum capacity without worrying about power consumption. Let’s not waste any more time and see how to awaken this hidden beast.
What is the Ultimate Performance Mode (And Do You Need It?)
If you’re thinking, “But wait, the Control Panel already has a ‘High Performance’ option, so what’s this new mode all about?” Microsoft originally designed the “Ultimate Performance” plan for enterprise-level systems, Windows 10 or 11 Pro for Workstations, and heavy servers.
The difference between the two modes is quite technical, but it’s very important for a power user. This is because while ‘High Performance’ mode does keep your CPU clock speed high, it still sends hardware components into a sleep state in the background with micro-latencies, or slight delays, to save power.
On the other hand, the Ultimate Power Plan completely bypasses the hardware’s power management protocols. This means the hardware isn’t cut off from power even when idle. As a result, micro-latency in any action is reduced to absolutely zero. If you want to deeply understand CPU latency and OS power management, you can refer to Wikipedia’s guide on Advanced Configuration and Power Interface (ACPI).
Let’s take a quick look at and understand a comparison of these power plans using a table:
| Power Plan | CPU State | Micro-Latency | Best Used For |
|---|---|---|---|
| Balanced | Dynamic (Low to High) | High | Normal daily usage, Web browsing |
| High Performance | Mostly High | Medium | Casual Gaming, Office work |
| Ultimate Performance | Always Maximum | Zero / Minimal | Heavy Gaming, 4K Rendering |
Who needs this plan the most?
- Hardcore Gamers: Who need zero frame drops and maximum FPS in competitive games like Valorant, CS2, or others.
- Video Editors or Animators: Who render massive files in Premiere Pro, After Effects, or Blender.
- Power Users: Who don’t want their OS to produce any kind of micro-stutter (lag).
If this option isn’t showing up when you open the control panel on your new PC, don’t worry. The issue with the Missing Ultimate Performance power plan occurs in every standard Windows Home and Pro edition. But in the next step, we’ll look at the same secret method for enable Ultimate Performance power plan in Windows 11 that I use in my own heavy video editing setups.
Step-by-Step: How to Enable Ultimate Performance Power Plan in Windows 11
If you go to the Control Panel, Hardware and Sound, then Power Options the normal way, you’ll see only “Balanced” and “High Performance” by default, but “Ultimate Performance” will be missing (hidden) because Windows hides it from regular users by default.
But don’t worry, the easiest way to bring back this hidden setting is with a simple command line trick. If you want to know step-by-step how to enable Ultimate Performance power plan in Windows 11, then follow these steps exactly as I’m telling you:
- Open Command Prompt as Admin: Click the Windows Search icon on your taskbar and type cmd or Command Prompt in the search bar.
- When the Command Prompt app appears, right-click on it and select “Run as administrator.” This is very important, because you can’t change system settings without admin rights.
- Now copy the magic powercfg ultimate performance code given below and paste it into that black CMD window by pressing Ctrl+V.
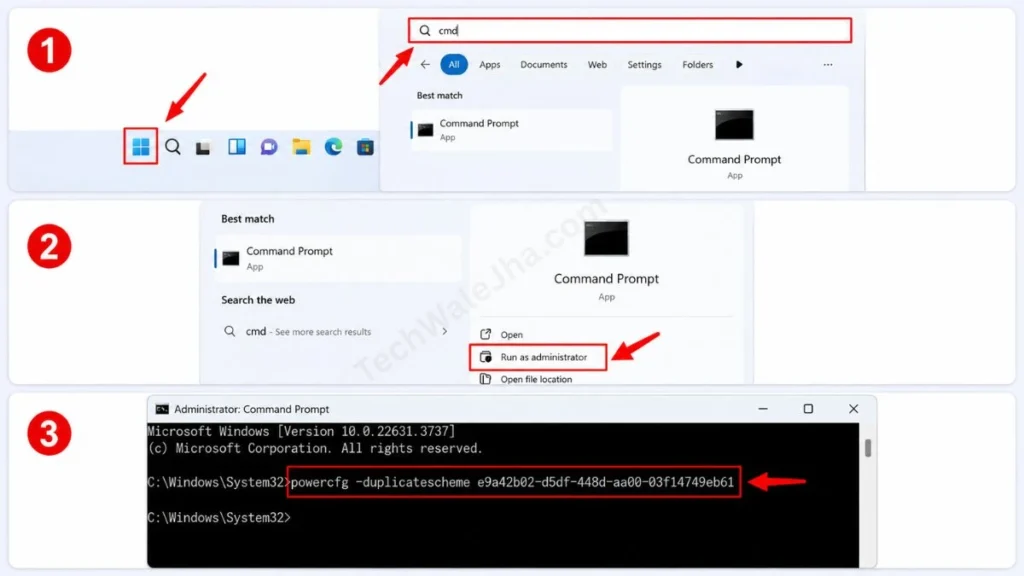
The Magic CMD Command
Here is the secret code that will force your OS to unhide this hidden plan in the Windows 11 power plans list:
powercfg -duplicatescheme e9a42b02-d5df-448d-aa00-03f14749eb61
- After pasting the code, simply press Enter.
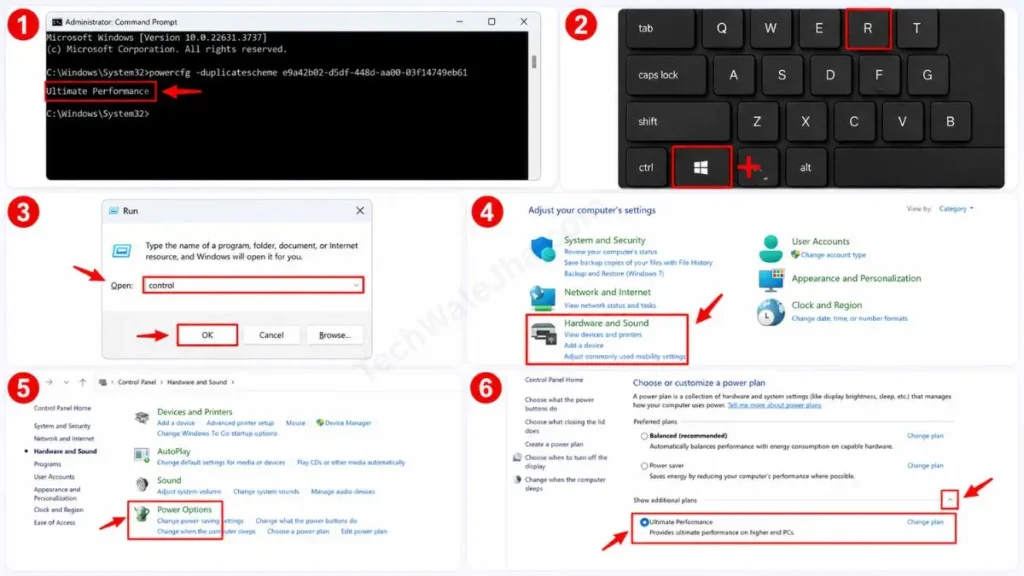
- As soon as you press Enter, you will see “Ultimate Performance” written in the CMD window. This means your process has been 100% successful.
- Activate the Plan: Now, close that CMD window. Then, press Windows Key + R on your keyboard, type
controland press Enter to open the Control Panel. - Then, go to Hardware and Sound, and then to Power Options. There, you will see a small dropdown arrow for “Show additional plans.” Click on it.
- Now you will see a new and shiny Ultimate Performance plan there. Just click on the circle next to it to select (activate) it.
Now you have successfully completed the unlock ultimate power plan cmd process, and your PC is all set to run at full throttle.
Is the Ultimate Power Plan Safe for Laptops?
This is the most frequently asked question. If you are using a proper desktop with good cooling, i.e., fans or a liquid cooler, and a direct wall power supply, then you don’t need to worry at all. You can enable it without any fear.
But, if you’re a laptop user, then as a tech expert, I have a small warning for you:
- Massive Battery Drain: Because this mode doesn’t let your hardware go into a ‘Sleep’ or ‘Low-power’ state, your laptop’s battery starts to drain very quickly. You might find that a battery that normally lasts for 4 hours runs out in just 2 hours.
- Thermals and Overheating: Removing the maximum power limit directly means generating maximum heat. Laptops don’t have the same cooling space as desktops, so during heavy tasks or continuous gaming, the laptop can get quite hot or even overheat, and in such cases, your cooling fans will start to run at full speed continuously.
- Thermal Throttling: If the heat gets too high, your processor will automatically reduce its speed to protect itself. This will cause your FPS to drop, and you’ll miss out on the full benefits of this mode.
Frequently Asked Questions
Why is the Ultimate Performance plan missing by default in Windows 11?
Microsoft primarily focuses on power-saving and eco-friendly (carbon footprint–reducing) approaches. That’s why they made “Balanced” the default and reserved Ultimate mode for Windows Workstation and high-end enterprise servers. I’m simply accessing that hidden enterprise feature on my regular PC by using the Windows 11 power settings command prompt (CMD).
Does the Ultimate Performance mode actually boost FPS in games?
Yes, absolutely! Although it doesn’t overclock your hardware beyond its original capacity, this boost definitely helps with Windows 11 gaming performance. It eliminates micro-stutters (small lags) because the CPU stays continuously at 100% active and doesn’t have any latency (delay) in rendering any frame. This will definitely make the FPS more stable and better.
Will it damage my CPU or GPU?
No, it is completely safe for your hardware. This is because the setting doesn’t overclock any of your components beyond their limits. It simply instructs Windows not to put components into a low-power state when they are idle. As long as your PC has good cooling, you are not at any risk.
How do I disable or delete the Ultimate Performance Plan?
If you want to remove it, go to the Control Panel and then to Power Options. There, select the ‘Balanced’ plan first. Then, next to ‘Ultimate Performance’, click “Change plan settings” and on the next page, select “Delete this plan”. After following this step, your system will return to its normal state.
Conclusion: Get Your Money’s Worth Out of Your Hardware!
Friends, when we spend thousands of rupees building a gaming rig or an editing setup, it’s our right to use its full potential. Right? I hope this detailed guide has helped you understand how to enable Ultimate Performance power plan in Windows 11 and how to use it safely.
Desktop users can take full advantage of this hidden trick, while laptop users will need to pay a little more attention to cooling. For more OS tweaks, gaming optimizations, and tech hacks, stay tuned to our brand, TechWaleJha. If this trick has made your PC faster, be sure to share this article with your gaming squad so they can benefit from it too.
Disclaimer: This guide and the CMD tweak described herein are for educational purposes only. Ultimate Performance mode can significantly increase your system’s (especially laptops’) temperature and power consumption. Please apply it at your own risk. TechWaleJha or its author will not be held responsible for any hardware damage, battery drain, or overheating issues. Be sure to maintain proper cooling for your system while using it.




