
Has it ever happened to you that you’re editing an important video, working on your website’s technical backend, or doing some other important work, and suddenly your computer freezes or you get the “Blue Screen of Death” on your screen? These sudden errors are very annoying and can ruin hours of your work in just a few seconds. When this happens, we often think our PC must have a virus or that the hardware has failed. But it has been observed that in most cases, the real problem is something else.
When your PC keeps crashing, apps behave strangely, or the system becomes extremely slow, the main cause is often hidden “corrupted system files.” These essential files continuously work in the background of Windows to keep your PC running smoothly. If these files get damaged due to a power cut, sudden shutdown, failed software update, or malware, you’ll face a lot of trouble using your system.
But the best part is that you don’t need to go to an expensive PC mechanic for these problems. You can easily scan Windows PC for corrupted files yourself and fix your system like new. For this, Microsoft Windows provides us with some excellent built-in command-line tools that automatically detect these issues and safely repair corrupted Windows files.
Properly using these tools is an essential skill for any smart PC user. To gain a deeper understanding of this core mechanism, you can also refer to Wikipedia’s guide on System File Checker. In this guide, we’ll go through step-by-step in detail how to use CMD to fix corrupted system files and restore your PC’s health and speed to normal. So let’s learn to run these built-in magic tools without any delay.
A Quick Guide: How to Scan Windows PC for Corrupted Files?
To quickly Scan Windows PC for Corrupted Files, use these built-in CMD tools in Administrator mode. To do this, you:
- Open Command Prompt as an Administrator.
- Then, run the DISM cleanup image restorehealth command:
DISM.exe /Online /Cleanup-image /Restorehealth - Next, run the SFC scan: type
sfc /scannowand press Enter. - After the verification is complete, restart your PC.
The 4-point list above gives you a direct and fast solution to this problem, but it’s very important to run these commands in the correct sequence. If you run “SFC scannow Windows 11” directly, without DISM, it’s possible the PC may not be fully fixed. That’s why it’s always recommended to use the DISM tool before SFC.
Let’s understand in simple terms, through the comparison table below, what these commands actually do in the background and what the main difference is between them:
| Windows Tool Name | CMD Execution | What is its real purpose? |
|---|---|---|
| DISM Tool | DISM.exe /Online... | It downloads fresh files from the Internet to repair Windows’ base image or backup system. |
| SFC Tool | sfc /scannow | It compares the current damaged files with the intact image from DISM and replaces the corrupted Windows files. |
| CHKDSK Tool | chkdsk X: /f | It fixes physical or logical block errors on the hard drive (storage). |
Whenever you notice an unexplained error or slow performance on your system, the very first step should be to run a troubleshooting scan. One “Pro Tip” to always remember: when using the CMD method to fix corrupted system files, be sure to have some patience. This scan depends on the speed of your PC’s hard drive (SSD/HDD), so don’t close it until it’s 100% complete.
Also Read: How to Find Hidden Viruses Using CMD
Step 1: Run the DISM Tool to Fix the Image
As we discussed above, before running the SFC scan directly, it’s very important to use the DISM (Deployment Image Servicing and Management) tool. Think of SFC as a mechanic and DISM as his spare parts store. If the store (the Windows system image) itself has bad parts, how can the mechanic fix your PC? Therefore, first we use the DISM cleanup image restorehealth command to repair the Windows base image (backup system) so that the files can be properly replaced later.
Open Command Prompt as Administrator
You must have administrator rights to make deep changes to system files, otherwise CMD will give an error.
- Now, on your keyboard, click the Start menu (Windows icon).
- Then, simply type cmd in the search bar.
- Right-click on ‘Command Prompt’ in the search results and select ‘Run as administrator’. A pop-up will then appear on the screen; click “Yes” to grant it permission.
Execute the DISM Command
A black window will now open in front of you. Here, you need to type the DISM command:
- Carefully type this exact code on the black screen:
DISM.exe /Online /Cleanup-image /Restorehealth - After typing, press Enter and let the scan begin.
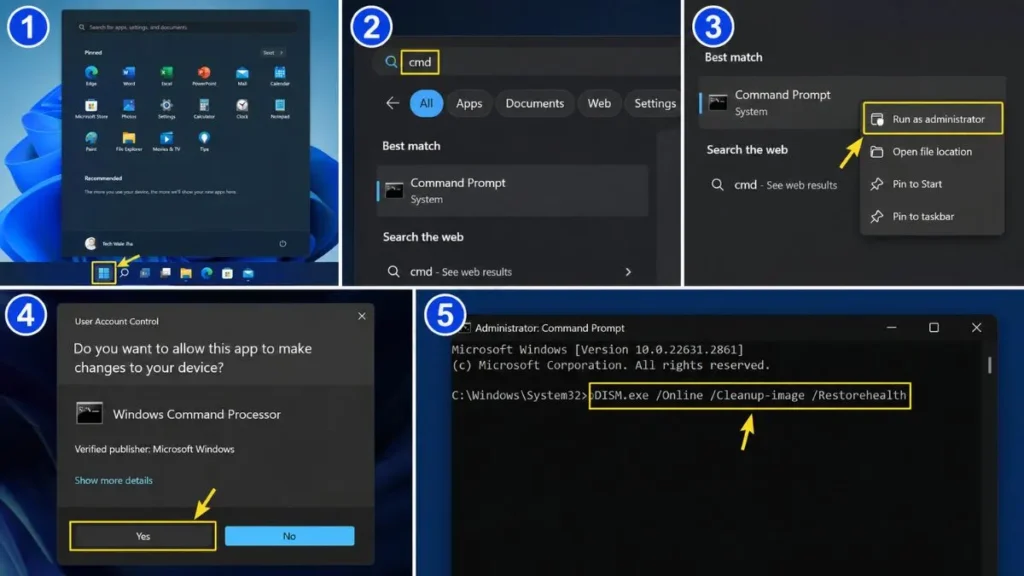
This powerful tool will connect directly to Microsoft’s online servers and will properly fix your system image by downloading new, healthy files. This process can take about 10-15 minutes to complete 100%, and sometimes it might get stuck at 20% or 40% for a while, but you don’t need to worry at all because this is normal. Do not close the window until you see “The restore operation completed successfully” on the CMD screen. Otherwise, you’ll get the error I mentioned above.
Also Read: How to Recover Deleted Files for Free
Step 2: Run the System File Checker (SFC)
Now that our base system image is perfectly healthy, we’ll start the actual checkup of the PC. Here we’ll use the built-in Windows file checker tool, commonly called SFC for short. If you want to effectively scan Windows PC for corrupted files, this step is your biggest and final tool.
Start the SFC Scannow Process
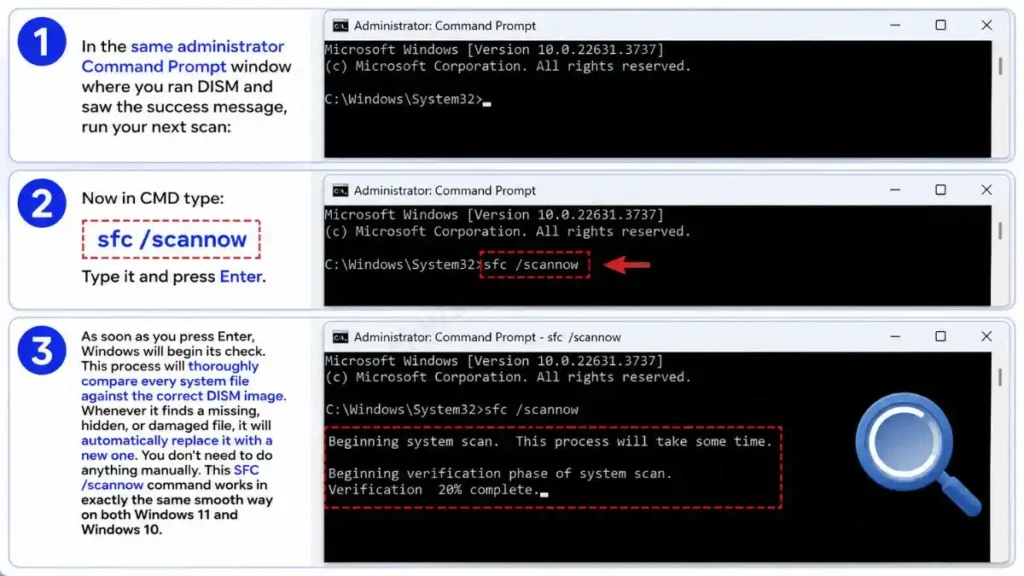
In the same administrator Command Prompt window where you ran DISM and saw the success message, run your next scan:
- Now in CMD type:
sfc /scannow - Type it and press Enter.
As soon as you press Enter, Windows will begin its check. This process will thoroughly compare every system file against the correct DISM image. Whenever it finds a missing, hidden, or damaged file, it will automatically replace it with a new one. You don’t need to do anything manually. This SFC /scannow command works in exactly the same smooth way on both Windows 11 and Windows 10.
Understanding the Scan Results
When the SFC process is 100% complete, you will see one of these final messages on the CMD screen. It’s very important for you to know what they mean:
- “Windows Resource Protection did not find any integrity violations”: This means that everything on your PC is perfectly fine, or there were no corrupt files.
- “Windows Resource Protection found corrupt files and successfully repaired them”: Congratulations! This simply means that you have successfully completed the step of repairing corrupted Windows files and all the errors in the system have been fixed.
- “Windows Resource Protection found corrupt files but was unable to fix some of them”: If this somewhat rare error occurs, you will need to repeat the SFC scan process, but this time by starting your PC in “Safe Mode”.
After the scan for both tools (DISM and SFC) has successfully completed 100%, be sure to manually restart your computer once so that all the fresh changes are properly applied.
Also Read: How to Check If Someone Used Your Computer
What If SFC Fails? (Using CHKDSK & Safe Mode)
Sometimes system files are so severely damaged that the Windows File Checker tool can’t replace them in normal Windows mode. If you get an error message after an SFC scan saying “unable to fix some of them,” then you’ll need to perform the next level of troubleshooting.
In this case, first boot your PC into “Safe Mode.” In Safe Mode, Windows starts with only the basic and essential files, so no third-party apps will interfere with the repair process. After entering Safe Mode, open the admin CMD again and repeat the same step to run the SFC scan (sfc /scannow).
Additionally, if you suspect the problem is due to bad sectors on your hard drive (storage), you should use another powerful Windows CMD command called CHKDSK. In CMD, type chkdsk C: /f /r and press Enter (here ‘C’ is your Windows drive), then restart the PC. This scan will find and fix physical and logical disk errors to prevent further file corruption.
Frequently Asked Questions
Will these steps work the same way on Windows 10?
Yes, they will work exactly the same. Whether you need to run SFC scannow Windows 11 or you’re looking for a fix for corrupted files on Windows 10, all of these DISM and SFC commands work perfectly and in the exact same way on both operating systems.
Will running a CMD scan delete my personal files (photos, videos, documents)?
No, it’s 100% safe. These tools (DISM and SFC) only check and replace Windows’ internal system files (like .dll files). They have no effect on your personal data, photos, or installed software. They simply repair corrupted Windows files to restore the PC’s core system health.
How often should I run this scan on my PC?
There’s no need to run it daily. Use these commands only when you notice errors on your PC, apps start closing unexpectedly, or you’re regularly troubleshooting Windows crashes like Blue Screen errors.
Final Thoughts
Whenever our computer slows down or suddenly shuts down, we panic. But now you know that Windows has a complete ‘digital doctor’ built right in that can fix the system on its own. In this guide, we’ve practically shown how easy it is to scan Windows PC for corrupted files without any expensive software.
Always remember that whenever you need to fix system errors, you should first run DISM cleanup image restorehealth and only then use the sfc /scannow command. Complete these steps and restart your PC. By using these CMD methods to fix corrupted system files, you can significantly improve your system’s life, speed, and stability, and also save a lot of time and money.
Did using these CMD tools (DISM and SFC) solve your PC’s repeated crashing problem or not? After the scan reached 100% completion, what final message did you see on your screen—“successfully repaired” or something else? If you’re facing any issues while running the scan or if your system is still running slow, be sure to let me know in the comments below, and I’ll help you out fully! 👇
Disclaimer: The CMD commands (such as DISM, SFC, and CHKDSK) and system repair steps described in this guide are for educational and troubleshooting purposes only. Although these are built-in and safe Windows tools, exercise caution when using the command prompt directly. Please apply these steps carefully and at your own risk. We will not be liable for any incorrect command execution, system crash, data loss, or technical error you may encounter. Always back up your important data before performing any critical repairs.




