
Friends, Windows 11 is a truly amazing operating system with its new look and smooth interface. But as we keep installing heavy software and games, after a while the system starts to hang or lag, which becomes a major hindrance to our work.
If you’re also bothered by this lag and are looking online for a quick or 100% working solution are looking for an answer to “how to make windows 11 faster,” then the easiest and most direct answer is to open the Task Manager to increase your PC’s speed. You can use the shortcut (Ctrl+Shift+Esc) to do this, and from there, disable unwanted ‘Startup apps’. After that, go to Settings, then System, and under Advanced system settings, set ‘Visual effects’ to ‘Adjust for best performance.’ And to keep your C: Drive clutter-free, always keep ‘Storage Sense’ turned ON.
On my Tech Wale Jha platform today, I’m going to show you completely safe and tested tricks to make even your old or slow laptop fly like new, without any paid third-party software. So, let’s practically learn how to truly speed up Windows 11, and do it all with absolute ease.
Why is Windows 11 Slow? (Main Reasons)
Before starting the tricks, it’s very important to understand why such an advanced OS runs slow. If your Windows 11 is running slow, there are some common system errors and some technical reasons behind it, such as:
- Heavy Visual Animations: Windows 11 features visuals like transparency, shadows, and rounded corners. While these look nice, they place a heavy load on your RAM and processor.
- Background Bloatware: New laptops often come with many unnecessary promotional apps (bloatware) pre-installed, which quietly run in the background, continuously consuming internet and memory.
- Startup Program Load: When you turn on your PC or laptop, some heavy apps like Skype, Spotify, or uTorrent automatically launch, causing the laptop to take 5 minutes to start up.
- Storage Full: If your C: drive, where Windows is installed, is more than 90% full, the system doesn’t have enough free space (cache memory) to process data.
Also Read: How to Check if Your PC Supports Windows 11 (Easy Guide)
Trick 1: Disable Startup Apps (Instant Boost)
If you want to see an instant difference in your PC, apply this trick first. Disabling apps that automatically start when your PC turns on is called disabling startup apps in Windows 11, and it instantly cuts your boot time in half.
The easy steps to apply this solid trick are given below; follow them carefully:
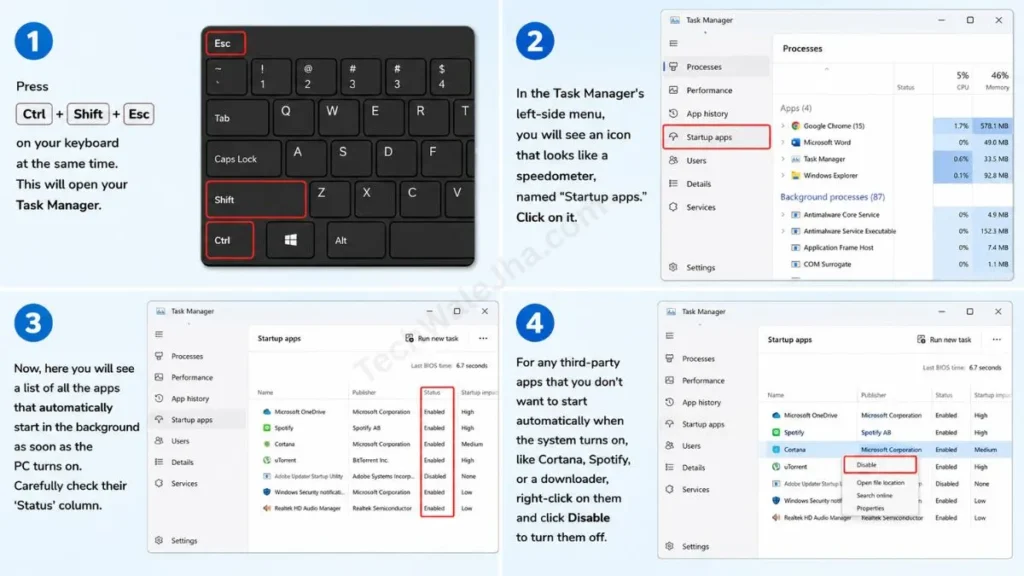
- To do this, press the Ctrl + Shift + Esc buttons on your keyboard at the same time. This will open your Task Manager.
- Then, in the Task Manager’s left-side menu, you will see an icon that looks like a speedometer, named “Startup apps.” Click on it.
- Now, here you will see a list of all the apps that automatically start in the background as soon as the PC turns on. Carefully check their ‘Status’ column.
- For any third-party apps that you don’t want to start automatically when the system turns on, like Cortana, Spotify, or a downloader, right-click on them and click Disable to turn them off.
Tech Wale Jha Pro Tip: Make sure you don’t disable any essential antivirus, audio driver, or Windows Security app. Only disable unnecessary third-party apps. Because with this one small setting, you can make your system even faster and take your first step toward optimizing Windows 11 for gaming.
Also Read: How to Reset Windows 11 Without Losing Data (Easy Steps)
Trick 2: Turn Off Visual Effects and Animations
Friends, Windows 11 is known for its transparent menus, shadows, and smooth minimize and maximize animations. These all look premium, but did you know that they constantly use a large portion of your processor and RAM? If your laptop is a bit older, you can easily get a solid Windows 11 performance boost by turning off these visual effects.
To change this setting, carefully follow these steps below:
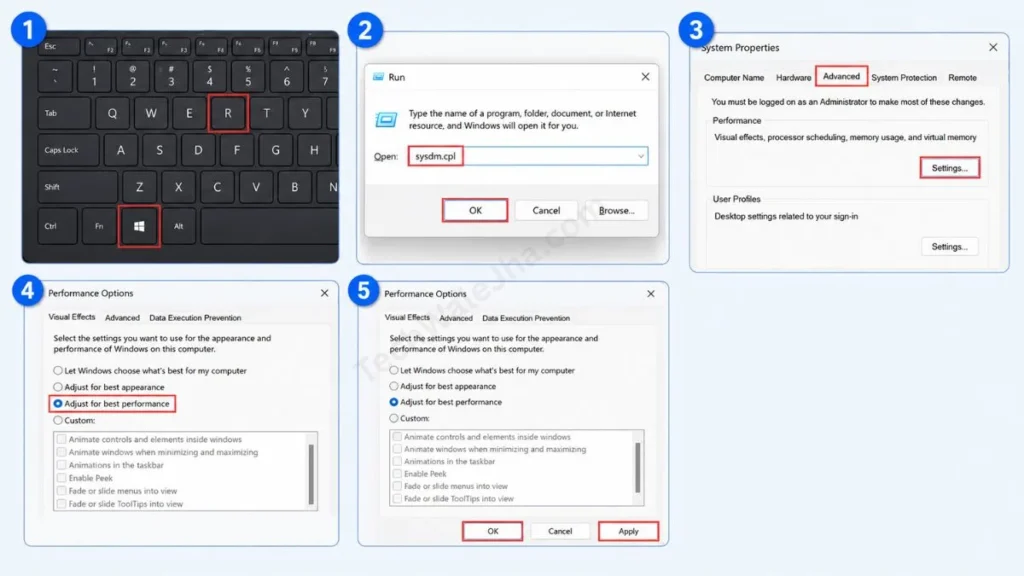
- Now, press the Windows Key + R on your keyboard. This will open the ‘Run’ box.
- Type sysdm.cpl in it and press Enter. This will open ‘System Properties’.
- Click the Advanced tab at the top. Then, in the ‘Performance’ section, click the Settings button.
- A new window will open. Here, select the “Adjust for best performance” option. This will uncheck all the boxes.
- Finally, click ‘Apply’ and then ‘OK’.
After this, the screen will blink for a moment. Although your Windows will look a bit more basic, its speed and response time will be as fast as a rocket.
Also Read: How to Activate Windows 11 (With & Without Product Key)
Trick 3: Turn on Storage Sense (Automatically Clean Junk Files)
Many times we download a lot of things from the internet, and this completely fills up the C: drive with temporary files. When Windows can’t find enough free space to process things, the PC starts to lag. You don’t need to manually delete everything, because Microsoft has built an amazing auto-clean feature into it.
If you want to safely clean junk files on Windows 11, ‘Storage Sense’ is your best friend. Let’s see what the big difference is between the old manual methods and the new Storage Sense:
| Feature | Manual Disk Cleanup (Old Method) | Storage Sense (New Method) |
|---|---|---|
| How does it work? | You have to open the tool every week, select the files, and then delete them yourself. | It quietly runs automatically in the background. |
| Recycle Bin Cleaning | You have to go and empty the Recycle Bin yourself. | It automatically deletes files that are 30 days old from the Recycle Bin. |
| Time Saving | This is a time-consuming and very boring process. | Turned it on once and forgot about it forever. 100% time-saving! |
How to turn it on: First, open Settings, then go to System, and then to Storage. There you’ll see the Storage Sense toggle for Windows 11. Just turn it on. You can also configure it to your liking to decide when it cleans up junk.
Also Read: How to Factory Reset Windows 11 (2026 Step-by-Step Guide)
How to Optimize Windows 11 for Gaming? (Game Mode)
If you play heavy games like Valorant, GTA V, or BGMI on your PC, you need to configure your system smartly. Windows 11 has a built-in ‘Game Mode’ for gamers, which temporarily stops background processes and gives all your processor’s power directly to the game. This prevents FPS (Frames Per Second) drops and eliminates lag.
To turn on Game Mode, go to Settings, then to Gaming, and then to Game Mode, and toggle the switch to ‘ON’. If you want to understand this in more detail, you can read Microsoft’s official Game Mode guide. This official guide will explain how Game Mode actually manages background processes on your PC to give you the best possible experience.
Frequently Asked Questions
Does upgrading RAM really make a PC faster?
Yes, absolutely! If your system currently only has 4GB of RAM, Windows 11 will really slow it down. Installing at least 8GB or 16GB of RAM will let your system easily handle many apps and Chrome tabs at once without freezing. It’s the best hardware upgrade for any slow laptop.
Should I use third-party PC cleaner apps (like CCleaner) to increase speed?
These days, I don’t recommend any third-party cleaner apps. Windows 11’s built-in “Storage Sense” and “Windows Security” are so powerful that you don’t need any external app. Often these third-party apps themselves eat up RAM in the background and show unnecessary ads, which slow your PC down even more.
What should I do if my laptop is still slow after trying all these tricks?
If your system is still hanging after trying everything, the biggest reason could be your old HDD (Hard Disk Drive). Remove your old hard disk and replace it with a new SSD (Solid State Drive). An SSD is 10 times faster than a normal hard disk, and it will make a world of difference in your PC’s speed.
Conclusion
Friends, I’m confident that after following these easy steps, you’ll never have to search for “how to make Windows 11 faster” again. Once you disable unnecessary startup apps and optimize the Windows visual effects, the system will automatically start to breathe easier.
Always keep your PC updated, and leave Storage Sense ON so that junk doesn’t accumulate. If you feel that this guide has improved your laptop’s speed even a little, then be sure to share your experience by commenting below. And stay connected with us for more easy tech tips like this.




