
Friends, do you also want to run your normal 60Hz monitor at 75Hz, or enjoy a ‘stretched resolution’ like pro players in games like Valorant and CS:GO? If you’re looking for the perfect Custom Resolution Utility Windows 11 guide that shows you exactly how to set this up step by step, here’s a quick setup.
To use the CRU (Custom Resolution Utility) in Windows 11, first download the CRU .zip file from the official forum and extract it. Then, open ‘CRU.exe’. Third, in the ‘Detailed Resolutions’ box, click ‘Add’. Fourth, type your new resolution, like 1440×1080, and refresh rate, like 75Hz, and press ‘OK’. 5. Go to the file folder and run ‘restart64.exe’ so that the graphics driver restarts properly and the new resolution can be applied.
On our TechWaleJha platform, we always strive to teach you these advanced PC tricks in the easiest way possible. When I’m recording on a vertical screen for technical shorts and Facebook Reels, I often need a specific screen size and refresh rate. In such cases, the CRU software becomes my greatest tool. So, in this detailed custom resolution utility tutorial, let’s see how you can safely overclock your monitor without causing any damage, and all with ease.
Also Read: How to Fix 100% Disk Usage on Windows 10 SSD
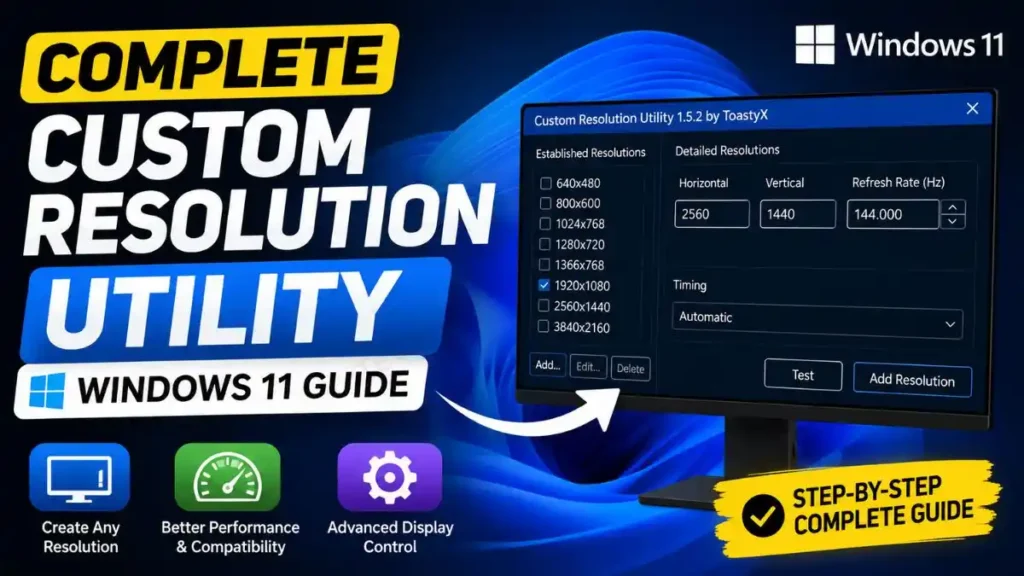
What Exactly is the Custom Resolution Utility (CRU)?
In simple terms, the Custom Resolution Utility, or CRU, is a very small, free software that bypasses the Windows registry and sends new display signals to your monitor. If you’re searching for a way to use a screen size like a 4:3 aspect ratio or any other size that isn’t available in Windows’ display settings, this is it.
This is where CRU comes in. It’s a very small and free software that completely bypasses the Windows registry and sends new display signals to your monitor. If you’re searching for how to use CRU on Windows 11, then you should know its two biggest benefits:
- The first is Overclock Monitor for Windows 11: You can push your basic 60Hz monitor up to 75Hz or 80Hz. This makes the screen feel very smooth in gaming and video editing.
- The second is Stretched Resolution: If you’re an eSports or BGMI gamer, the enemy’s head (hitbox) will look slightly larger with a stretched display, making it easier to get a headshot.
CRU is a game-changing tool, but it’s very important to use it correctly, otherwise your screen could permanently go black. So, follow this guide carefully.
Also Read: How to Disable Windows 11 Telemetry
Step 1: How to Safely Download and Install the CRU?
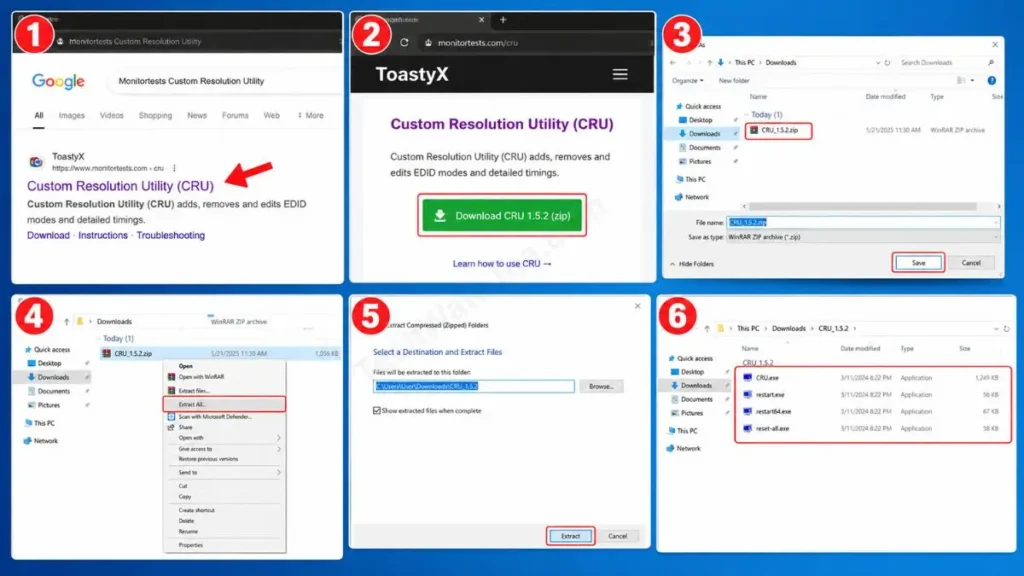
First and foremost, the internet is full of many fake and virus-infected websites that claim to offer CRU downloads. If you want to download a safe and original CRU custom resolution utility, always download it from the creator ‘ToastyX’s’ official forum.
Safe Download Process:
- In your browser, search for “Monitortests Custom Resolution Utility” and open the first official ToastyX website.
- Then, on that page, you will find a download link for a small .zip file. Click on it to download and save the file to your PC.
- Now, right-click on the zip file and click ‘Extract All…’.
- After this, a new folder will be created. Open that folder. Here you will see 4 different files with strange icons, such as CRU.exe, restart.exe, restart64.exe, or reset-all.exe. With the help of these files, we will complete the entire process of creating a custom resolution in Windows 11.
Friends, after downloading the software, I always advise you to first scan this folder with your Windows Defender to clear up any doubts you may have.
Also Read: How to Disable VBS in Windows 11 | Advanced Fix
Step 2: Set Custom Resolution and Refresh Rate (Main Step)
Friends, when you open ‘CRU.exe’ for the first time, its interface might seem a bit old and complicated, but there’s absolutely no need to worry. We will only focus on the part that is relevant to our task. If you play eSports and want to apply the fix for stretched resolution in Windows 11 or increase your refresh rate, follow these steps carefully:
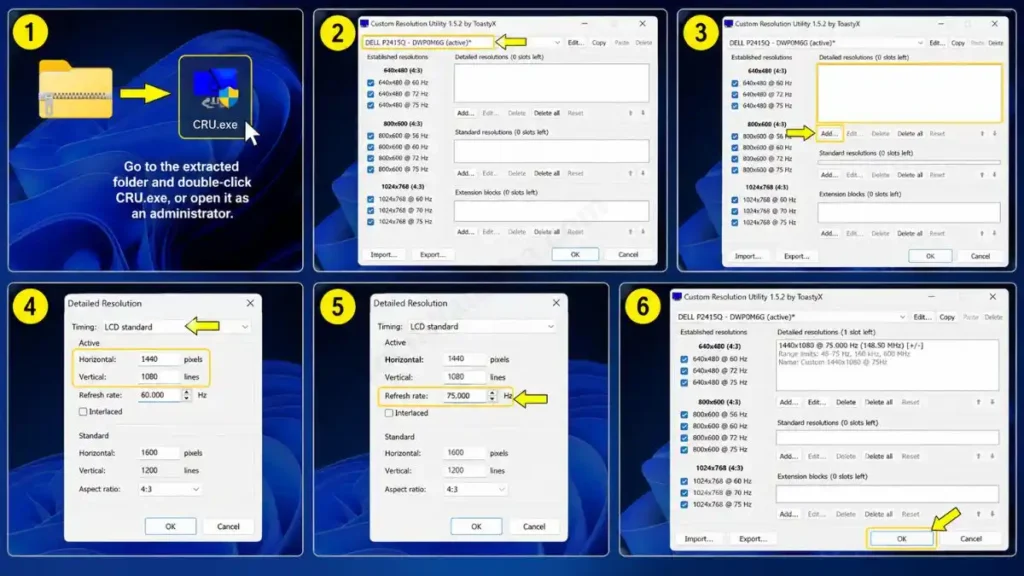
- Open CRU.exe: Go to the extracted folder and double-click CRU.exe, or open it as an administrator.
- Select Monitor: At the top, there will be a drop-down menu showing your current active monitor with “Active” next to it. Make sure that is selected.
- Detailed Resolutions: Look below, you will see a large box named ‘Detailed Resolutions’. Click the ‘Add…’ button right below that box.
- Enter the Values: A new window will open. Here, leave ‘Timing’ set to ‘LCD standard’.
- If you need a stretched resolution, like 4:3 for CS:GO, set Horizontal to 1440 and Vertical to 1080 in the ‘Active’ parameters.
- or If you want to set a custom refresh rate in Windows 11 (like 60Hz to 75Hz), type 75 in the ‘Refresh rate’ box at the very bottom.
- Save: Just click ‘OK’, and close the main CRU window by clicking ‘OK’ as well.
Safe vs Unsafe Monitor Overclocking
Increasing your monitor’s speed is easy, but if you get greedy and enter the wrong numbers, your screen can go black. Use the table below to properly understand the safe limits:
| Current Status | Safe Overclocking Limit | Unsafe Limit | Result |
|---|---|---|---|
| 60Hz Monitor | From 65Hz to 75Hz | Direct 120Hz or 144Hz input | The screen will permanently go black. |
| 144Hz Monitor | From 150Hz to 165Hz | 240Hz refresh rate | An “Out of Range” error will occur. |
| Aspect Ratio | 1440×1080 (4:3 Stretched) | Enter numbers that the GPU doesn’t support. | The screen will cut off in a strange way. |
Also Read: How to Fix Blue Screen Error in Windows 11 Using Command Prompt
Step 3: The Magic of Restart64.exe (Apply Changes)
After saving settings in CRU, they don’t take effect immediately. Normally, you have to restart your entire PC for this, but ToastyX has made our job easier. This is where the cru restart64.exe comes in; it resets the graphics driver without shutting down the PC.
How to Apply It?
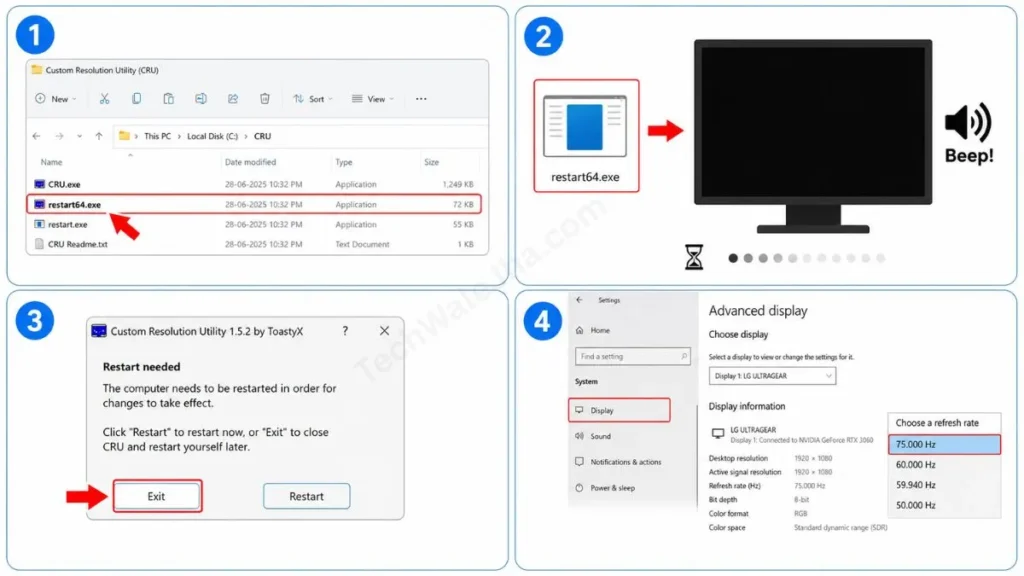
- Go back to your CRU folder.
- There will be a file named restart64.exe; if you have a 64-bit Windows, double-click it.
- Your screen will suddenly go black, blink for a few seconds, and you’ll hear a ‘Beep’. Don’t be alarmed, this is completely normal!
- Once the screen returns, click ‘Exit’.
Final Step: To actually use your new refresh rate, press Windows key + I to go to Settings, then go to System, then to Display, and then to Advanced display. Here, under ‘Choose a refresh rate’, you should see your new 75Hz option. To understand this in more technical detail, you should definitely read Microsoft Support’s Official Screen Refresh Rate Guide, where Microsoft explains the effects of different refresh rates on the eyes and the screen.
Emergency: How to Reset if the Screen Goes Black?
Every custom resolution utility Windows 11 guide is incomplete without troubleshooting. Suppose you mistakenly set it to 144Hz instead of 60Hz, and after running restart64.exe, the screen went black and wouldn’t come back. What do you do in such a case?
Solution: If the screen goes black, Windows has a built-in safety feature that automatically reverts to the previous settings after 15 seconds. So, wait for 15 seconds. If the screen still doesn’t come on, force restart your PC. Boot into Safe Mode, go to your CRU folder, and double-click the reset-all.exe file there. This will completely remove all CRU modifications and your monitor will be 100% normal. This trick makes Windows 11 monitor overclocking safe.
Also Read: How to Repair Windows 11 Using Command Prompt (Guide)
Frequently Asked Questions
Can using a CRU physically damage my monitor?
Modern monitors these days are quite smart. If you set a refresh rate higher than their limit, their built-in protection activates, and the screen will display “Out of Range” or go black. In this situation, the risk of physical hardware failure is almost zero.
How does CRU work on both AMD and NVIDIA graphics cards?
CRU isn’t software for a specific brand; instead, it directly modifies the EDID (registry) of Windows. That’s why whether you have an NVIDIA RTX, an AMD Radeon, or a basic Intel integrated graphics card, CRU works perfectly on all of them without interfering with their control panels.
Can I also overclock my laptop’s screen with CRU?
Using CRU on laptops is a bit tricky. Laptop display panels are generally locked to save battery and prevent overheating. If you try, the screen will mostly go black, and you’ll have to reset it. CRU results on desktop monitors are 99% successful.
Conclusion
Friends, tinkering with hardware and display settings might seem a bit technical, but if you follow the steps correctly, you can get pro-level gaming performance even from your old hardware. I hope this detailed guide has cleared up all your doubts about the custom resolution utility Windows 11.
A stretched resolution and a little extra refresh rate (from 60Hz to 75Hz) can significantly improve your reaction time in competitive games like Valorant and CS:GO. When you start landing lag-free headshots, you’ll truly feel how powerful display overclocking is. Just be sure not to get greedy and enter unrealistic numbers.
At what refresh rate have you successfully overclocked your monitor? Be sure to mention your monitor brand and new Hz in the comment box below. Or, to easily learn more advanced PC optimization tips and tricks, stay connected with our TechWaleJha platform.
Disclaimer: This guide is for educational and troubleshooting purposes only. Overclocking your monitor (increasing the refresh rate) puts extra load on the hardware, which may slightly reduce the monitor’s lifespan. Please keep the provided safe limits in mind. The TechWaleJha platform or its author will not be held responsible for any hardware damage, display errors, or black screens. Always apply modifications at your own risk.




