
Friends, when Microsoft launched Windows 11, its new design and features won everyone’s hearts. But Microsoft also introduced a new hardware requirement that has kept old laptop and PC users up at night: TPM 2.0 and Secure Boot. If your computer is 4–5 years old, you get an annoying error screen when running the update setup: “This PC can’t run Windows 11.” But there’s no need to worry anymore.
If you’re directly searching online for a quick and solid answer on how to install Windows 11 without TPM 2.0, the simplest answer is that you can install Windows 11 on any old or unsupported PC without any errors. The safest way to do this is by creating a custom bootable USB drive using the Rufus tool. This tool automatically removes and bypasses the hardware checks for TPM 2.0 and Secure Boot before the installation, allowing the installation to complete smoothly.
In today’s step-by-step guide, we will explain in detail how you can easily complete the bypass TPM 2.0 for Windows 11 process on your system without causing any damage. Even if you’re completely new to tech, by following these simple steps you’ll be able to confidently install Windows 11 on any old unsupported PC. You won’t need any heavy coding its just a USB drive and the right software magic trick will do the trick.
What is TPM 2.0 and Why Does Windows 11 Need It?
I know that before jumping straight to the solution (Rufus trick) many users wonder what exactly this TPM thing is and why Microsoft is being so strict about it. Let’s break down this technical term in simple terms so you can fully grasp the rest of the technical concept.
TPM stands for ‘Trusted Platform Module’. You can think of it as a “Digital Bouncer” for your computer. It’s a small hardware security chip on your laptop’s motherboard. The main job of this bouncer is to protect your PC from malicious malware, ransomware, and hackers at a hardware level. Since Microsoft has made Windows 11 the most secure OS to date, they have made this security chip (TPM 2.0) and the ‘Secure Boot’ feature completely mandatory for installation.
So does this mean that if a laptop doesn’t have this chip, it’ll end up in the trash? That’s absolutely not the case! When people ask online how to install Windows 11 without TPM 2.0, they often assume their old hardware won’t be able to handle the new OS. But the truth is the OS runs like butter even on your old i3 or i5 processors. The problem isn’t with the OS’s ability to load, but with that ‘Digital Bouncer’ setup check that gives us an error and won’t let us proceed.
To remove this obstacle, in the next steps, we will create a specially modified Rufus Windows 11 bootable USB. This trick fools the setup and provides a virtual VIP pass, making Windows Setup believe that the system has TPM. This way, we can easily bypass Windows 11’s Secure Boot and TPM and proceed.
Before you practically start this working method, have these 4 things ready on your table:
- Empty Pen Drive: With at least 8GB of storage, and keep in mind that all the old data on it will be deleted.
- Windows 11 ISO File: Which you can download for free from Microsoft’s official website.
- Rufus Software: Download the latest version from the internet for free. There’s no need to install it; it’s a portable application that opens directly.
- Your Old PC: The one where we will finally successfully complete the mission of installing Windows 11 on an unsupported PC using this bypass method.
Also Read: How to Factory Reset Windows 11 (2026 Step-by-Step Guide)
Method 1: Using Rufus (The Easiest Method)
Friends, if you want to avoid any hassle during the installation and complete the entire Windows 11 ISO bypass TPM process with a single click, then ‘Rufus’ is going to be your best friend. This method is 100% safe and carries no risk.
Just follow these simple steps carefully:
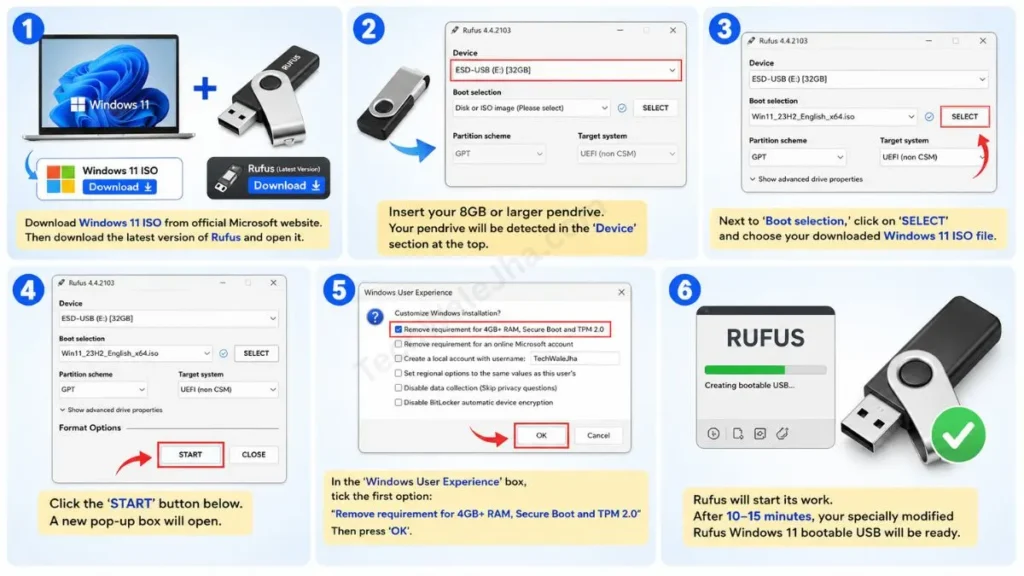
- Download Rufus and ISO: First, download the Windows 11 ISO file to your PC from the official Microsoft website. Then, download the latest version of ‘Rufus’ from the internet and open it.
- Select the Pendrive: Insert your 8GB or larger pendrive into your laptop. As soon as Rufus opens, your pendrive will automatically be detected in the ‘Device’ section at the top.
- Add ISO File: Next to ‘Boot selection,’ there will be a ‘SELECT’ button. Click on it and choose your downloaded Windows 11 ISO file.
- The Magic Step (Bypass Trick): As soon as you click the ‘START’ button below, a new pop-up box will open in front of you named ‘Windows User Experience’. This is where the magic happens!
- Tick the Box: In this box, the first option will be “Remove requirement for 4GB+ RAM, Secure Boot and TPM 2.0”. You just need to tick this box and press ‘OK’.
- Pendrive Ready: Now Rufus will start its work. After 10-15 minutes, your specially modified Rufus Windows 11 bootable USB will be ready.
Now just plug this USB drive into your old PC, boot from it, and without any errors, make your dream of upgrading to Windows 11 without TPM a reality!
Also Read: How to Free Up Disk Space in Windows 11 (2026 Guide)
Method 2: Registry Editor (Regedit) Trick (Without Software)
Let’s say you have already created a normal Windows 11 USB drive (from the Media Creation Tool). After that, you booted your PC, started the setup, and suddenly that scary error appeared on the screen: “This PC can’t run Windows 11”.
At a time like this, you don’t need to go back to the previous step. We’ll just sit right there and apply a small hack to the system’s registry. The steps for this Windows 11 TPM 2.0 error fix sound like something out of a hacker movie, but they’re actually very easy:
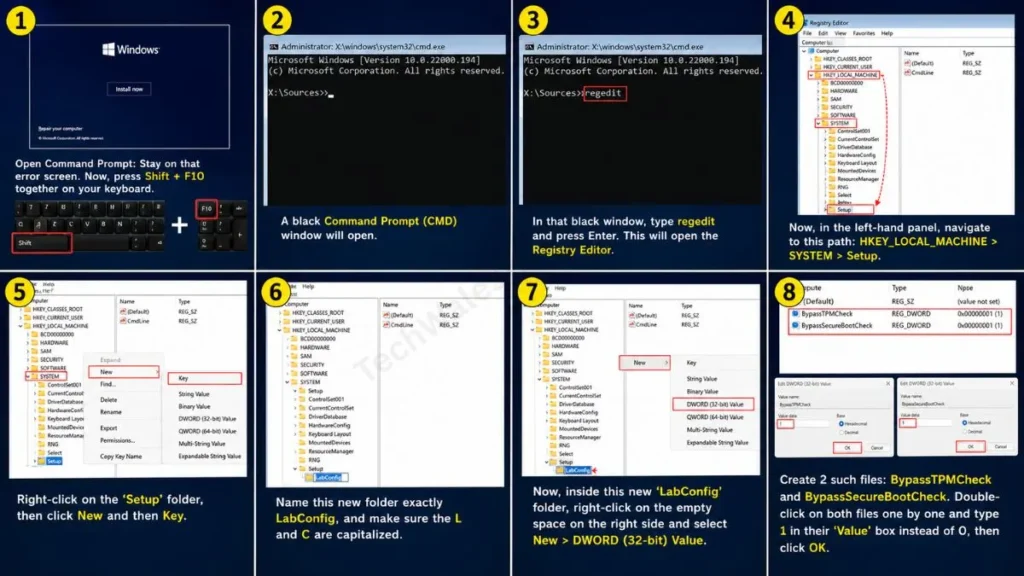
- Open Command Prompt: Stay on that error screen. Now, press Shift + F10 together on your keyboard. A black Command Prompt (CMD) window will open.
- Open Registry: In that black window, type regedit and press Enter. This will open the Registry Editor.
- Navigate to the correct folder (path): Now, in the left-hand panel, navigate to this path: HKEY_LOCAL_MACHINE > SYSTEM > Setup.
- Create a new key: Right-click on the ‘Setup’ folder, then click New and then Key. Name this new folder exactly LabConfig, and make sure the L and C are capitalized.
- Add Bypass Values: Now, inside this new ‘LabConfig’ folder, right-click on the empty space on the right side and select New > DWORD (32-bit) Value. You need to create 2 such new files:
- Name the first file: BypassTPMCheck
- Name the second file: BypassSecureBootCheck
- Change the Value: Double-click on both files one by one and type 1 in their ‘Value’ box instead of 0, then click OK.
That’s it! Now, close all these windows by clicking the ‘X’ in the corner. Go back to the setup screen, click the ‘Back’ arrow in the top-left corner once, and then click ‘Next’ again. This solid Windows 11 TPM registry hack will make your error disappear, and the installation will proceed smoothly after t
Also Read: How to Install Windows 11 Without Microsoft Account
Is It Safe to Installing Windows 11 on an Unsupported PC?
Friends, to be honest, installing Windows 11 on an old laptop isn’t rocket science, and 99% of the time it runs smoothly. But we also have to accept the reality that Microsoft created these hardware rules for a solid reason. So installing the OS without following these rules has its own pros and cons.
Let’s understand its pros and cons from the comparison table below:
| Feature / Risk | Supported PC (with TPM 2.0) | Unsupported PC (with bypass) |
|---|---|---|
| Performance | Extremely smooth, fast, and lag-free. | The system may run a bit slow on older processors (like older i3/i5). |
| Security Layer | Hardware-level protection is available. | Advanced malware and ransomware protection doesn’t work properly. |
| Windows Updates | New features and security patches are released regularly. | In the future, Microsoft may stop official updates. You’ll have to manually update for new features. |
If you want to understand this tech policy more deeply, you can go directly to Microsoft Support’s official warning page to check its detailed information. There they strictly warn about the risks of system instability and security updates being blocked.
Frequently Asked Questions
Will my entire data be deleted if I bypass TPM and install Windows 11?
If you are doing a clean install, i.e., by booting from a USB drive and selecting ‘Custom Installation’, then your C: drive, which already has the OS, will be formatted and its data will be deleted. However, in this case, your D: or E: drive will remain completely safe. Still, to be on the safe side, always back up your important files to an external hard drive before upgrading.
Will I still get Windows updates in the future if I use a Rufus bypass?
Initially, you may receive basic Defender and security updates, but in this case Microsoft’s policy is quite strict. There’s no official guarantee that unsupported devices will get major feature updates in the future. You might have to download a new ISO file and manually upgrade the system again when major updates are released.
This problem occurs when your laptop’s ‘Boot Mode’ is completely different from Rufus’s settings. Restart your PC, then open the BIOS menu and check by pressing the F2, F10, or Del key during startup. Note that the format (Partition scheme: MBR or GPT) of the pendrive created in Rufus must exactly match your laptop’s BIOS settings (Legacy or UEFI); otherwise, it will not be detected.
Conclusion: Give Your Old PC a New Life
Friends, in this world of technology, there’s a workaround for every obstacle. If your budget doesn’t currently allow for a new laptop, but you want to enjoy the new OS, then the Rufus and Registry hacks mentioned above work perfectly.
Just understand the limits of your old hardware and always keep a backup of your essential data ready. Hopefully, this guide has cleared up all your technical confusion. Now, without any fear, make your USB drive bootable, restart your laptop, and easily run the new Windows 11 on your old PC.
Disclaimer: The information provided in this article is for educational and informational purposes only. Installing Windows 11 on an unsupported PC by bypassing TPM 2.0 and Secure Boot may lead to system instability, data loss, or block official Microsoft updates. This website or its author will not be held responsible for any damage to your device or data during this process. Please be sure to back up your important data before following any steps, and apply these tricks at your own risk.




