
Whenever we buy a new laptop or install a new OS on our old PC, the Windows 11 setup always gets stuck at the “Let’s connect you to a network” step. These days Microsoft does everything it can to make every user connect to the internet and enter their email address before moving forward.
But what if you don’t have Wi-Fi at that moment? Or what if you don’t want to sync your data to the cloud and also want to maintain your privacy? In such cases, install Windows 11 without Microsoft account is the best option. By creating a local account, your PC boots faster, there’s no unnecessary background syncing, and you don’t have to type your email password every time.
But in the last few updates, Microsoft has hidden this “Offline” option. So there’s no need to worry! In this guide, we’ll show you a secret trick that lets you easily bypass the Windows 11 internet requirement and successfully complete your Windows 11 offline installation.
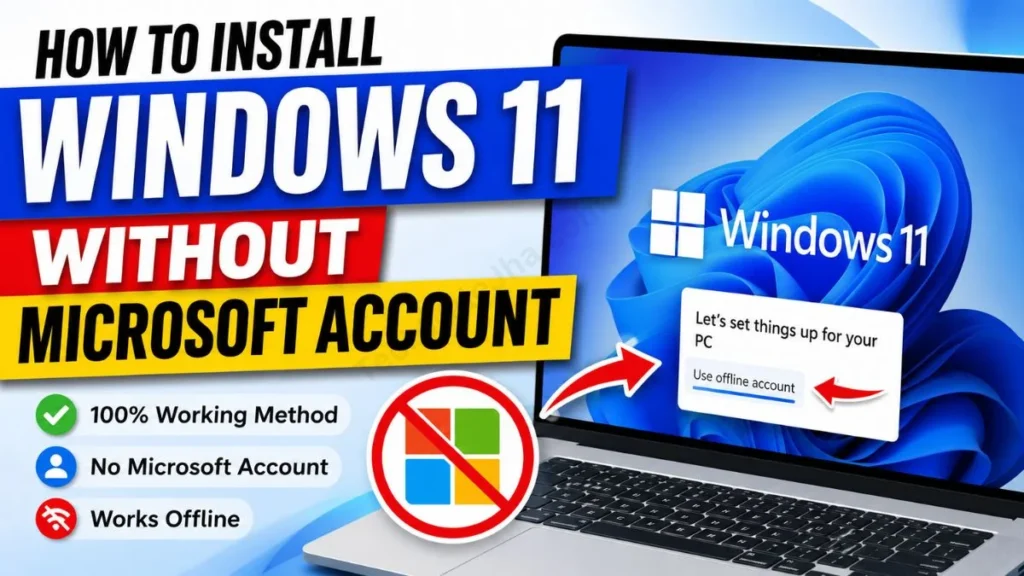
Quick Answer: How to Install Windows 11 Without a Microsoft Account?
If you’re stuck on the setup screen and want to instantly complete your Windows 11 local account setup, be sure to follow these quick steps:
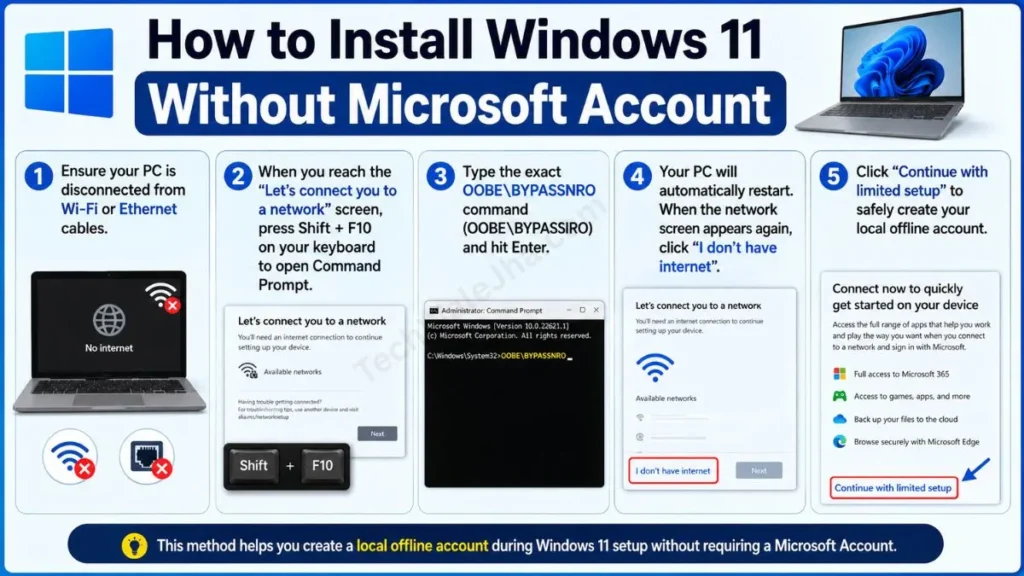
Steps to bypass the network screen and create a local account:
- Step 1: Ensure your PC is disconnected from Wi-Fi or Ethernet cables.
- Step 2: When you reach the “Let’s connect you to a network” screen, press Shift + F10 on your keyboard to open Command Prompt.
- Step 3: Type the exact OOBE BYPASSNRO command (OOBE\BYPASSNRO) and hit Enter.
- Step 4: Your PC will automatically restart. When the network screen appears again, click “I don’t have internet”.
- Step 5: Click “Continue with limited setup” to safely create your local offline account.
Pro Tip: Microsoft regularly updates its setup process. If you want to learn more about Windows 11 accounts and their privacy policies, be sure to read Microsoft’s Official Account Management Guide.
Also Read: How to Create a Windows 11 Bootable USB (2026 Guide)
Local Account vs Microsoft Account: Which One is Right for You?
If you’re confused about whether install Windows 11 without Microsoft account is the right decision for you, then first, you need to properly understand their differences.
What is a Local Account?
A local account is one where your data, such as your username and password, is saved only on your computer’s hard drive, like an SSD or HDD. It has no direct link to any online cloud service.
Here is a quick comparison table to help you easily decide what to do and what’s right or wrong for you:
| Feature | Local Account | Microsoft Account |
|---|---|---|
| Internet During Setup | I don’t need it. | It is very important (Usually Yes) |
| Offline Access | Absolutely (100% offline access) | Limited (Some features are disabled without a net) |
| OneDrive Auto-Backup | No | Yes, it automatically syncs. |
| Settings Sync (Other PCs) | No | Yes |
| Privacy & Tracking | High (No cloud tracking) | Low (Data sent to Microsoft servers) |
Why Use a Local Account?
Most advanced users choose the create local user option in Windows 11 because they:
- Better Privacy: Your usage data and passwords are not uploaded to Microsoft’s servers.
- No Internet Dependency: If you don’t have Wi-Fi or mobile data during setup, then an Windows 11 offline installation is the only way.
- Faster Setup & Login: It saves time verifying email IDs and loading cloud services, which also makes the boot process feel a bit faster.
Step-by-Step Guide: How to Use the OOBE BYPASSNRO Command
If you’ve decided that you only want an offline account, then let’s start our Windows 11 setup guide 2026. This process is completely safe, so there’s nothing to worry about.
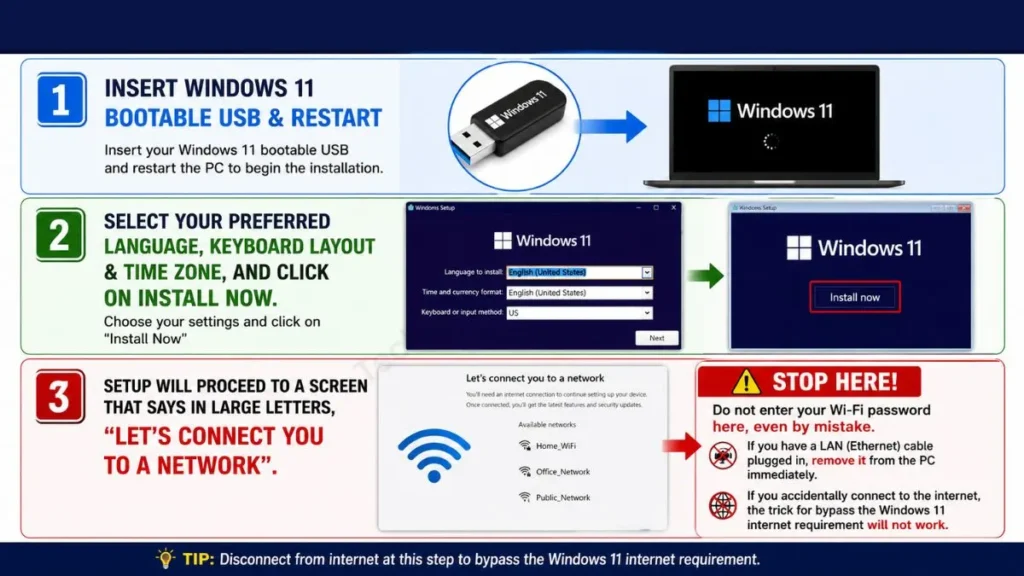
Step 1 & 2: Reach the Network Connection Screen
- Insert your Windows 11 bootable USB and restart the PC to begin the installation.
- After that, select your preferred language, keyboard layout, and time zone, and click on Install Now.
- The setup will then proceed to a screen that says in large letters, “Let’s connect you to a network”.
- STOP HERE! Do not enter your Wi-Fi password here, even by mistake. If you have a LAN (Ethernet) cable plugged in, remove it from the PC immediately. If you accidentally connect to the internet, the trick for bypass the Windows 11 internet requirement will not work.
Step 3 & 4: Open Command Prompt & Run the Bypass Command
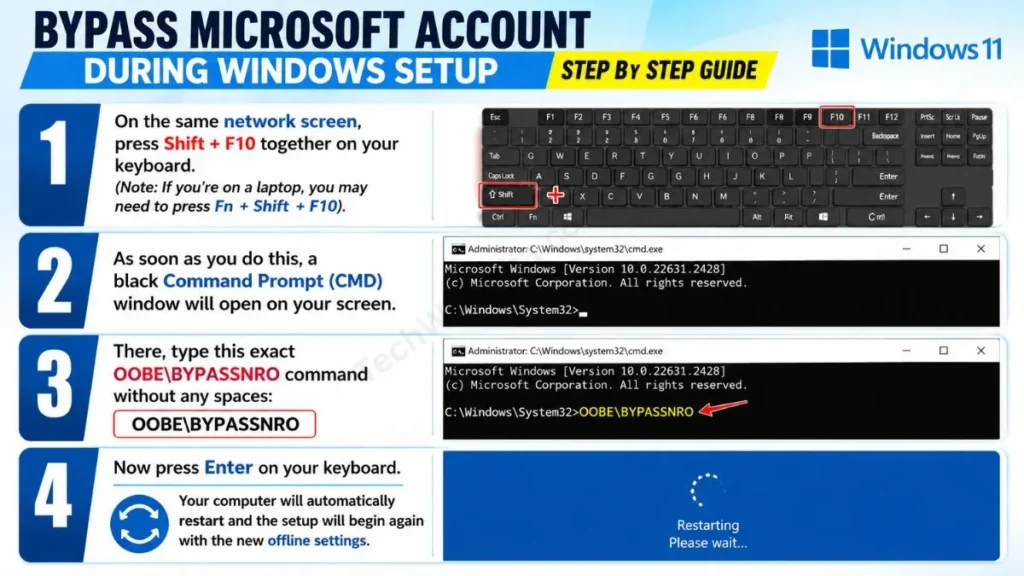
Now we need to force Windows into offline mode:
- While on the same network screen, press Shift + F10 together on your keyboard. (Note: If you’re on a laptop, you may need to press Fn + Shift + F10).
- As soon as you do this, a black Command Prompt (CMD) window will open on your screen.
- There, type this exact OOBE BYPASSNRO command without any spaces: OOBE\BYPASSNRO
- Now press Enter on your keyboard.
- Your computer will automatically restart and the setup will begin again with the new offline settings.
Also Read: How to Maintain Your Windows System
Finishing Setup: Create a Local Account and Complete the Offline Install
After the PC restarts, you will be taken back to the same Network page, going through the language and keyboard setup again. But this time, a new option will appear!
Step 5: Continue with Limited Setup (Without Internet)
- Once again, make sure not to connect to the internet to complete the Windows 11 installation without Wi-Fi.
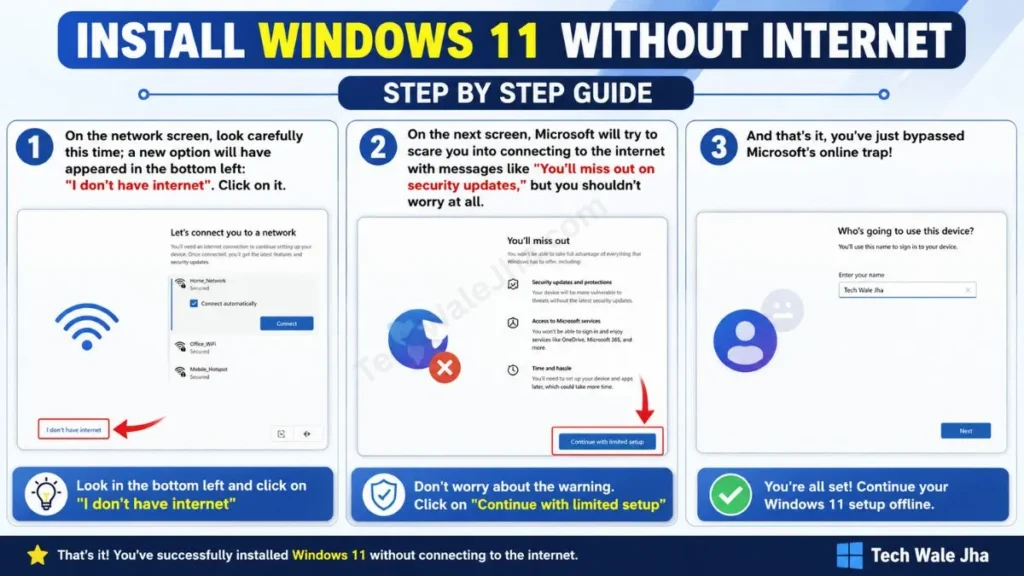
- On the network screen, look carefully this time; a new option will have appeared in the bottom left: “I don’t have internet”. Click on it.
- On the next screen, Microsoft will try to scare you into connecting to the internet with messages like “You’ll miss out on security updates,” but you shouldn’t worry at all. Just click on “Continue with limited setup.”
- And that’s it, you’ve just bypassed Microsoft’s online trap!
Step 6 & 7: Set Your Username, Password & Privacy Settings
Now we will finally complete our Windows 11 local account setup:
- Who’s going to use this device? Here, type your name or any Username, like: your name or Admin, and then click the Next button.
- Create a super memorable password: Create a strong password. If you don’t want to set a password, you can leave this field blank and click Next. If you create a password, you will also be asked 3 security questions; be sure to fill them out.
- Choose privacy settings for your device: On this screen, you will be asked to share your Location, Find my device, and Advertising data. To increase privacy, you can turn all these options off (No) and then click Accept.
- In a few moments, you’ll see “Hi, Getting things ready for you” on your screen, and boom! Your Windows 11 Desktop will be right in front of you. Congratulations, you have now successfully install Windows 11 without Microsoft account.
Troubleshooting & Bonus Tips: What to Do If a Command Isn’t Working?
Sometimes, minor issues can arise with new laptops or after installing new Windows updates. Below are the easiest solutions for them.
Add a Microsoft Account Later (If you change your mind)
Let’s say later you decide you want to play Xbox games or sync OneDrive. So, can you change your decision in this Microsoft account vs. Local account debate? The answer is, absolutely! You can change it.
You can link your account at any time. To do so, follow these steps:
- First, open the Start menu and go to Settings.
- From the left menu, click on Accounts.
- Then, click on Your info.
- Scroll down and click “Sign in with a Microsoft account instead,” then enter your email and password.
- Tip: If you’re having trouble with an online account, you can follow these same steps to switch back to a local account in Windows 11.
Common Setup Errors
- Shift + F10 Not Working: On most modern laptops like HP, Dell, or Lenovo, the function keys don’t work directly. In such cases, press Fn + Shift + F10 together on your keyboard to open the Command Prompt. If that still doesn’t work, try plugging in an external (USB) keyboard and giving it another shot.
- OOBE BYPASSNRO Not Recognized: If you get an error when typing the command, make sure not to include any spaces. The slash between OOBE and BYPASSNRO should be a backslash \, not a forward slash /.
- Setup Freezes: If the PC freezes while creating an account, press and hold your laptop’s power button for 10 seconds (Hard Shutdown). Then, turn on the PC; the setup will continue from where it left off.
Frequently Asked Questions
Can I use Windows 11 without a Microsoft account forever?
Yes, you absolutely can! Once your Windows 11 local account setup is complete, you can use your laptop for life without an email ID. This won’t have any negative impact on your regular software, games, or internet browsing.
Is using a local account less secure (unsafe)?
Not at all. If you set a strong password for your local account and keep Windows regularly updated, your PC remains perfectly safe. However, Microsoft accounts offer some extra security features like ‘Find My Device’ and online password recovery that are not available with an offline account.
Will my new Windows activate itself after an offline installation?
Yes! Windows activation is tied to your PC’s hardware (Motherboard) or a digital license key (Product key). It doesn’t matter whether you created your account online or offline.
Will I get new Windows Updates with a local account?
Yes, 100%. After completing the Windows 11 offline installation, when you reconnect your PC to Wi-Fi or Ethernet, you will regularly receive all the necessary security updates for Windows Defender and the OS.
Final Thoughts
Every user has the right to have full control over their PC. Although Microsoft has made the online setup almost mandatory to promote its cloud services like OneDrive and the MS Store, you can still protect your privacy and speed by following an install Windows 11 without Microsoft account process.
The OOBE\BYPASSNRO command is a life-saving trick that makes your setup process fast, simple, and track-free. If you feel the need for cloud backup in the future, you can link your MS account at any time by going into Settings. Just keep in mind that Microsoft may change these setup screens in future updates, so always use the latest official ISO file.
Has this secret CMD trick made your setup easier? Or are you seeing a new error on your laptop after the latest update? Be sure to share your questions or experiences in the comments section below—I’m ready to help! 👇
Disclaimer: The information and command-line tweaks provided in this 2026 guide are for educational and troubleshooting purposes only. Modifying Windows setup behavior, using bypass commands, or altering installation steps may yield different results depending on your specific Windows 11 build or laptop manufacturer. Always ensure you are using genuine Microsoft installation media and have backed up all important data before performing an OS installation. We are not responsible for any software issues, activation errors, or data loss that may occur while following these methods. Proceed at your own risk.




